Thank you for choosing the ONNAIS Biometric Pistol Gun Safe. This manual provides essential information for the safe and effective use of your new gun safe. Please read all instructions carefully before installation and operation. Proper use ensures the security of your firearm and prevents unauthorized access.
Image 1.1: ONNAIS Biometric Pistol Gun Safe with handgun and spare magazines.
2. Tärkeitä turvallisuustietoja
Always store firearms unloaded with the safety engaged.
Pidä kassakaappi lukittuna aina, kun sitä ei käytetä.
Store mechanical keys in a secure location away from the safe and out of reach of children.
Do not store a chambered firearm in the safe.
Ensure firearms with weapon-mounted lights or lasers are removed before storing, as they may not fit.
This safe is not compatible with revolvers.
Tarkista akun varaustaso säännöllisesti ja lataa tarvittaessa.
3. Pakkauksen sisältö
Varmista, että kaikki esineet ovat mukana:
ONNAIS Biometric Pistol Gun Safe (Model GL-04)
Mounting screws (8 pieces)
Latauskaapeli (USB-C)
Mechanical keys (2 pieces)
Käyttöopas (tämä asiakirja)
4. Tuotteen ominaisuudet
Pikakäyttö: Biometric fingerprint sensor for rapid unlocking (under 0.5 seconds).
Useita käyttötapoja: Fingerprint, 4-digit keypad, and mechanical key backup.
Secure Trigger Lock: Internal mechanism blocks trigger access when locked.
Kestävä rakenne: Valmistettu seosteräksestä paremman turvallisuuden takaamiseksi.
Ladattava akku: Built-in Lithium Polymer battery with up to 1 year of use per charge, 2-hour recharge time via USB-C.
Monipuolinen asennus: Includes pre-drilled holes and screws for wall, desk, under-counter, or vehicle console installation.
Monipuolinen muotoilu: Mounting bracket can be reversed for left or right-handed access.
Magazine Storage: Integrated slots for two spare magazines.
Video 4.1: Ylilyöntiview of the ONNAIS Defender Pro Gun Safe's features, including quick access, secure trigger protection, and easy installation.
5. Asennus
5.1 Ensimmäinen lataus
Before first use, fully charge the safe's internal battery using the provided USB-C cable. The charging port is located on the bottom of the unit. A full charge takes approximately 2 hours.
Image 5.1: The safe's USB-C charging port for convenient recharging.
5.2 Kassakaapin asentaminen
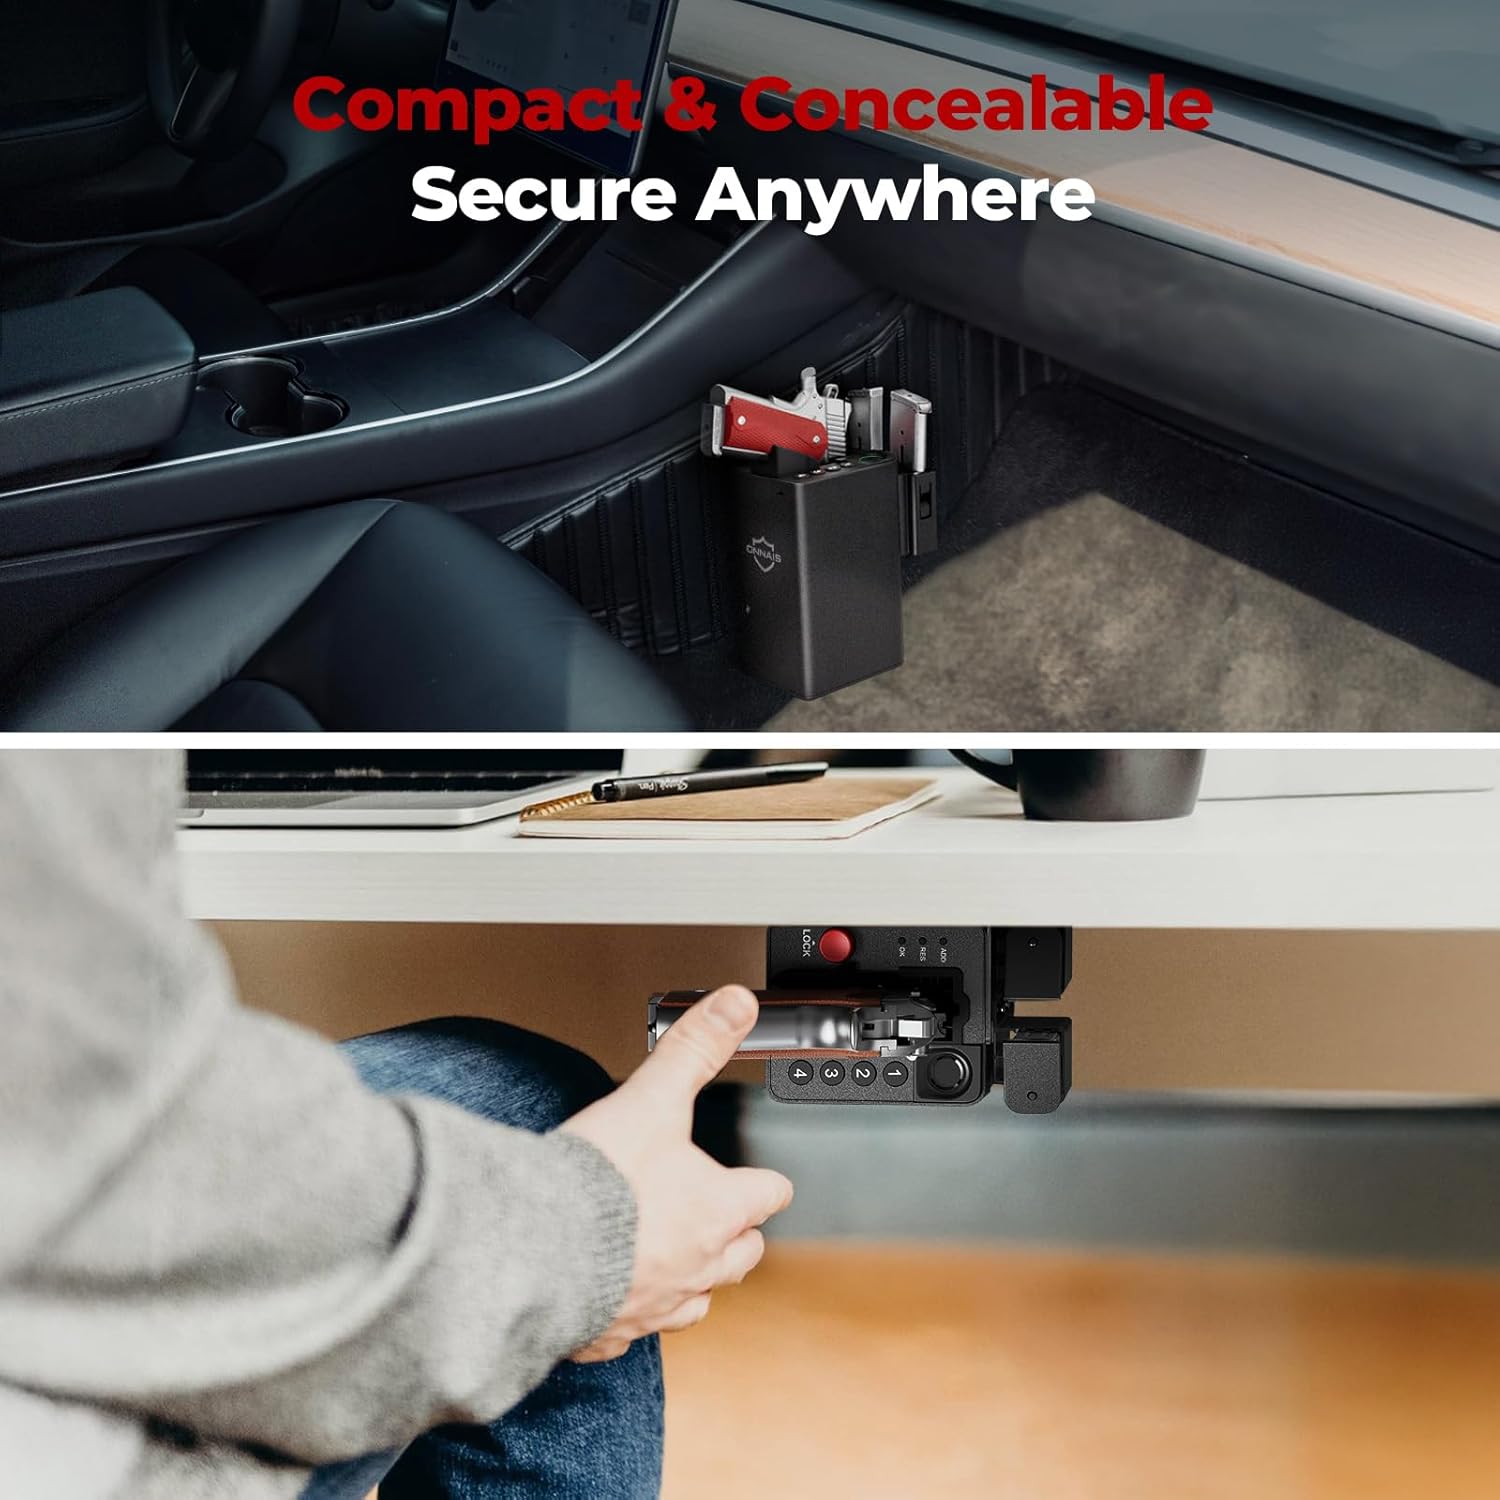
The safe can be mounted in various locations using the included bracket and screws. The mounting bracket is ambidextrous and can be reversed to suit left or right-handed access.
Määritä sijainti: Choose a secure and discreet location such as a nightstand, desk, cabinet, or vehicle console.
Sijoituskiinnike: Place the mounting bracket against the desired surface and mark the screw holes.
Poraa ohjausreiät: Poraa tarvittaessa ohjausreiät kiinnityspinnalle sopivaksi.
Turvakiinnike: Attach the bracket firmly using the provided screws.
Attach Safe: Slide the safe onto the mounted bracket until it clicks securely into place.
Kuva 5.2: Esim.amples of the safe mounted under a desk and within a vehicle console.
5.3 Sormenjälkien rekisteröinti
The safe supports up to 80 fingerprints for multiple users or different finger orientations.
Press the 'ADD' button on the bottom of the safe.
Place your finger on the fingerprint sensor. The indicator light will flash.
Lift and place your finger multiple times, slightly adjusting the position each time, until the indicator confirms successful registration.
5.4 Passcode Setup
Set a personal 5-10 digit passcode for backup access.
Press the 'ADD' button on the bottom of the safe.
Enter your desired 5-10 digit code using the keypad (buttons 1-4).
Vahvista painamalla 'OK'.
Re-enter the same code and press 'OK' again to verify.
6. Käyttöohjeet
6.1 Storing a Firearm
Ensure the firearm is unloaded and the safety is engaged before storing.
With the safe unlocked, gently slide the firearm into the designated slot, ensuring the trigger guard is clear.
Press the red 'LOCK' button to engage the trigger lock mechanism. The safe is now secured.
Image 6.1: Proper insertion of a handgun into the safe. Note: Firearms with weapon-mounted lights or lasers are too large to fit. Remove attachments before storing.
6.2 Lukituksen avaaminen sormenjäljellä
For rapid access:
Place a registered finger firmly on the biometric sensor.
The safe will unlock in approximately 0.5 seconds, releasing the trigger lock.
Grasp the firearm's handle and draw it out.
Image 6.2: Quick draw access from the safe, highlighting the exposed grip for immediate retrieval.
6.3 Lukituksen avaaminen salasanalla
As an alternative access method:
Enter your registered 5-10 digit passcode using the keypad.
Press 'OK' to confirm. The safe will unlock.
Grasp the firearm's handle and draw it out.
Image 6.3: Close-up of the 4-button keypad for passcode entry.
6.4 Lukituksen avaaminen mekaanisella avaimella
For emergency or battery-depleted situations:
Locate the keyhole on the side of the safe.
Insert one of the provided mechanical keys and turn to unlock.
Grasp the firearm's handle and draw it out.
Image 6.4: The mechanical key and keyhole for emergency access.
7. Huolto
7.1 Akun huolto
Lataa akku, kun akun heikon varauksen ilmaisin tulee näkyviin.
Vältä akun täydellistä tyhjentymistä sen käyttöiän pidentämiseksi.
7.2 Puhdistus
Pyyhi kassakaapin ulkopinta pehmeällä,amp kangas.
Älä käytä voimakkaita kemikaaleja tai hankaavia puhdistusaineita.
Pidä sormenjälkitunnistin puhtaana ja kuivana optimaalisen suorituskyvyn varmistamiseksi.
8. Vianmääritys
Ongelma
Mahdollinen syy
Ratkaisu
Sormenjälkeä ei tunnistettu
Finger is dirty, wet, or improperly placed; fingerprint not registered.
Clean and dry finger; ensure proper placement; re-register fingerprint if needed.
Näppäimistö ei vastaa
Incorrect passcode; low battery.
Enter correct passcode; recharge battery.
Safe does not unlock
Low battery; electronic malfunction.
Recharge battery; use mechanical key for emergency access.
Firearm does not fit
Firearm is too large or has attachments; revolver.
Remove lights/lasers; confirm firearm dimensions (6.5"D x 3.5"W x 7.9"H); safe is not compatible with revolvers.
The ONNAIS Biometric Pistol Gun Safe comes with a Elinikäinen takuu. For any questions, troubleshooting assistance, or warranty claims, please contact ONNAIS customer support.
Contact information for support is typically found on the product packaging or the official ONNAIS websivusto.
ONNAIS Iron PRO Biometric Fingerprint Gun Safe Quick Start Guide This guide provides quick start instructions for the ONNAIS Iron PRO Biometric Fingerprint Gun Safe. Learn how to set up your safe, install batteries, program digital passwords and fingerprints, and find answers to common questions.
ONNAIS HX-011 Pikaopas: Biometrisen kassakaapin asennus ja käyttö Aloita ONNAIS HX-011 -biometrisen kassakaapin käyttö. Tämä pikaopas kattaa lataamisen, lukituksen avaamisen, salasanojen, sormenjälkien ja RFID-korttien rekisteröinnin sekä vianmäärityksen ja usein kysytyt kysymykset optimaalisen turvallisuuden takaamiseksi.
Onnais HX-009 Quick Start Guide: Setup, Passwords, and Usage This Quick Start Guide provides essential information for setting up and using the Onnais HX-009 safe, including password and fingerprint configuration, battery installation, key usage, and troubleshooting.