1. Tärkeitä turvallisuustietoja
Lue kaikki ohjeet huolellisesti ennen ilmankuivaimen käyttöä. Säilytä tämä käyttöohje myöhempää tarvetta varten.
- Ensure the unit is placed on a level, stable surface to prevent water spillage.
- Maintain adequate clearance (at least 20 cm) around the unit for proper airflow.
- Do not operate the unit with a damaged power cord. Contact customer support for replacement.
- Irrota ilmankuivain pistorasiasta ennen puhdistusta tai huoltoa.
- Älä työnnä esineitä ilman tulo- tai ulostuloaukkoon.
- Pidä laite poissa lämmönlähteistä ja suorasta auringonvalosta.
- Tätä laitetta ei ole tarkoitettu henkilöiden (mukaan lukien lapset) käytettäväksi, joilla on alentuneet fyysiset, sensoriset tai henkiset kyvyt tai joilla ei ole kokemusta ja tietoa, ellei heidän turvallisuudestaan vastaava henkilö ole valvonut tai opastanut laitteen käyttöä.
2. Tuote ohiview
The Waykar 80 Pints Dehumidifier is designed to efficiently remove excess moisture from your environment, improving air quality and comfort. It is suitable for spaces up to 5,000 square feet.

Kuva 2.1: Etuosa view of the Waykar 80 Pints Dehumidifier.

Figure 2.2: Dehumidifier operating in a room, illustrating its coverage capability and adjustable humidity range (30-80% RH).
Keskeisiä ominaisuuksia ovat:
- 80 tuopin tilavuus: Poistaa jopa 80 pinttiä kosteutta päivässä.
- Energy Star -sertifioitu: Designed for high energy efficiency.
- Wide-Angle Swing: Automatic 30°-90° swing function for improved air circulation.
- Hiljainen toiminta: Operates as low as 42 dB.
- Smart Touch Control: Intuitive panel for easy settings adjustment.
- 24 tunnin ajastin: Schedule operations for convenience.
- Auto Defrost & Memory Restart: Ensures stable performance and resumes settings after power interruption.
- Joustava salaojitus: Options for manual tank emptying or continuous drainage.
- Pestävä ilmansuodatin: Helppo puhdistaa ja huoltaa.
- 360° Swivel Wheels & Integrated Handle: Helppoa liikkuvuutta varten.
3. Asennus ja asennus
3.1 Pakkauksesta purkaminen
Carefully remove the dehumidifier from its packaging. Inspect the unit for any signs of damage. If any damage is found, do not operate the unit and contact customer support.
3.2 Sijoitus
Place the dehumidifier on a firm, level surface in a location where the ambient temperature will not fall below 5°C (41°F). Ensure there is at least 20 cm (8 inches) of space around the unit for proper air circulation. Avoid placing the unit near heat-generating appliances or in direct sunlight.

Figure 3.1: The dehumidifier features 360° swivel wheels and an integrated handle for easy movement, along with tidy cable storage.
3.3 Virtaliitäntä
Kytke virtajohto maadoitettuun pistorasiaan. Varmista, että laitteen jännitetage and frequency of the power supply match the specifications on the unit's rating label.
4. Käyttöohjeet
Ohjauspaneelin avulla voit hallita kaikkia ilmankuivaimen toimintoja.
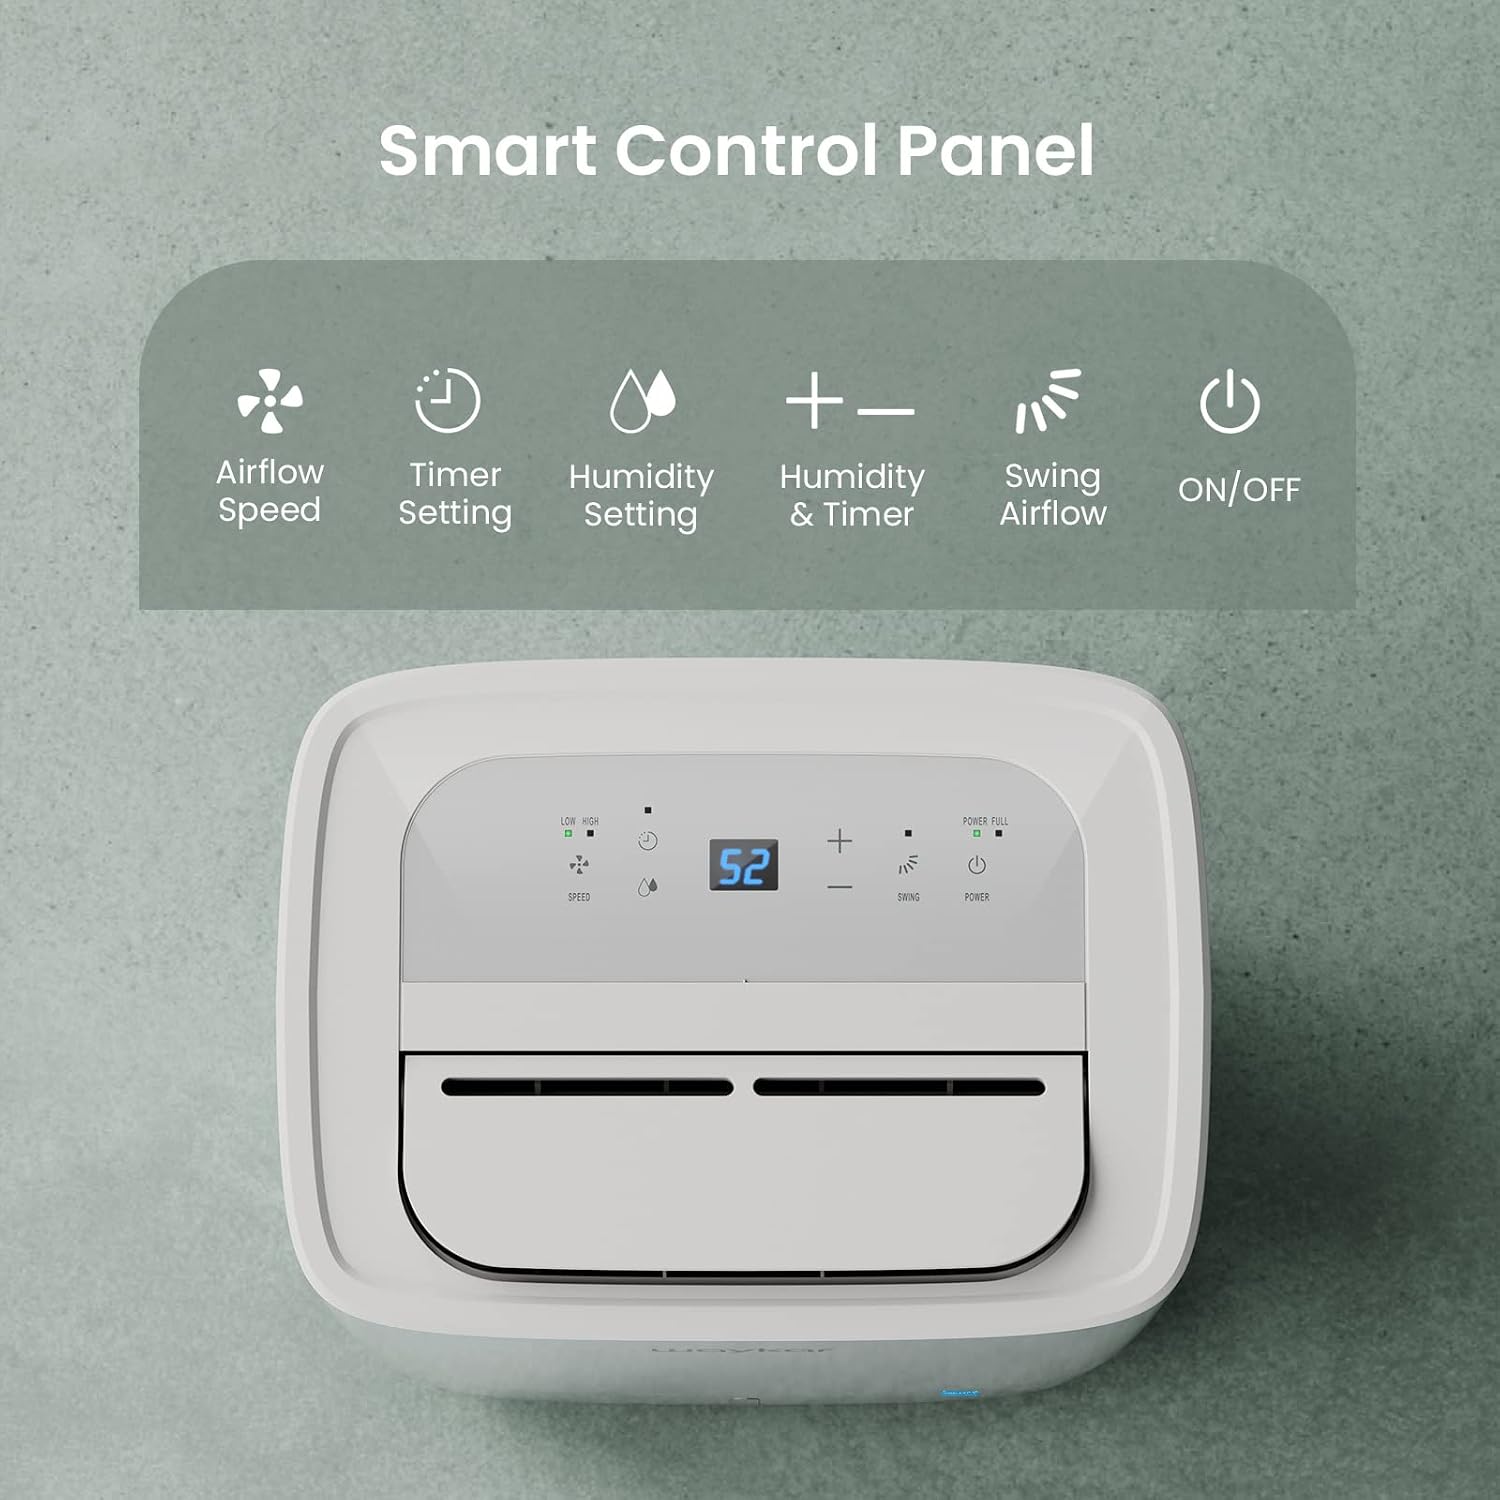
Figure 4.1: Smart Control Panel with buttons for Airflow Speed, Timer Setting, Humidity Setting, Swing Airflow, and ON/OFF.
4.1 Virta päälle/pois
- Paina Tehoa painiketta kytkeäksesi laitteen päälle tai pois päältä.
4.2 Kosteustason asettaminen
- Paina + or - buttons to adjust the desired humidity level between 30% and 80% Relative Humidity (RH). The unit will operate until the set humidity level is reached, then cycle ON/OFF to maintain it.
4.3 Tuulettimen nopeus
- Paina Nopeus button to toggle between Low and High fan speeds.
4.4 Ajastintoiminto
- Paina Ajastin -painiketta asettaaksesi viiveen laitteen käynnistymiselle tai sammumiselle. Ajastimen voi asettaa 0.5–24 tunnin välille.
4.5 Swing Airflow
- Paina Swing button to activate the automatic 30°-90° airflow oscillation. This helps distribute dehumidified air more evenly.
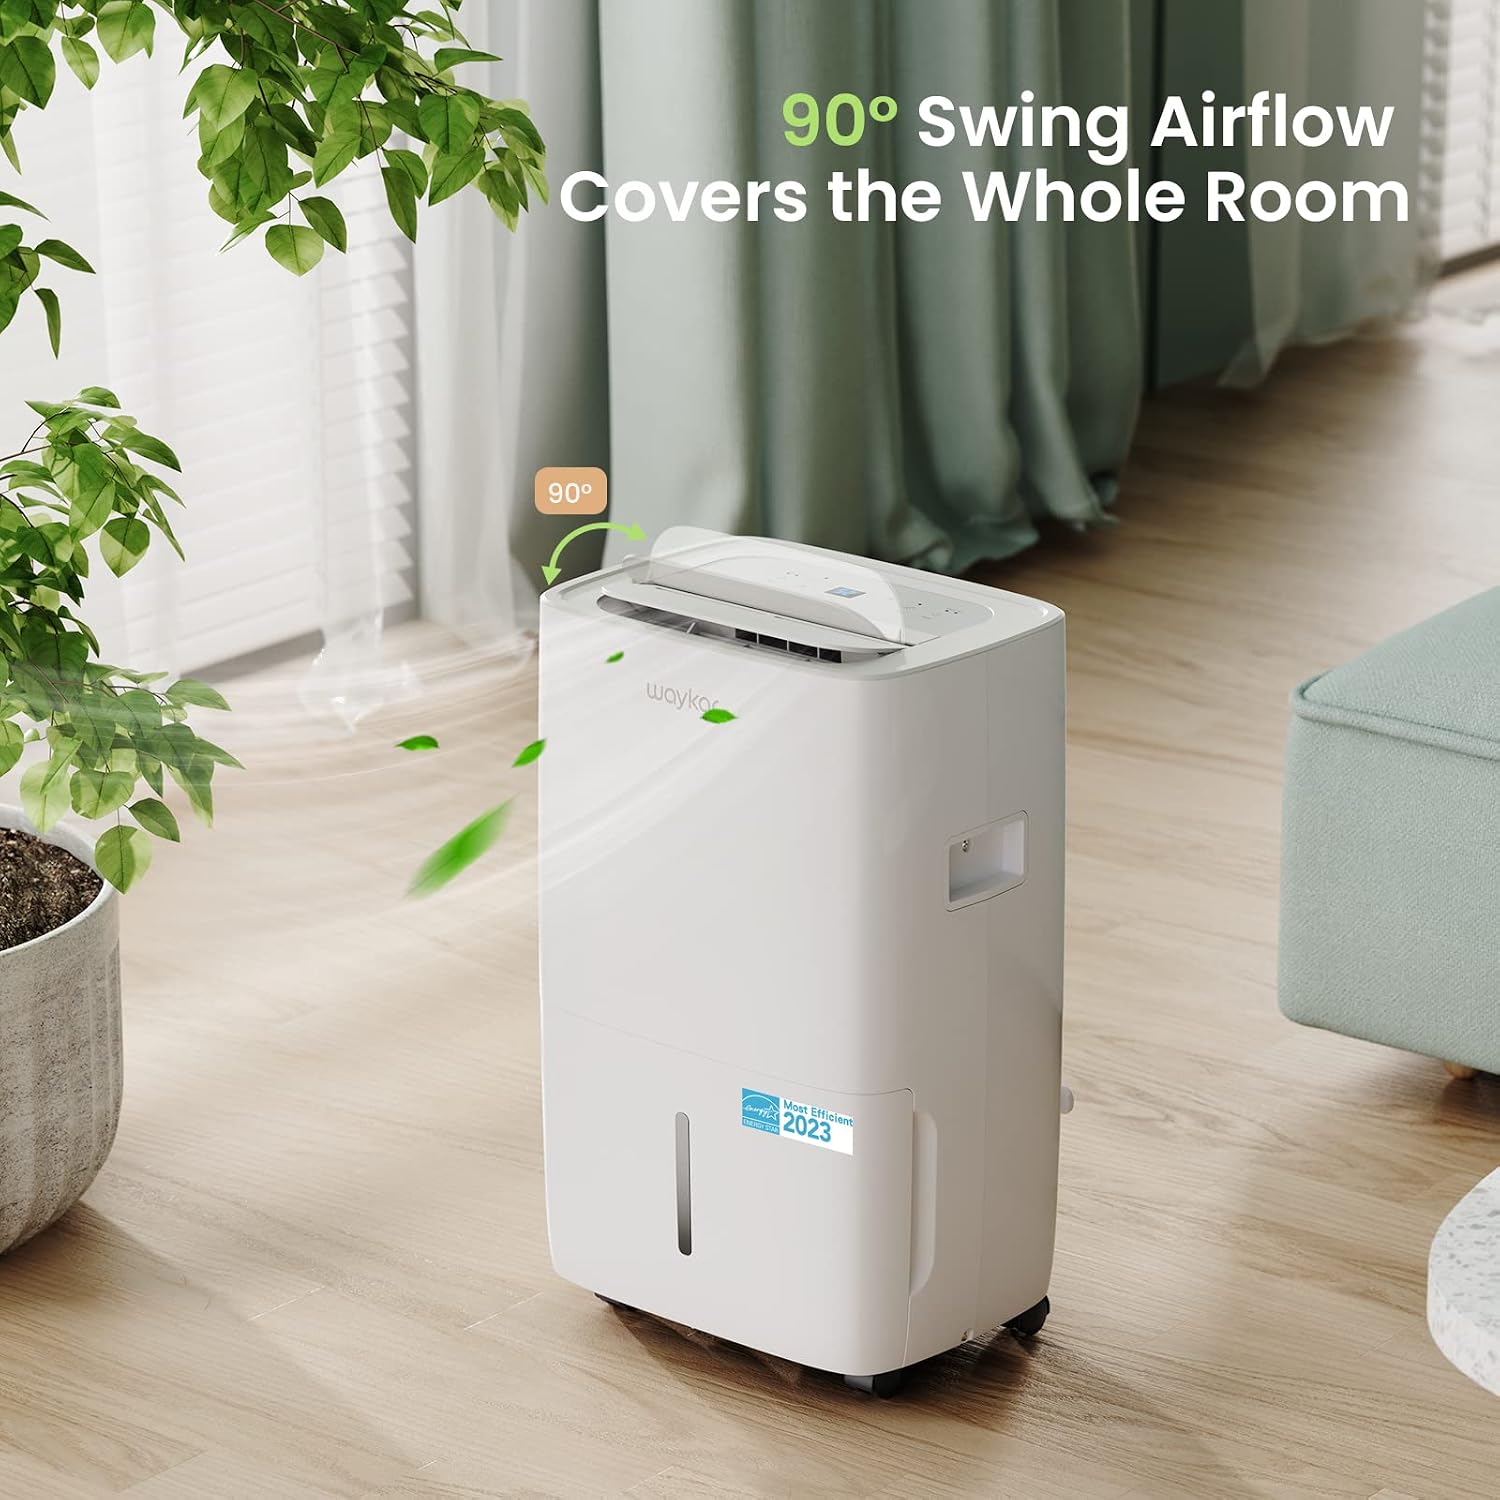
Figure 4.2: The 90° swing airflow feature helps cover the entire room for efficient dehumidification.
4.6 Lapsilukko
- Lapsilukon aktivoimiseksi paina ja pidä pohjassa Ajastin button for 3 seconds. The control panel will be locked to prevent accidental changes. Repeat to unlock.
4.7 Auto Defrost and Memory Restart
- Laitteessa on automaattinen sulatustoiminto, joka aktivoituu, kun höyrystimen keloihin kertyy huurretta, mikä varmistaa tehokkaan toiminnan viileämmissä ympäristöissä.
- Jos valtaa outage, the Memory Restart function will automatically resume the previous settings once power is restored.
5. Viemäröintivaihtoehdot
The Waykar dehumidifier offers two convenient drainage methods:
5.1 Manuaalinen tyhjennys (vesisäiliö)
- When the 1.14-gallon (4.3L) water tank is full, the unit will automatically shut off and an indicator light will illuminate on the control panel.
- Vedä vesisäiliö varovasti ulos laitteen etuosasta.
- Tyhjennä kerätty vesi.
- Slide the empty tank back into the unit until it clicks into place. The unit will then resume operation.
5.2 Jatkuva tyhjennys (tyhjennysletku)
- For continuous operation without needing to empty the tank, attach the included 3.3 ft (1 m) drain hose to the drainage outlet at the back of the unit.
- Ensure the hose is securely tightened to prevent leaks.
- Direct the other end of the hose to a suitable drain (e.g., floor drain, sink). Ensure the hose is sloped downwards to allow gravity drainage.

Figure 5.1: Illustration of both manual drainage (left) and continuous drainage (right) options.
6. Huolto
Säännöllinen huolto varmistaa ilmankuivaimen optimaalisen suorituskyvyn ja pitkän käyttöiän.
6.1 Ilmansuodattimen puhdistus
The washable air filter should be cleaned regularly (approximately every 250 hours of operation or when the filter indicator light illuminates) to maintain efficiency.
- Sammuta laite ja irrota se pistorasiasta.
- Irrota ilmansuodatin laitteen takaosasta.
- Pese suodatin lämpimällä saippuavedellä. Huuhtele huolellisesti.
- Anna suodattimen kuivua kokonaan ilmassa ennen kuin asetat sen takaisin laitteeseen.
- Once the filter is reinstalled, press and hold the Suodattaa button for 3 seconds to reset the filter indicator.

Figure 6.1: The detachable and washable water tank, featuring a visible water level indicator.
6.2 Vesisäiliön puhdistaminen
Clean the water tank periodically to prevent mold and bacteria growth.
- Irrota vesisäiliö laitteesta.
- Pese säiliö lämpimällä vedellä ja miedolla pesuaineella.
- Huuhtele huolellisesti ja kuivaa ennen kuin asetat sen takaisin ilmankuivaajaan.
6.3 Ulkopuolen puhdistus
- Pyyhi laitteen ulkopuoli pehmeällä, damp kangas. Älä käytä voimakkaita kemikaaleja tai hankaavia puhdistusaineita.
7. Vianetsintäopas
Ennen kuin otat yhteyttä asiakastukeen, tutustu seuraaviin yleisiin ongelmiin ja ratkaisuihin:
| Ongelma | Mahdollinen syy | Ratkaisu | ||||||||||
|---|---|---|---|---|---|---|---|---|---|---|---|---|
| Dehumidifier does not turn ON | No power supply; Power cord not plugged in; Water tank full or incorrectly installed. | Check power outlet; Plug in power cord securely; Empty and correctly reinstall water tank. | ||||||||||
| Laite toimii, mutta ei kuivaa ilmaa | Ilmansuodatin tukossa; Huoneen lämpötila liian alhainen; Kosteusasetus liian korkea. | Clean air filter; Ensure room temperature is above 5°C (41°F); Lower desired humidity setting. | ||||||||||
| Yksikkö on meluisa | Laite ei ole tasaisella alustalla; Ilmansuodatin tukossa. | Aseta laite tasaiselle ja vakaalle alustalle; Puhdista ilmansuodatin. | ||||||||||
| Vettä vuotaa laitteesta | Water tank incorrectly installed; Drain hose not securely attached (continuous drainage). | Reinstall water tank correctly; Securely tighten drain hose connection. | ||||||||||
Virhekoodi
Aiheeseen liittyvät asiakirjat - JD025CE-80-CA
|


