1. Johdanto
Thank you for choosing the Bodywel A275 Electric Bicycle. This manual provides essential information for the safe assembly, operation, maintenance, and troubleshooting of your e-bike. Please read this manual thoroughly before your first ride and keep it for future reference. Proper assembly and maintenance are crucial for your safety and the longevity of your bicycle.
2. Turvallisuustiedot
Your safety is paramount. Always wear a helmet and appropriate safety gear when riding. Familiarize yourself with local traffic laws and regulations for electric bicycles. Regular maintenance checks are essential to ensure all components are in good working order.
2.1 Yleiset turvallisuusohjeet
- Käytä aina sertifioitua kypärää.
- Suorita ajoa edeltävä tarkastus ennen jokaista käyttökertaa.
- Ensure tires are properly inflated and brakes are functioning correctly.
- Ole tietoinen ympäristöstäsi ja aja varovaisesti.
- Älä aja alkoholin tai huumeiden vaikutuksen alaisena.
- Vältä ajoa huonoissa sääolosuhteissa.
2.2 Paristojen turvallisuus
- Only use the charger provided with your Bodywel A275.
- Älä altista akkua äärilämpötiloille tai suoralle auringonvalolle.
- Avoid puncturing or damaging the battery.
- Lataa akku hyvin ilmastoidussa tilassa, kaukana syttyvistä materiaaleista.
- If the battery is damaged or leaking, contact customer support immediately.
3. Pakkauksen sisältö
Pura pakkausta pakkauksesta ja varmista, että kaikki alla luetellut osat ovat mukana ja vahingoittumattomia:
- 1 x Bodywel A275 Electric Bicycle (partially assembled)
- 1 x Käyttöohje
- 1 x Allen Key Set (4/5/6 mm)
- 1 x jakoavain
- 1 x laturi
- 1 x Key set for battery
- Etu- ja takalokasuojat
- Etuvalo
- Takateline
- Polkimet
4. Kokoamisohjeet
Your Bodywel A275 e-bike comes 85% pre-assembled. Follow these steps carefully to complete the assembly. For visual guidance, please refer to the assembly video below.
Video: Bodywel A275 E-Bike Assembly Guide. This video demonstrates the complete assembly process for your electric bicycle.
4.1 Pakkauksesta purkaminen ja alkutarkastus
- Poista polkupyörä ja kaikki osat varovasti pakkauksesta.
- Remove all protective wrapping and zip ties.
- Tarkista kuljetuksen aikana näkyvien vaurioiden varalta.
4.2 Installing the Kickstand
Attach the kickstand to the designated mounting points on the bicycle frame using the provided bolts and Allen key. Ensure it is securely tightened.
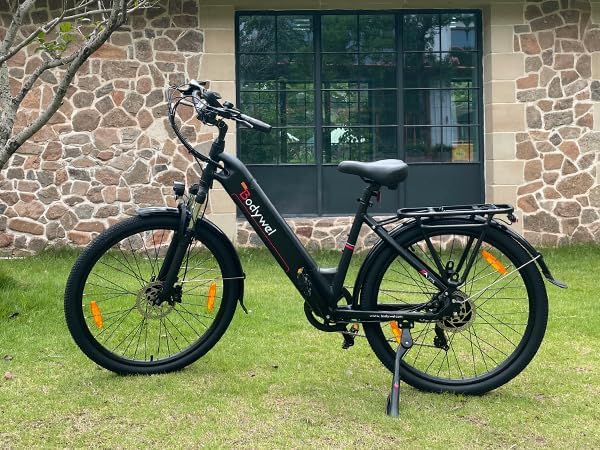
Kuva: The Bodywel A275 Electric Bicycle with its kickstand deployed, showcasing the stable upright position.
4.3 Installing the Rear Fender
Secure the rear fender to the frame above the rear wheel. Use the provided screws and tools to fasten it firmly. Ensure there is adequate clearance between the fender and the tire.
4.4 Installing the Handlebar and Stem
Insert the handlebar stem into the fork tube. Adjust the height to your preference and tighten the stem bolt. Attach the handlebar to the stem, ensuring it is centered and the brake levers and shifters are in a comfortable position before tightening the handlebar clamp pultit.

Kuva: Close-up of the adjustable multi-angle handlebar and aluminum suspension fork, highlighting ergonomic features.
4.5 Installing the Front Fender and Front Light
Attach the front fender to the front fork. Then, mount the front light to the designated bracket on the front fork or handlebar. Connect any necessary wiring for the light, ensuring it is neatly routed and secured.
4.6 Etupyörän asennus
Remove the protective spacer from the front fork. Carefully align the front wheel with the fork dropouts, ensuring the brake rotor slides correctly into the brake caliper. Insert the quick-release skewer through the hub and tighten it securely. Ensure the wheel spins freely without rubbing against the brake pads.
4.7 Installing the Rear Rack
Mount the rear rack to the designated attachment points on the rear frame of the bicycle. Use the provided bolts and tools to secure it firmly. Ensure all connections are tight for stability.
4.8 Installing the Pedals
Identify the left (L) and right (R) pedals. The left pedal tightens counter-clockwise, and the right pedal tightens clockwise. Apply a small amount of grease to the pedal threads before screwing them into the crank arms. Tighten them firmly with the wrench.
4.9 Installing the Rear Light
Attach the rear light to the rear rack or seat post, depending on the design. Ensure it is visible from behind and securely fastened. Connect any necessary wiring.
4.10 Lopputarkastukset
- Double-check all bolts and fasteners for tightness.
- Ensure the quick-release levers are properly closed.
- Verify that the brakes are functioning correctly.
- Tarkista rengaspaineet.
- Adjust the seat height for comfortable riding.
5. Käyttöohjeet
Learn how to operate your Bodywel A275 Electric Bicycle for an optimal riding experience.
5.1 Virran kytkeminen päälle/pois ja näyttötoiminnot
To power on the e-bike, ensure the battery is inserted and locked, then press the power button on the battery. The LED display will illuminate, showing battery status, speed, distance (DST/ODO), and pedal-assist level. Use the '+' and '-' buttons on the handlebar control to adjust the pedal-assist level (0-3). Press and hold the power button on the display to turn the system off.
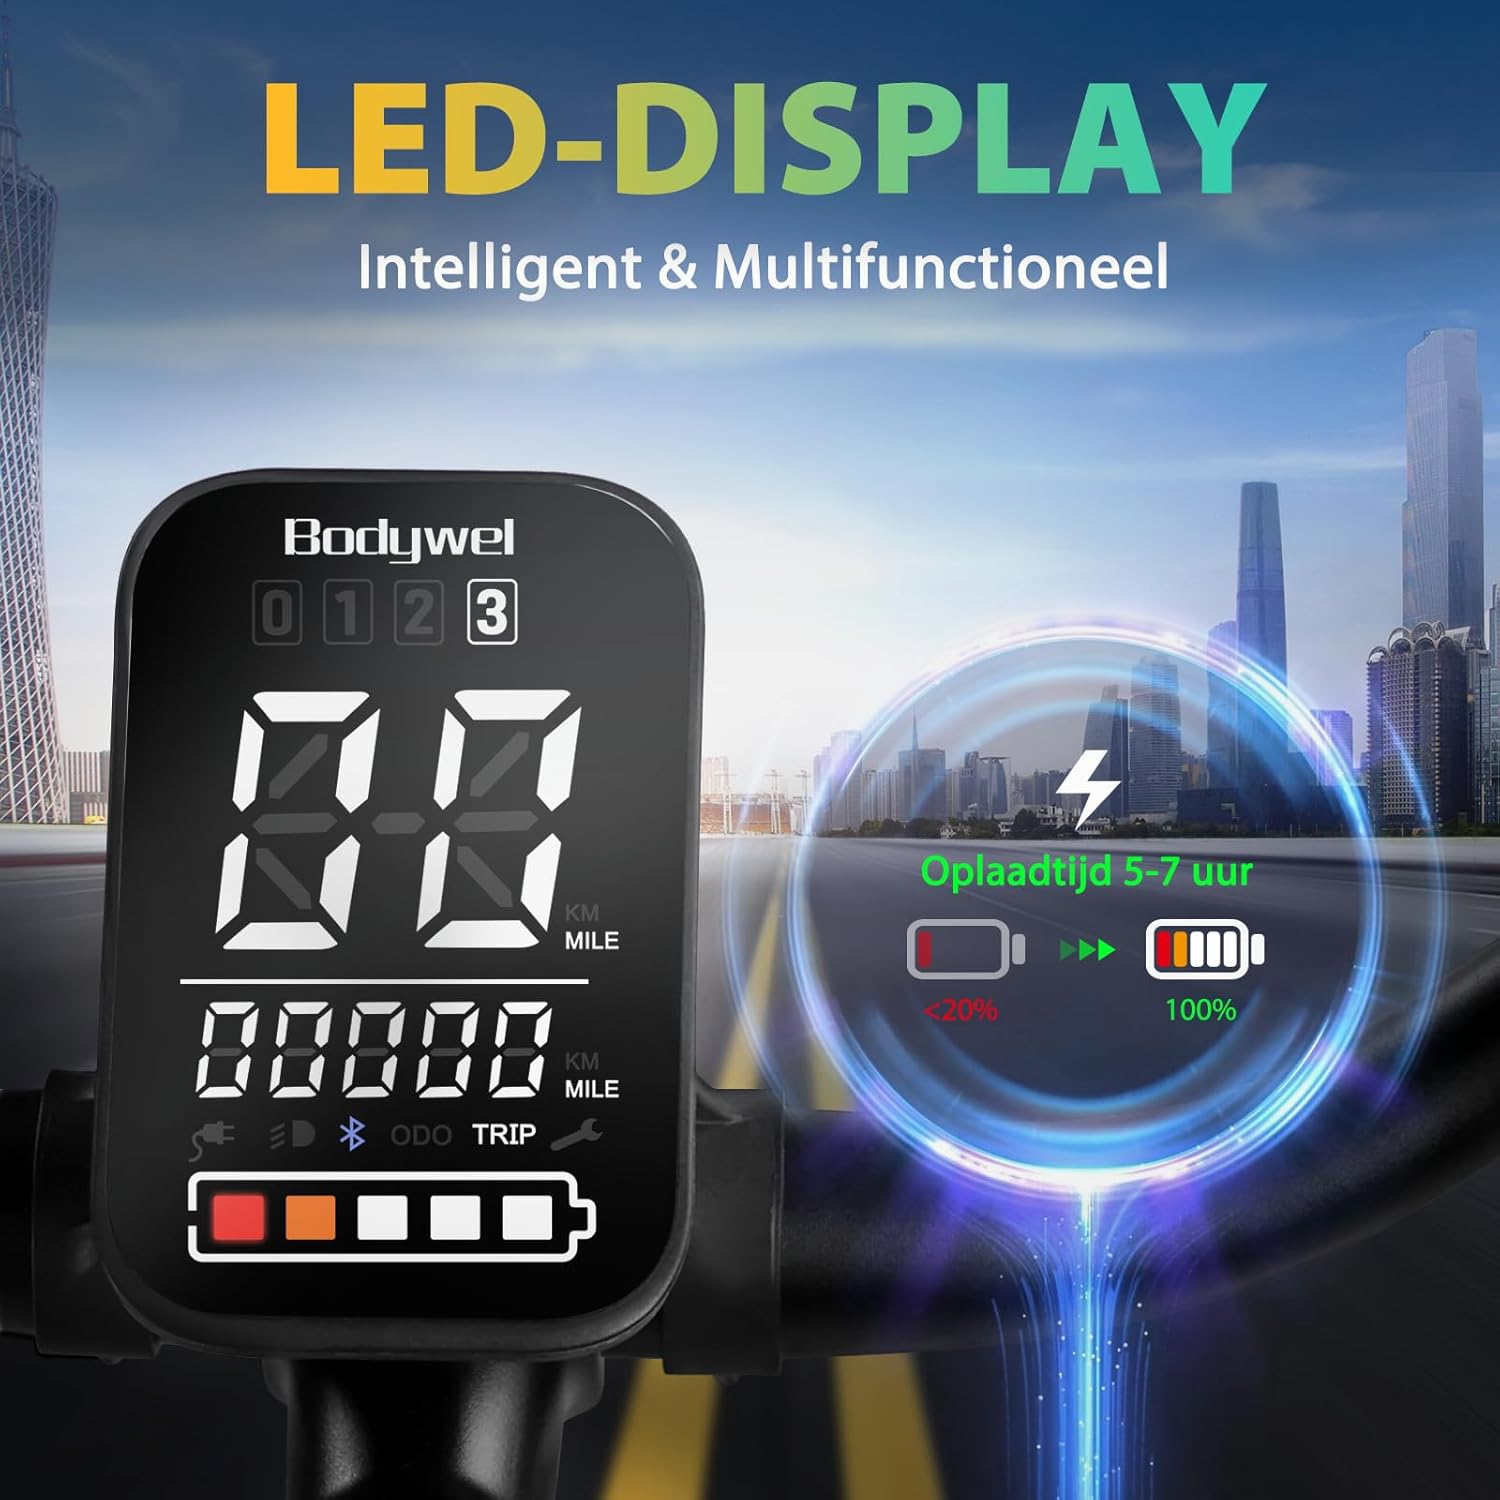
Kuva: The intelligent and multifunctional LED display, providing real-time information such as battery status, speed, and trip data.
5.2 Battery Removal and Charging
The 36V 15.6Ah (540Wh) battery is removable for convenient charging. Use the provided key to unlock and remove the battery. Connect the charger to the battery and a power outlet. The charging time is typically 5-7 hours. A full charge provides a range of up to 100 km under optimal conditions (70 kg rider, flat road, assist level 2).

Kuva: The removable 15.6Ah battery, designed for flexible charging options.
5.3 Using the APP Function (Bluetooth Connection)
Your Bodywel A275 features an APP function for enhanced control and ride tracking. Download the "Tuya" app (or specified Bodywel app) on your smartphone. Enable Bluetooth on your phone and pair it with your e-bike. The app allows you to view GPS tracks, adjust settings, and monitor ride data.
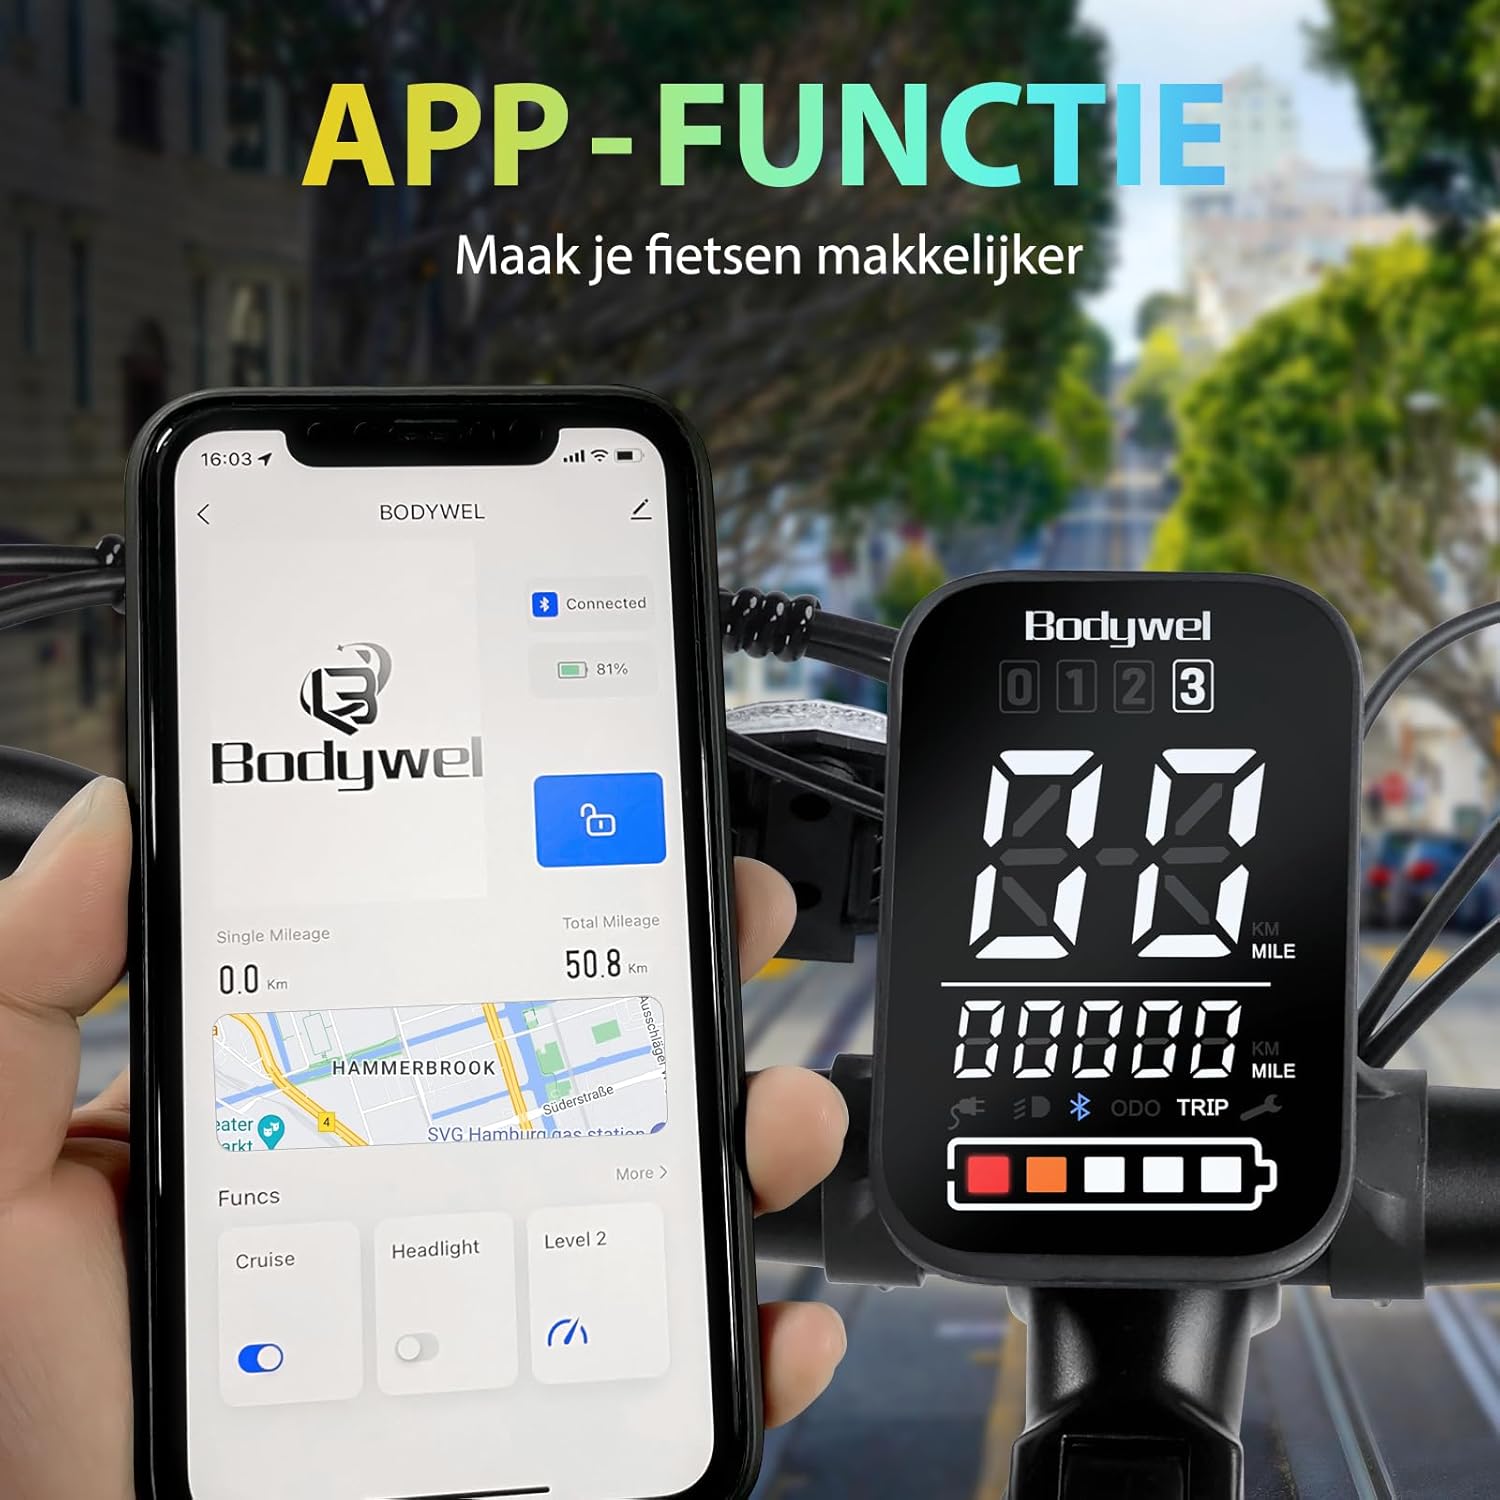
Kuva: The e-bike's display alongside a smartphone connected via Bluetooth, demonstrating the app's interface for managing ride functions.
6. Huolto
Regular maintenance ensures the safety and longevity of your Bodywel A275 e-bike.
6.1 Yleinen puhdistus
- Puhdista pyörä säännöllisesti mainoksellaamp liinalla ja miedolla saippualla. Vältä painepesua, erityisesti sähkökomponenttien lähellä.
- Kuivaa pyörä huolellisesti puhdistuksen jälkeen.
6.2 Jarrujärjestelmä
The Bodywel A275 is equipped with dual hydraulic disc brakes for effective stopping power. Regularly check brake pads for wear and replace them when necessary. Ensure brake levers have proper tension and the braking action is smooth and responsive.

Kuva: Yksityiskohtainen view of the hydraulic disc brakes, emphasizing their safety and effectiveness.
6.3 Tires and Wheels
- Tarkista rengaspaineet ennen jokaista ajokertaa. Suositeltu paine on yleensä merkitty renkaan kylkeen.
- Tarkasta renkaat viiltojen, reikien tai liiallisen kulumisen varalta.
- Ensure wheel spokes are tight and wheels run true.
6.4 Ketju ja voimansiirto
- Pidä ketju puhtaana ja voideltuna ruosteen estämiseksi ja sujuvan vaihteenvaihdon varmistamiseksi.
- Regularly check the chain for wear and tension.
6.5 Akun hoito
- Säilytä akkua viileässä ja kuivassa paikassa, kun sitä ei käytetä.
- Jos akkua säilytetään pitkään, lataa se 50–70 %:iin 2–3 kuukauden välein.
7. Vianmääritys
This section addresses common issues you might encounter with your Bodywel A275 e-bike.
7.1 Moottori ei avusta
- Tarkista akku: Varmista, että akku on täyteen ladattu ja tukevasti paikallaan lokerossaan.
- Tarkista teho: Varmista, että sähköpyörä on päällä ja näyttö on aktiivinen.
- Check Pedal-Assist Level: Make sure the pedal-assist level is set above 0.
- Tarkista liitännät: Tarkista kaikki sähköliitännät löysyyden tai vaurioiden varalta.
7.2 Akku ei lataudu
- Tarkista laturi: Ensure the charger is properly connected to both the battery and a working power outlet.
- Laturin merkkivalo: Observe the charger's indicator light (usually red for charging, green for full).
- Akun lämpötila: The battery might not charge if it's too hot or too cold. Allow it to reach room temperature.
7.3 Jarrut vinkuvat tai tehottomat
- Jarrupalat: Check brake pads for wear. Worn pads need replacement.
- Rotor Contamination: Clean brake rotors with a clean cloth and isopropyl alcohol to remove any oil or grease.
- Säätö: Brake cables or hydraulic lines may need adjustment. If unsure, consult a professional bike mechanic.
If you encounter issues not covered here or require further assistance, please contact Bodywel customer support.
8. Tekniset tiedot
Key technical specifications for the Bodywel A275 Electric Bicycle:
| Ominaisuus | Erittely |
|---|---|
| Merkki | Bodywel |
| Mallinumero | A275 |
| Pyörän koko | 27.5 tuumaa |
| Moottori | 250W Brushless Motor (Ananda) |
| Akku | 36 V 15.6 Ah (540 Wh) irrotettava litiumioniakku |
| Suurin alue | Up to 100 km (under optimal conditions) |
| Max nopeus | 25 km/h (EU compliant) |
| Jarrut | Kaksoishydrauliset levyjarrut |
| Gears | 7 nopeutta |
| Rungon materiaali | Alumiini |
| Jousitus | Etuhaarukan jousitus |
| Näyttö | 4.5-inch LED Display with APP connectivity |
| Paino | Noin 29.94 kg (66 lbs) |
| Mitat | 191.26 x 115.82 x 24.38 cm |
| Suositeltu ratsastajan korkeus | 160-195 cm |
| Sertifikaatit | CE-15194 |
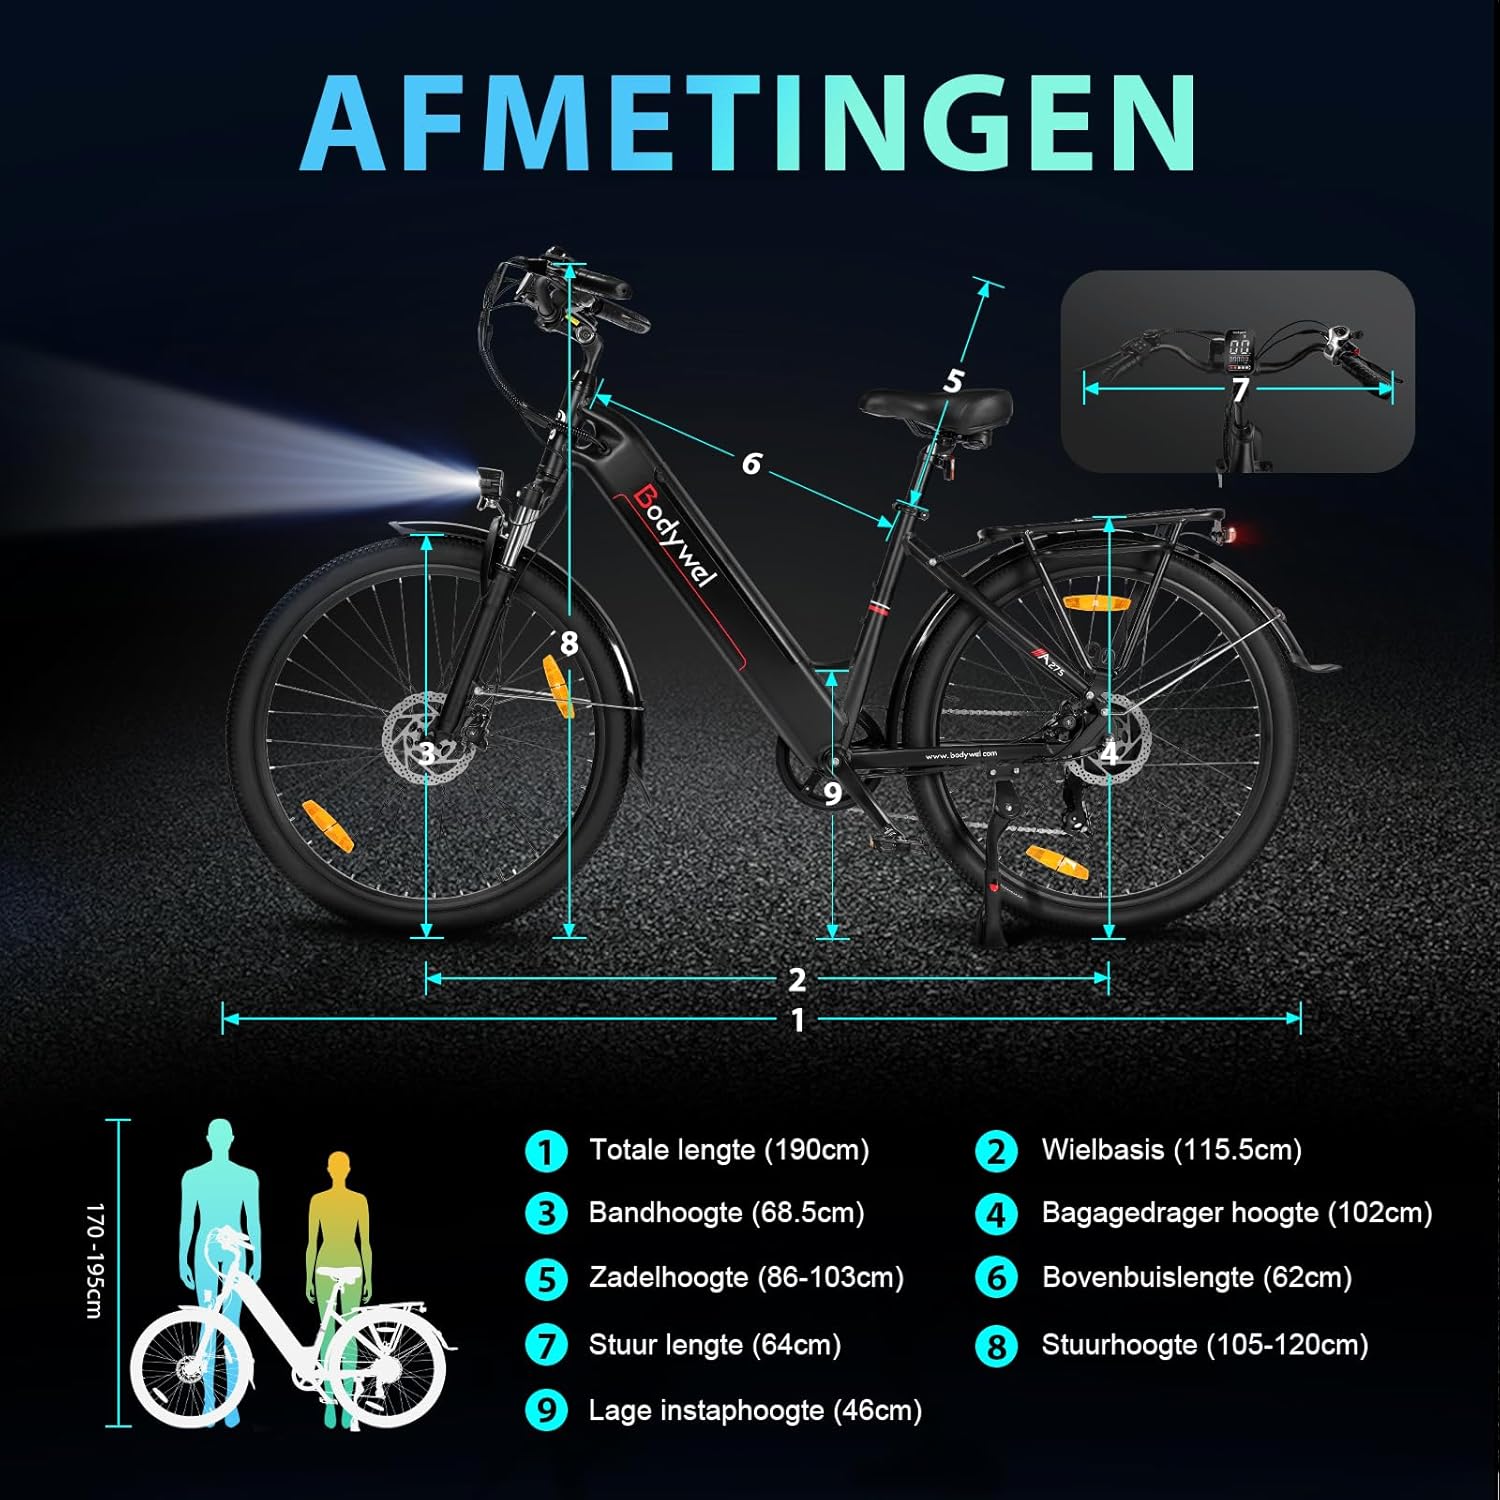
Kuva: Diagram illustrating the key dimensions of the Bodywel A275 Electric Bicycle.
9. Takuu ja tuki
Bodywel electric bicycles comply with European regulations and hold CE-15194 certification. For warranty information, technical support, or any questions regarding your Bodywel A275, please refer to the warranty card included with your purchase or contact Bodywel customer service directly. Contact details can typically be found on the official Bodywel websivustoltasi tai jälleenmyyjän kautta.


