1. Johdanto
Thank you for choosing a Beko appliance. This user manual provides essential information for the safe and efficient operation, installation, and maintenance of your Beko DIN34320 fully built-in dishwasher. Please read these instructions carefully before using your appliance to ensure optimal performance and to prevent any damage or injury.
The Beko DIN34320 is a fully integrated dishwasher designed for seamless installation into your kitchen cabinetry, offering a capacity of 13 place settings and an energy efficiency class E.
2. Turvallisuustiedot
Noudata aina sähkölaitteita käyttäessäsi perusturvallisuusohjeita tulipalon, sähköiskun ja henkilövahinkojen riskin vähentämiseksi.
- Lue kaikki ohjeet ennen astianpesukoneen käyttöä.
- Tämä laite on tarkoitettu vain kotitalouskäyttöön.
- Älä anna lasten leikkiä astianpesukoneella, sen päällä tai sisällä.
- Varmista, että astianpesukone on maadoitettu oikein.
- Älä käytä astianpesukonetta, jos sen virtajohto tai pistoke on vaurioitunut.
- Keep detergents and rinse aid out of the reach of children.
- Käytä vain astianpesukoneille tarkoitettuja pesuaineita ja huuhteluaineita.
- Sharp items should be loaded with handles up to prevent cuts.
- Älä avaa luukkua käytön aikana, sillä kuumaa vettä voi roiskua ulos.
3. Asennus ja asennus
Oikea asennus on ratkaisevan tärkeää astianpesukoneen suorituskyvyn ja pitkän käyttöiän kannalta. On suositeltavaa, että asennuksen suorittaa pätevä teknikko.
3.1 Pakkauksesta purkaminen
Carefully remove all packaging materials. Inspect the dishwasher for any damage that may have occurred during transit. Report any damage to your retailer immediately.
3.2 Positioning and Dimensions
Your Beko DIN34320 is a fully built-in model, designed to be integrated into a standard kitchen cabinet. Ensure the cabinet dimensions match the appliance requirements.

Kuva 1: Etuosa view of the Beko DIN34320 dishwasher, illustrating its design for full integration into kitchen cabinetry.
- Korkeus: 82 cm
- Leveys: 60 cm
- Syvyys: 55 cm
Ensure there is adequate space for water inlet and outlet hoses, and the electrical cable.
3.3 Vesiliitäntä
Connect the water inlet hose to a cold water supply with a minimum pressure of 0.03 MPa and a maximum of 1 MPa. The water outlet hose should be connected to a drain pipe, ensuring it is not kinked or obstructed.
3.4 Sähköliitäntä
Connect the dishwasher to a grounded electrical outlet. The appliance operates on 230 Volts. Ensure the electrical supply meets the specifications of the appliance and local regulations.
3.5 Cabinet Door Installation
As a fully integrated model, a custom cabinet door panel must be attached to the front of the dishwasher. Follow the detailed instructions provided in the separate installation template for precise alignment and secure fastening of the panel.
4. Käyttöohjeet
This section guides you through the daily use of your Beko DIN34320 dishwasher.
4.1 Ohjauspaneeli ohiview
The Beko DIN34320 features a fully integrated control panel, typically located on the top edge of the dishwasher door. Controls are visible only when the door is open and include program selection buttons, a start/pause button, and an LED display for program status and remaining time.
4.2 Astianpesukoneen täyttäminen
For optimal cleaning results, load dishes correctly. Scrape off large food particles before loading. Place larger items in the lower basket and delicate items like glasses in the upper basket.

Kuva 2: Sisustus view of the dishwasher, showing the arrangement of the upper and lower baskets, and the cutlery basket.
Kuva 3: Esimample of a loaded dishwasher, illustrating how to arrange various dishes for effective cleaning.
- Varmista, että suihkuvarret voivat pyöriä vapaasti.
- Place cups, glasses, and small bowls upside down in the upper basket.
- Place plates, larger bowls, and pots in the lower basket.
- Käytä aterinkoria haarukoille, lusikoille ja veitsille terävät päät alaspäin.
4.3 Pesuaineen ja huuhtelukirkasteen lisääminen
Open the detergent dispenser and add the recommended amount of dishwasher detergent. Close the dispenser lid securely. Check the rinse aid indicator and refill if necessary.
4.4 Ohjelman valitseminen
Your dishwasher offers several wash programs to suit different needs. Common programs include:
- Eko-ohjelma: Energy-efficient program for normally soiled dishes. (Water consumption: 12.9 L, Duration: 3:25 h:min)
- Automaattinen ohjelma: Säätää pesuohjelman automaattisesti likaisuusasteen mukaan.
- Other optional cycles are available for specific washing needs.
Refer to the control panel for specific program options and their indicators.
4.5 Ohjelman käynnistäminen
Close the dishwasher door firmly. Select your desired program using the program selection buttons. Press the Start/Pause button to begin the cycle. The LED display will show the program status.
4.6 Ohjelman lopettaminen
Once the program is complete, the dishwasher will signal with an audible alert or a light indicator. Carefully open the door and allow dishes to cool before unloading. Unload the lower basket first to prevent water from dripping onto dry dishes.
5. Huolto ja hoito
Säännöllinen huolto varmistaa astianpesukoneen tehokkaan toiminnan ja pidentää sen käyttöikää.
5.1 Suodattimien puhdistus
The filter system prevents large food particles from entering the pump. Clean the filters regularly (at least once a week) to ensure optimal washing performance. Remove the lower basket, twist and lift out the filter assembly, rinse under running water, and reassemble.
5.2 Suihkusuuttimien puhdistus
Check the spray arm nozzles for blockages. If necessary, remove the spray arms and clean the holes with a thin object like a toothpick. Rinse thoroughly and reattach.
5.3 Sisä- ja ulkopuolen puhdistaminen
Pyyhi sisusta mainoksellaamp cloth after each use. For the exterior, use a soft, damp liinalla ja miedolla pesuaineella. Vältä hankaavia puhdistusaineita.
5.4 Adding Dishwasher Salt
If your water supply is hard, you may need to add dishwasher salt to the dedicated salt dispenser to prevent limescale buildup. The salt indicator light on the control panel will illuminate when a refill is needed.
6. Vianmääritys
Ennen kuin otat yhteyttä huoltoon, tarkista seuraavat yleiset ongelmat:
| Ongelma | Mahdollinen syy | Ratkaisu |
|---|---|---|
| Astianpesukone ei käynnisty | Ei virransyöttöä; Luukku ei ole kunnolla kiinni; Ohjelmaa ei ole valittu. | Tarkista virtaliitäntä; Varmista, että luukku on lukittu; Valitse ohjelma ja paina Käynnistä-painiketta. |
| Huono puhdistustulos | Väärä täyttö; Tukkeutuneet suihkuvarret/suodattimet; Liian vähän pesuainetta; Väärä ohjelma. | Täytä astiat oikein; Puhdista suodattimet ja suihkuvarret; Lisää pesuainetta; Valitse tehokkaampi ohjelma. |
| Vesi ei valu | Tukkeutunut tyhjennysletku/suodatin; Tyhjennyspumpun toimintahäiriö. | Clean filters; Check drain hose for kinks; Contact service if pump is faulty. |
| Liiallinen melu | Dishes interfering with spray arms; Foreign object in pump; Improper installation. | Järjestä astiat uudelleen; Tarkista vieraiden esineiden varalta; Varmista, että astianpesukone on vaakasuorassa. |
If the problem persists after checking these points, please contact Beko customer support.
7. Tekniset tiedot
Detailed technical specifications for the Beko DIN34320 dishwasher.
| Ominaisuus | Erittely |
|---|---|
| Mallin nimi | DIN34320 |
| Merkki | Beko |
| Asennustyyppi | Fully Built-in / Integrated |
| Kapasiteetti | 13 Paikkaasetukset |
| Energiatehokkuusluokka | E |
| Melutaso | 49 dB (desibeliä) |
| Vedenkulutus (Eko-ohjelma) | 12.9 litraa/sykli |
| Ohjelman kesto (Eko-ohjelma) | 3:25 (h:min) |
| Mitat (K x L x S) | 82 cm x 60 cm x 55 cm |
| Voitage | 230 volttia |
| Näytön tyyppi | LED |
| Ohjaustyyppi | Täysin integroitu |
| Materiaali | Metalli |
| Mukana olevat komponentit | Cutlery basket, Plate rack |
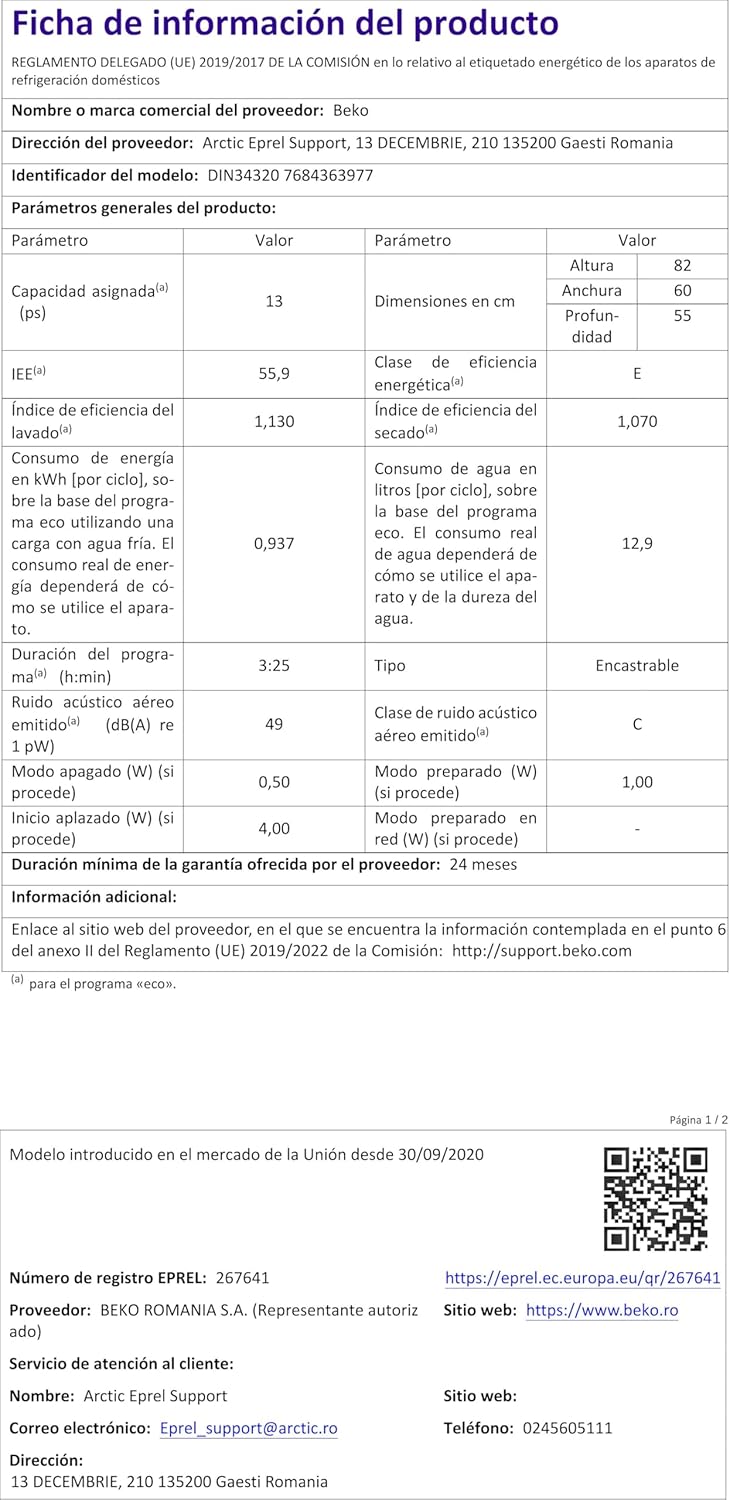
7.1 Energy Label and Product Information Sheet
The energy label provides key information about the appliance's energy consumption and performance. The product information sheet offers more detailed specifications.

Figure 4: EU Energy Label for the Beko DIN34320 dishwasher.
For detailed product information, including the official product information sheet, please visit the EPREL database:

Figure 5: Product Information Sheet (example in French, content is consistent across languages).
8. Takuu ja tuki
8.1 Takuutiedot
This Beko dishwasher comes with a minimum warranty period of 24 kuukautta provided by the supplier. Please retain your proof of purchase for warranty claims.
8.2 Asiakastuki
For technical assistance, spare parts, or warranty service, please contact the authorized service provider:
- Palveluntarjoaja: Arctic Epel Support
- Sähköposti: Eprel_support@arctic.ro
- Puhelin: 0245605111
- Websivusto: https://www.beko.ro
- Osoite: 13 DECEMBRIE, 210 135200 Gaesti Romania