1. Turvallisuustiedot
Please read and understand all safety information and operating instructions before using this multimeter. Failure to follow these instructions may result in electric shock, fire, or damage to the meter.
- Varmista aina, että mittausjohdot on kytketty oikein ja toimintokytkin on asetettu oikealle mittausalueelle ennen mittausten tekemistä.
- Älä yritä mitata voltages or currents exceeding the maximum rated values for this meter.
- Ole äärimmäisen varovainen työskennellessäsi jännitteisten virtapiirien kanssa. Korkea äänenvoimakkuustagse voi olla vaarallista.
- Never open the meter casing unless specifically instructed for battery or fuse replacement. Ensure test leads are disconnected before opening.
- Vaihda paristo, kun heikon pariston ilmaisin tulee näkyviin, jotta saat tarkat lukemat.
- Älä käytä mittaria, jos se näyttää vaurioituneelta tai jos mittausjohtojen eristys on vaurioitunut.
Kuva 1: Takaosa view of the Rebel MIE-RB-830 Multimeter, showing the battery compartment cover and a warning label. The label advises removing test leads before opening the case to avoid electrical shock and to install fuses with correct amp/volt ratings. It also indicates the power supply is a 9V battery, type NEDA 1604 9V 6F22.
2. Tuote ohiview
The Rebel MIE-RB-830 is a compact, battery-operated digital multimeter designed for measuring DC/AC voltage, DC current, resistance, diode, and transistor (hFE) values. It is suitable for general electrical testing and troubleshooting.
2.1. komponentit
- Digitaalinen yleismittari
- Mittausjohdot (punainen ja musta)
- 9 V paristo (voi sisältyä toimitukseen tai myydään erikseen)
- Käyttöopas (tämä asiakirja)

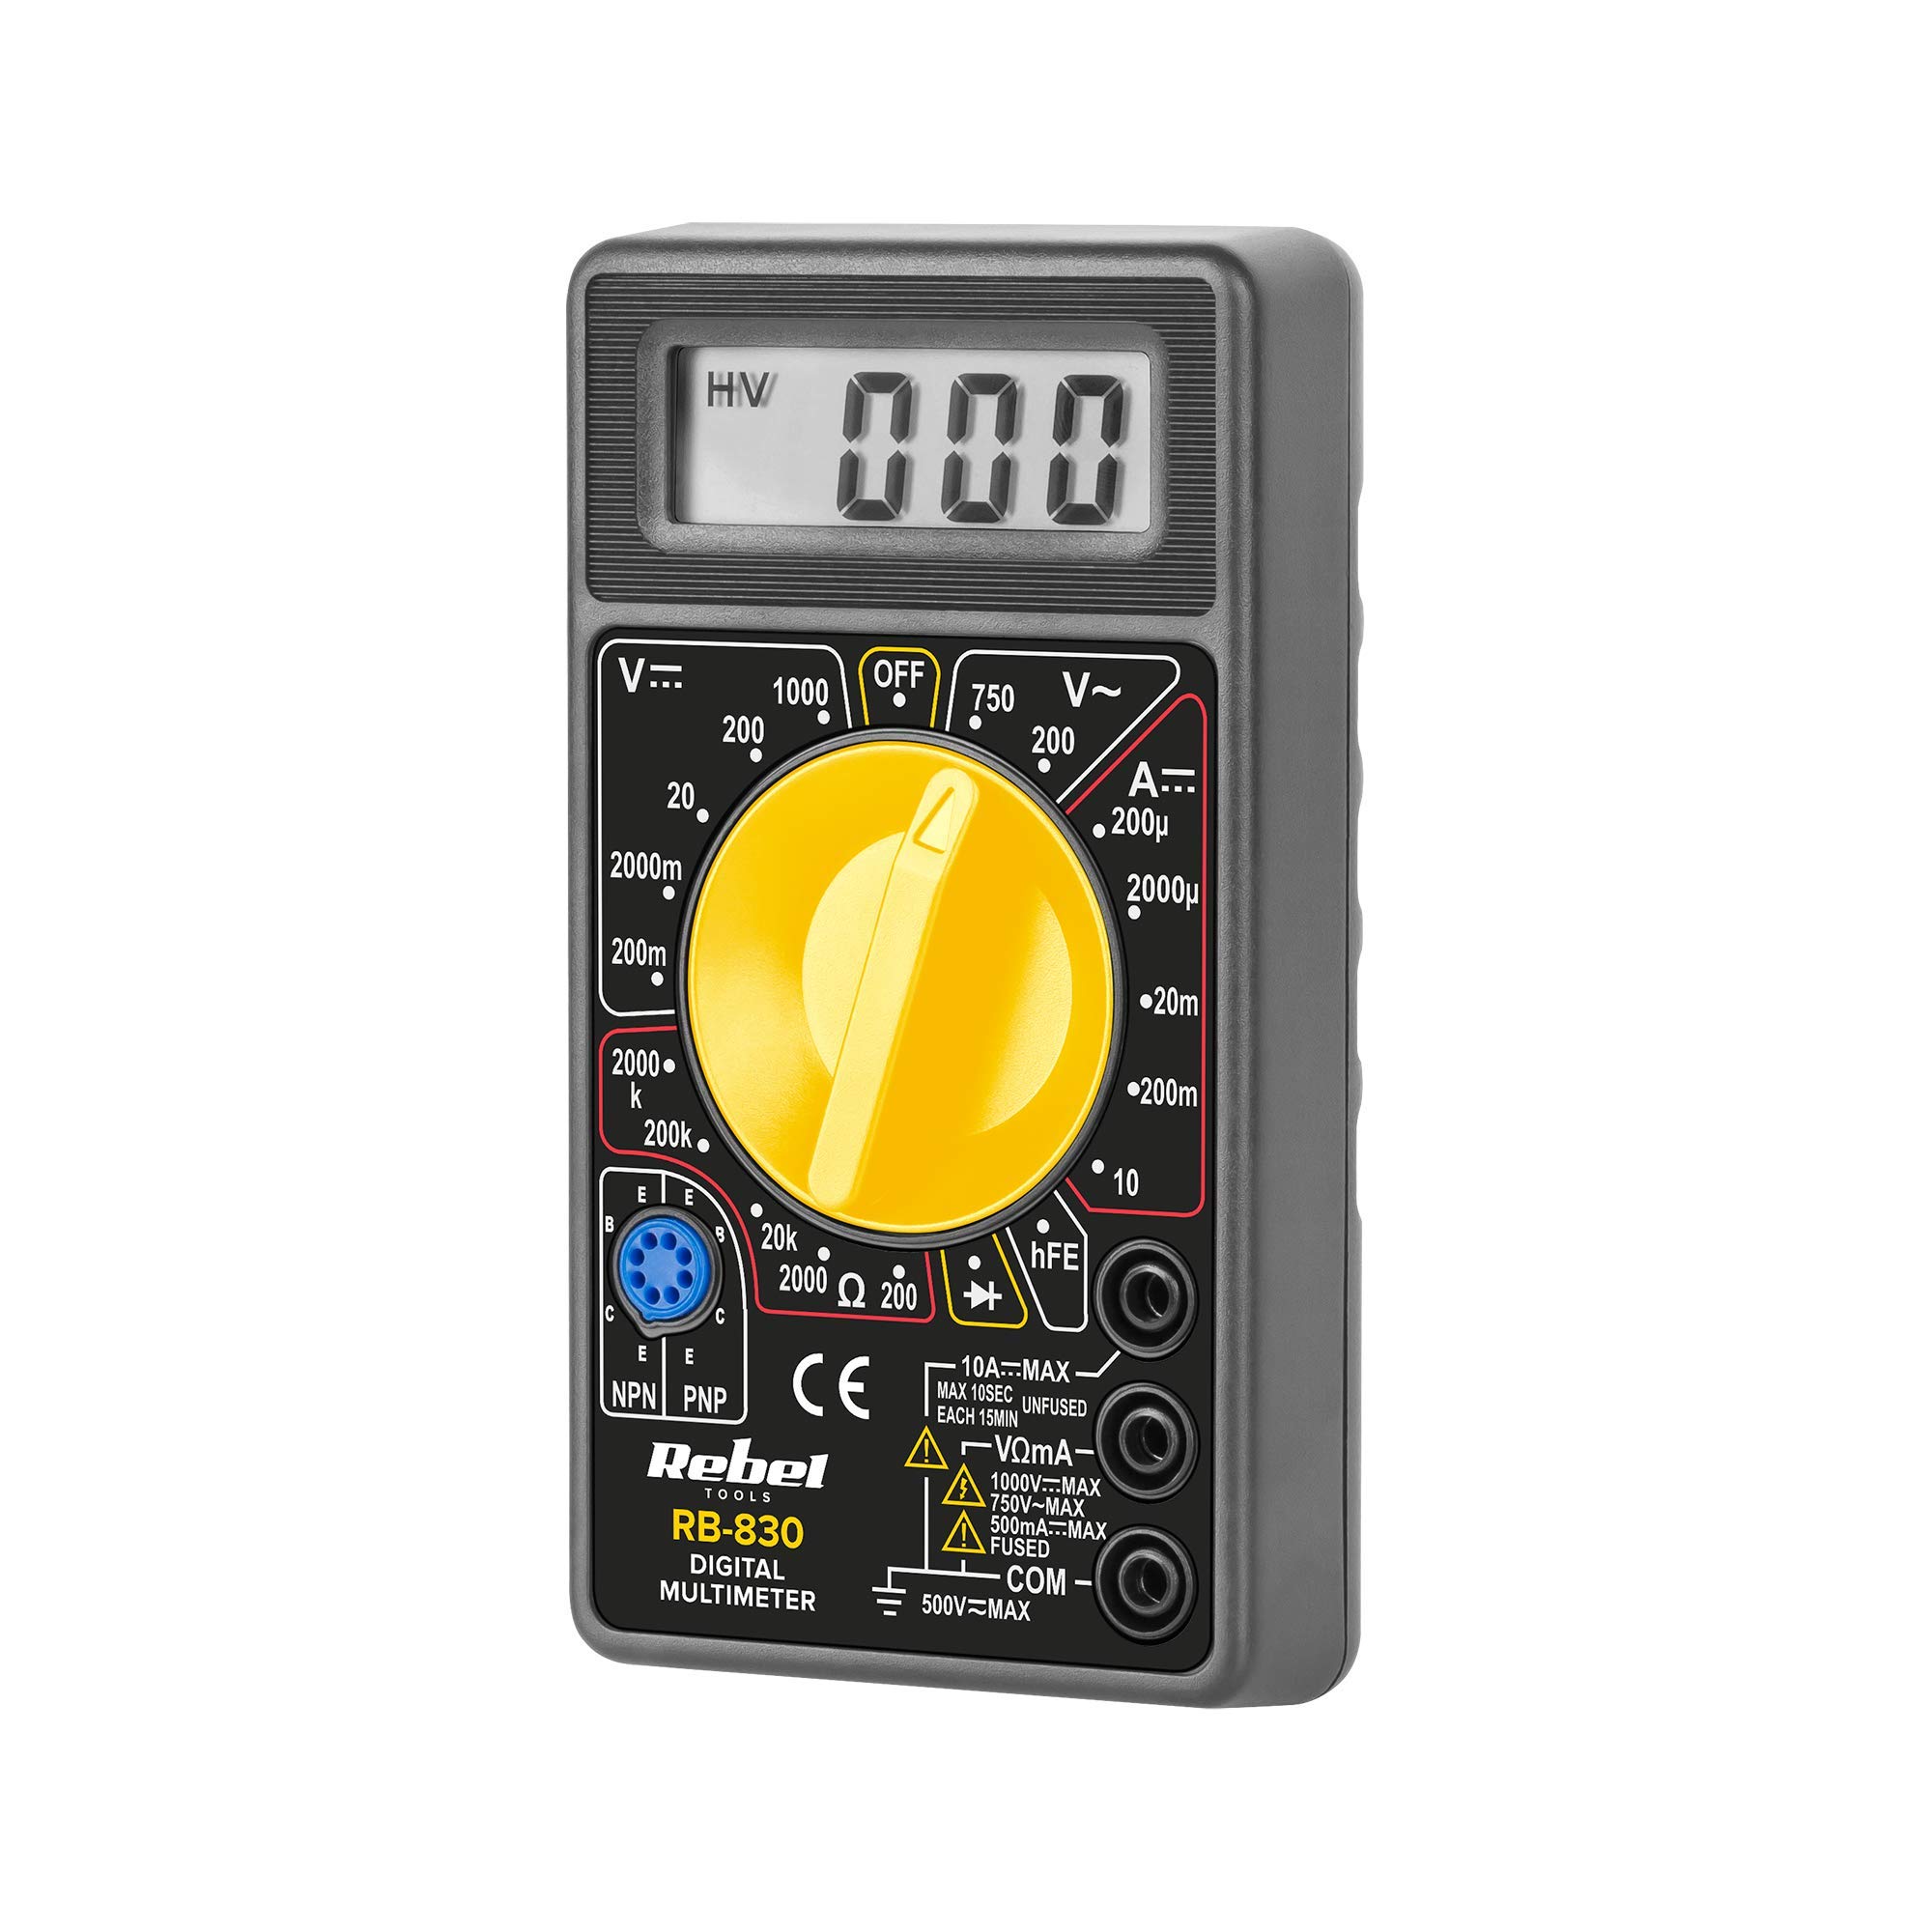
Kuva 2: The Rebel MIE-RB-830 Digital Multimeter shown with its accompanying red and black test leads. The multimeter features a large LCD display and a rotary function switch.

Kuva 3: Lähikuva view of the red and black test leads. These leads are essential for connecting the multimeter to the circuit under test.
3. Asennus
3.1. Akun asennus
- Varmista, että yleismittari on sammutettu ja kaikki mittausjohdot on irrotettu.
- Paikanna paristolokeron kansi mittarin takaa (katso kuva 1).
- Irrota kiinnitysruuvi(t) ja poista kansi varovasti.
- Insert a new 9V battery (NEDA 1604 or 6F22 type), observing the correct polarity (+ and -).
- Sulje paristolokeron kansi ja kiinnitä se ruuveilla/ruuveilla.
3.2. Testijohtojen liittäminen
- Yhdistä punainen test lead to the "VΩmA" input jack.
- Yhdistä musta test lead to the "COM" (common) input jack.
- For current measurements exceeding 200mA (up to 10A), connect the red test lead to the "10A" input jack.
4. Käyttöohjeet
4.1. Toiminnon valinta
Turn the rotary switch to the desired measurement function and range. Always start with a higher range if the approximate value is unknown to prevent overloading the meter.
4.2. Tasajännitteen mittaaminentage (V–)
- Aseta kiertokytkin haluttuun tasavirta-asentoon.tage (V–) range (e.g., 20V, 200V).
- Kytke punainen mittausjohto piirin positiiviseen (+) napaan ja musta mittausjohto negatiiviseen (-) napaan.
- Lue voltage -arvo nestekidenäytössä.
4.3. Mittaus AC Voltage (V∼)
- Aseta kiertokytkin haluttuun AC Vol -asentoontage (V∼) range (e.g., 200V, 750V).
- Kytke mittausjohdot AC-jännitteen mittausliittimeen.tage lähde.
- Lue voltage -arvo nestekidenäytössä.
4.4. Measuring DC Current (A–)
Varoitus: To measure current, the meter must be connected in series with the circuit. Never connect the meter in parallel with a voltage source when in current mode, as this can damage the meter and the circuit.
- Aseta kiertokytkin halutulle tasavirta-alueelle (A–) (esim. 20 mA, 200 mA, 10 A).
- For currents up to 200mA, ensure the red lead is in the "VΩmA" jack. For currents up to 10A, move the red lead to the "10A" jack.
- Avaa virtapiiri, josta virta mitataan, ja kytke mittari sarjaan.
- Lue nykyinen arvo LCD-näytöltä.
4.5. Resistanssin (Ω) mittaaminen
Varoitus: Varmista, että testattava virtapiiri tai komponentti on jännitteetön ennen resistanssin mittaamista.
- Set the rotary switch to the desired Resistance (Ω) range (e.g., 200Ω, 2kΩ, 200kΩ).
- Kytke mittausjohdot mitattavaan komponenttiin tai piiriin.
- Lue vastusarvo LCD-näytöltä.
4.6. Diode Test (→|–)
- Set the rotary switch to the Diode Test (→|–) position.
- Kytke punainen mittausjohto diodin anodiin ja musta mittausjohto katodiin.
- Näytössä näkyy eteenpäin suunnattu äänenvoimakkuustage-pudotus (tyypillisesti 0.5 V - 0.8 V piidiodeille).
- Käännä johtimet. Näytössä pitäisi näkyä "OL" (avoin silmukka), joka osoittaa toimivan diodin.
4.7. Transistorin (hFE) testaus
- Aseta kiertokytkin hFE-asentoon.
- Selvitä, onko transistori NPN- vai PNP-tyyppinen.
- Insert the transistor's emitter, base, and collector leads into the corresponding sockets on the hFE test socket.
- Read the hFE (DC current gain) value on the display.
5. Huolto
5.1. Pariston vaihto
Kun näyttöön ilmestyy heikon pariston ilmaisin, vaihda 9 V:n paristo osiossa 3.1 kuvatulla tavalla. Heikon pariston käyttö voi johtaa epätarkkoihin lukemiin.
5.2. Sulakkeen vaihto
If the current measurement function stops working, the fuse may need replacement. This operation should only be performed by qualified personnel.
- Varmista, että yleismittari on sammutettu ja kaikki mittausjohdot on irrotettu.
- Avaa takakansiasing of the meter (this may involve more screws than just the battery compartment).
- Locate the blown fuse and replace it with a fuse of the exact same type and rating (e.g., F200mA/250V for mA range, F10A/250V for 10A range). Refer to the internal markings or specifications for precise fuse ratings.
- Kokoa mittari varovasti takaisin ja varmista, että kaikki ruuvit on kiristetty.
5.3. Puhdistus
Pyyhi mittari mainoksellaamp liinalla ja miedolla pesuaineella. Älä käytä hankaavia aineita tai liuottimia. Pidä mittari kuivana.
6. Vianmääritys
| Ongelma | Mahdollinen syy | Ratkaisu |
|---|---|---|
| Ei näyttöä tai himmeä näyttö | Alhainen tai tyhjä akku | Vaihda 9 V: n paristo. |
| Väärät lukemat | Low battery; Incorrect range selection; Poor test lead connection | Replace battery; Select appropriate range; Ensure leads are firmly connected. |
| Virran mittaus ei toimi | Blown fuse; Incorrect lead connection for current | Replace fuse (see Section 5.2); Ensure red lead is in "VΩmA" or "10A" jack as appropriate. |
| Näytössä näkyy "OL" (ylikuormitus) | Measured value exceeds selected range; Open circuit (for resistance/continuity) | Select a higher range; Check circuit for breaks. |
7. Tekniset tiedot
| Mittaustoiminto | Alue | Tarkkuus |
|---|---|---|
| DC Voitage (V–) | 200mV, 2V, 20V, 200V, 1000V | ±(0.5 % + 2 numeroa) |
| AC Voitage (V∼) | 200V, 750V | ±(1.2 % + 10 numeroa) |
| DC Current (A–) | 200µA, 2mA, 20mA, 200mA, 10A | ±(1.0 % + 2 numeroa) |
| Vastus (Ω) | 200Ω, 2kΩ, 20kΩ, 200kΩ, 2MΩ | ±(0.8 % + 2 numeroa) |
| Dioditesti | Kyllä | Eteenpäin voltage pudota |
| Transistorin (hFE) testi | Kyllä | hFE value |
| Virtalähde | 9 V:n paristo (NEDA 1604 tai 6F22) | |
| Näyttö | 3½ Digit LCD, Max. 1999 | |
| Mitat | N. 13.5 x 10 x 4 cm | |
| Paino | Approx. 107 grams (without battery) | |
| Käyttölämpötila | 0 °C - 40 °C (32 °F - 104 °F) | |
| Varastointilämpötila | -10 °C - 50 °C (14 °F - 122 °F) | |
| Turvallisuusstandardit | CE, RoHS |
8. Takuu ja tuki
This Rebel MIE-RB-830 Digital Multimeter is covered by a standard manufacturer's warranty against defects in materials and workmanship. Please refer to the warranty card included with your purchase or contact your retailer for specific warranty terms and conditions.
For technical support or service inquiries, please contact the point of purchase or visit the official Rebel websivustolta yhteystiedot.


