1. Johdanto
Thank you for choosing the DIGOO DG-TH8380 Wireless Weather Station. This device provides accurate indoor and outdoor temperature and humidity readings, weather forecasts, time, and an alarm function. Please read this manual carefully to ensure proper setup and operation of your weather station.
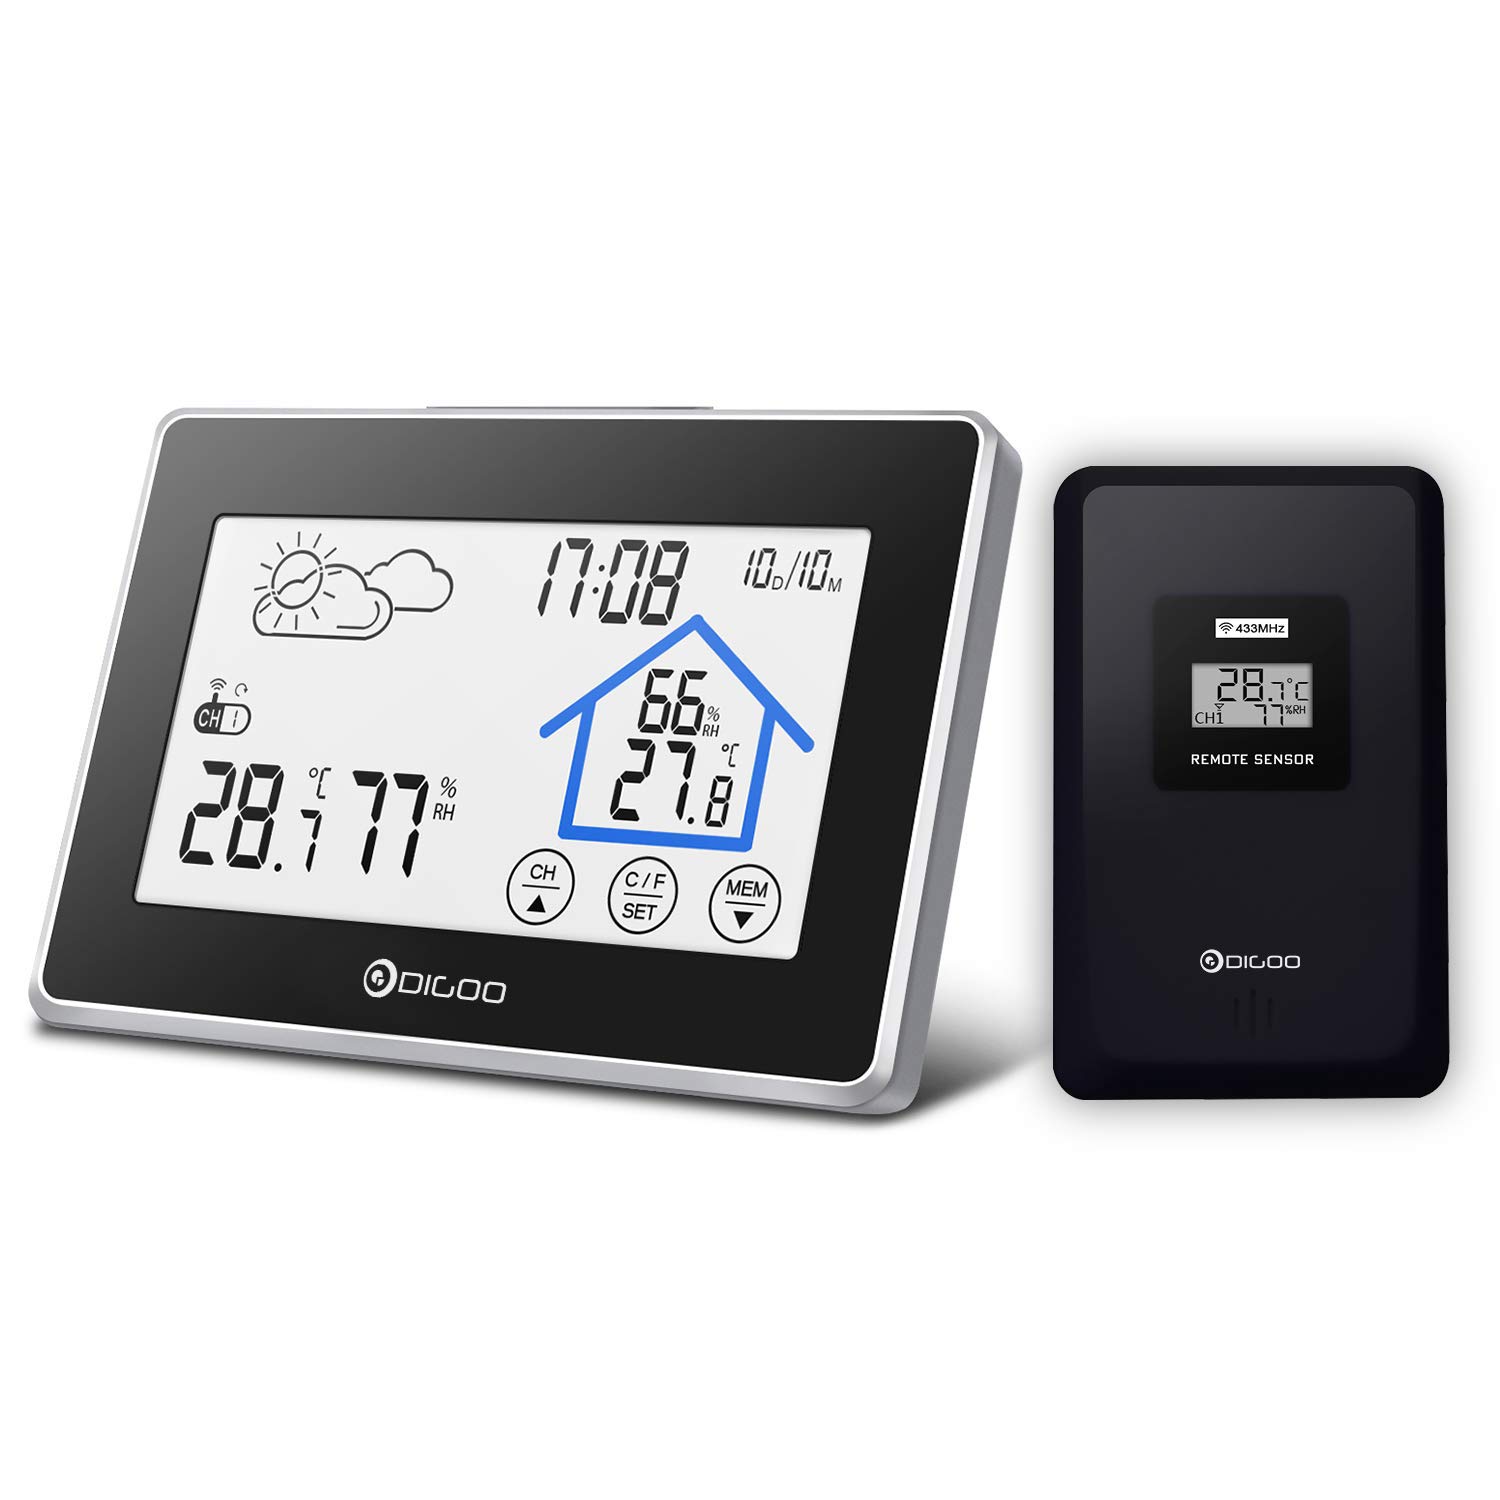
Kuva 1.1: The DIGOO DG-TH8380 Wireless Weather Station main unit and its remote outdoor sensor.
2. Tuote ohiview
2.1 Tärkeimmät ominaisuudet
- Multifunction Weather Station Clock with easy-to-use touch screen.
- Displays weather forecasts, temperature, and humidity.
- Time and calendar display.
- Soft, eye-care white backlight for visibility in low light, automatically turns off after 20 seconds.
- Records maximum and minimum temperature/humidity data.
- Low battery indicator for both main unit and remote sensor.
- Supports up to 3 remote outdoor sensors (one included).
2.2 Sisältyvät komponentit
- 1 x DIGOO DG-TH8380 Wireless Touch Screen Weather Station (Main Unit)
- 1 x DIGOO DG-TH8380 Wireless Outdoor Sensor
- 1 x englanninkielinen käyttöohje
2.3 Main Unit Display and Buttons

Kuva 2.1: Yksityiskohtainen view of the weather station's display and controls, indicating areas for weather icons, time/date, indoor/outdoor temperature and humidity, channel display, backlight button, and touch buttons (CH, C/F SET, MEM).
The main unit features a clear LCD display with various indicators:
- Weather Icon: Displays current weather forecast (Sunny, Partly Cloudy, Cloudy, Rainy).
- Aika ja päivämäärä: Shows current time and date.
- Sisälämpötila ja kosteus: Readings from the main unit's internal sensor.
- Ulkolämpötila ja kosteus: Readings from the remote sensor.
- Kanavan näyttö: Indicates which remote sensor channel is currently displayed (CH1, CH2, CH3).
- Taustavalopainike: Activates the soft backlight.
- Touch Buttons (CH, C/F SET, MEM): Used for various settings and functions.
3. Asennus
3.1 Akun asennus
The weather station main unit and remote sensor are battery-powered. Batteries are not included.
- Pääyksikkö: Avaa paristolokeron kansi pääyksikön takana. Aseta 3 x AAA-paristoa varmistaen oikean napaisuuden (+/-). Sulje kansi.
- Kauko-ohjain: Open the battery compartment cover on the back of the remote sensor. Insert 2 x AAA batteries, ensuring correct polarity (+/-). Close the cover.
Huomautus: It is recommended to insert batteries into the remote sensor first, then the main unit, to ensure proper synchronization.

Kuva 3.1: Yliview of the weather station's physical features, including dimensions, wall-mount option, table stand, battery compartment, and the remote sensor.
3.2 Anturin synkronointi
After installing batteries, the main unit will automatically search for the remote sensor signal. This process may take a few minutes. Ensure the remote sensor is within range (up to 328ft / 100m in open air) of the main unit.
If synchronization fails, remove batteries from both units, wait a few seconds, and then reinsert batteries into the remote sensor first, followed by the main unit.
3.3 Multiple Sensors (Optional)
The weather station supports up to three remote sensors. If you have additional sensors, they will automatically be assigned to channels CH2 and CH3 upon synchronization.

Kuva 3.2: Illustration of how the weather station can connect to up to three remote sensors (CH1, CH2, CH3) and how to switch between their displays on the main unit.
3.4 Sijoitus
- Pääyksikkö: Place the main unit indoors on a flat surface using its integrated stand, or mount it on a wall. Avoid direct sunlight or heat sources.
- Kauko-ohjain: Place the remote sensor outdoors in a shaded, dry location, protected from direct rain and sunlight, for accurate readings. Ensure it is within the wireless range of the main unit.
4. Käyttöohjeet
4.1 Näytön perustiedot
Once set up, the main unit will display:
- Nykyinen aika ja päivämäärä.
- Sisälämpötila ja kosteus.
- Outdoor temperature and humidity (from the currently selected channel).
- Weather forecast icon.

Kuva 4.1: Icons representing the various features of the weather station: Weather, Temperature, Humidity, Alarm, Calendar, Touch Switch, and Night Light (backlight).
4.2 Kellonajan ja päivämäärän asettaminen
- Paina ja pidä painettuna C/F-SETTI touch button for 3 seconds to enter time setting mode.
- The setting value will flash. Use the CH or MEM touch buttons to adjust the value.
- Paina C/F-SETTI again to confirm and move to the next setting (e.g., 12/24 hour format, hour, minute, year, month, day).
- After setting the last item, press C/F-SETTI poistuaksesi asetustilasta.
4.3 Lämpötilayksikön valinta (°C/°F)
Paina lyhyesti C/F-SETTI touch button to switch between Celsius (°C) and Fahrenheit (°F) temperature units.
4.4 Taustavalon käyttö
Press the backlight button located on the top of the main unit to activate the soft white backlight. The backlight will remain on for approximately 20 seconds and then automatically turn off to conserve battery power.

Kuva 4.2: The weather station displaying its soft, eye-care backlight, designed for easy viewpimeissä ympäristöissä.
4.5 Lämpötilan ja kosteuden maksimi-/minimiarvojen tallenteet
Paina lyhyesti MEM touch button to view the maximum temperature and humidity records. Press it again to view the minimum records. Press a third time to return to current readings. The records are reset daily or when batteries are replaced.
4.6 Switching Remote Sensor Channels
If you have multiple remote sensors, briefly press the CH touch button to cycle through the outdoor temperature and humidity readings from CH1, CH2, and CH3.
4.7 Herätyskello ja torkkutoiminto
The weather station includes an alarm clock with a snooze function. Refer to the detailed instructions below for setting and activating the alarm:
- Hälytysajan asettaminen: Normaalissa aikanäyttötilassa paina lyhyesti MEM button until the alarm icon appears. Then, press and hold the C/F-SETTI button for 3 seconds. The alarm hour will flash. Use CH or MEM säätää, ja C/F-SETTI vahvistamiseksi ja siirtymiseksi minuutteihin.
- Hälytyksen aktivointi/deaktivointi: In alarm display mode, briefly press the CH button to turn the alarm ON or OFF. An alarm bell icon will appear when activated.
- Torkkutoiminto: When the alarm sounds, press the backlight button (on top) to activate the snooze function. The alarm will sound again after approximately 5 minutes. To stop the alarm completely, press any other touch button.
5. Huolto
5.1 Pariston vaihto
When the low battery indicator appears on the display for either the main unit or the remote sensor, replace the batteries promptly. Use new AAA batteries, ensuring correct polarity. After replacing batteries, the units may need to re-synchronize.
5.2 Puhdistus
Clean the weather station and remote sensor with a soft, damp liinaa. Älä käytä hankaavia puhdistusaineita tai liuottimia, sillä ne voivat vahingoittaa näyttöä taiasing.
5.3 Ympäristönäkökohdat
To ensure longevity and accurate readings, avoid exposing the main unit to extreme temperatures, direct sunlight, or high humidity. The remote sensor should be placed in a location protected from direct weather elements but with good air circulation.
6. Vianmääritys
| Ongelma | Mahdollinen syy | Ratkaisu |
|---|---|---|
| No display on main unit or sensor. | Paristot ovat tyhjiä tai väärin asennettuja. | Vaihda paristot uusiin varmistaen oikean napaisuuden. |
| Ulkolämpötilaa/kosteutta ei näytetä tai se on virheellinen. | Sensor out of range, interference, or synchronization issue. | Move sensor closer to the main unit. Remove batteries from both units, wait 1 minute, then reinsert into sensor first, then main unit. Avoid placing near large metal objects or electronics. |
| Weather forecast icon does not match actual weather. | The weather station forecasts based on atmospheric pressure changes over 12-24 hours, not real-time conditions. | This is normal operation. The forecast is a prediction, not a current observation. Allow time for the station to learn local pressure patterns. |
| Taustavalo ei toimi. | Low batteries or backlight button not pressed correctly. | Replace main unit batteries. Ensure a firm press on the backlight button. |
7. Tekniset tiedot
- Malli: DG-TH8380
- Pääyksikön teho: 3 x AAA paristot (eivät sisälly)
- Kaukosäätimen anturin virta: 2 x AAA paristot (eivät sisälly)
- Langaton taajuus: 433 MHz
- Langaton kantama: Jopa 100 metriä (328 jalkaa) avoimessa tilassa
- Sisälämpötila-alue: 0 °C - 50 °C (32 °F - 122 °F)
- Ulkolämpötila-alue: -20 °C - 60 °C (-4 °F - 140 °F)
- Kosteusalue: 20 % - 95 % RH
- Mitat (pääyksikkö): Noin 141 mm x 95 mm x 24 mm (5.55 tuumaa x 3.74 tuumaa x 0.87 tuumaa)
- Väri: Musta
8. Takuu ja tuki
Information regarding specific warranty terms for the DIGOO DG-TH8380 Wireless Weather Station is not available in this manual. For warranty claims, technical support, or replacement parts, please refer to the retailer where the product was purchased or visit the official DIGOO websivustolta asiakaspalvelun yhteystiedot.


