1. Johdanto
This manual provides comprehensive instructions for the installation, operation, and maintenance of the Supermicro X10SLM+-LN4F motherboard. Designed for server applications, this motherboard features an LGA1150 socket, Intel C224 PCH, DDR3 memory support, and multiple Gigabit Ethernet ports. Please read this manual thoroughly before proceeding with installation to ensure proper setup and optimal performance.
2. Tuote ohiview
The Supermicro X10SLM+-LN4F is a microATX server motherboard built for reliability and performance. Key features include:
- LGA1150 Socket for Intel Xeon E3-1200 v3/v4 and 4th Gen Core i3 processors.
- Intel C224 PCH chipset.
- Four DDR3 DIMM slots supporting up to 64GB ECC/non-ECC UDIMM.
- Multiple SATA3 (6Gbps) ports.
- Integrated quad Gigabit Ethernet ports.
- USB 3.0 and USB 2.0 support.
- VGA output for integrated graphics.
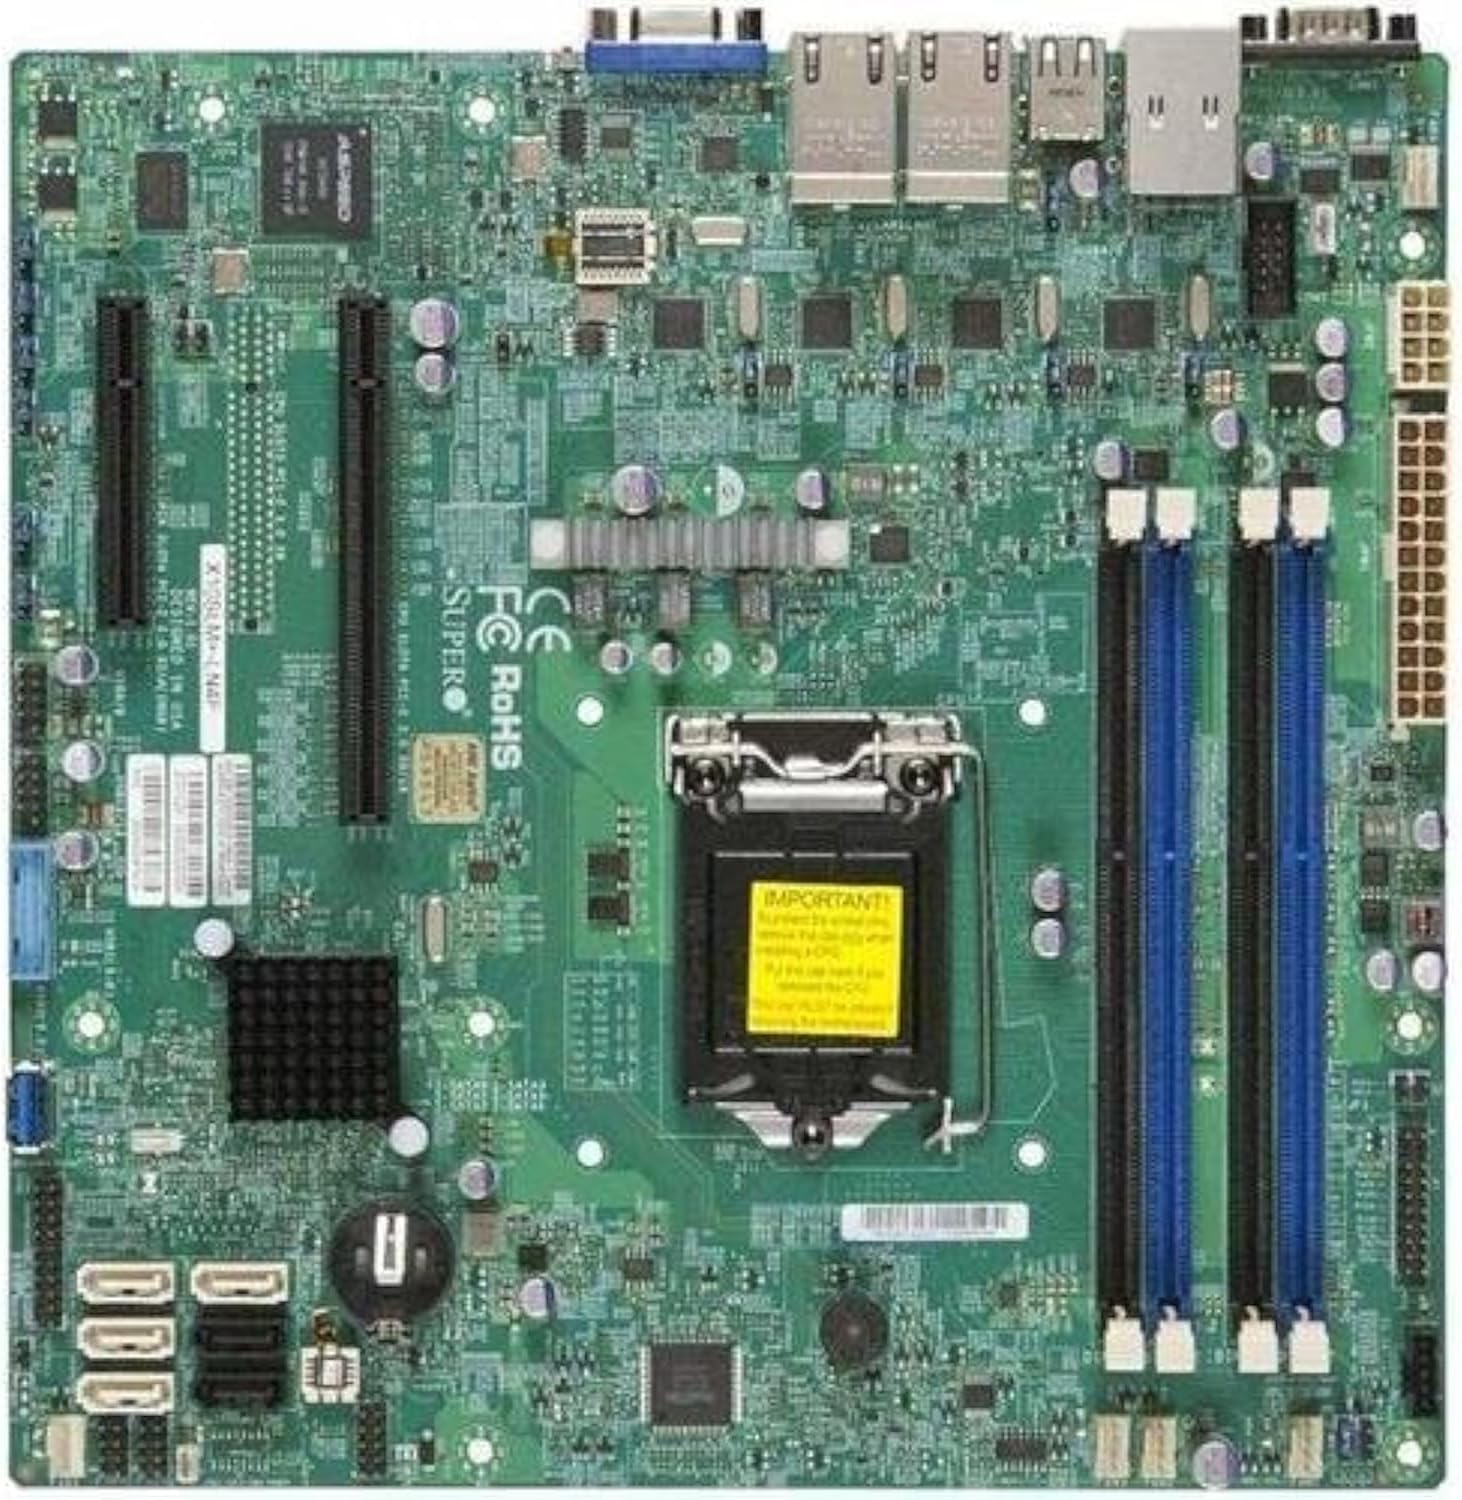
Kuva 2.1: Ylhäältä alas view of the Supermicro X10SLM+-LN4F motherboard, showing the CPU socket, DIMM slots, PCIe slots, and various connectors.

Kuva 2.2: Kulma view of the motherboard, highlighting the layout of components and expansion slots.
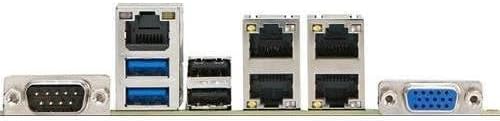
Kuva 2.3: Rear I/O panel of the Supermicro X10SLM+-LN4F motherboard, featuring multiple LAN ports, USB ports, and serial ports.
3. Asennus ja asennus
Ennen asennuksen aloittamista varmista, että järjestelmä on sammutettu ja irrotettu virtalähteestä. Käytä antistaattista ranneketta estääksesi staattisen sähkön purkaukset (ESD) aiheuttamia vaurioita komponenteille.
3.1. Suorittimen asennus
- Paikanna emolevyn LGA1150-suorittimen kanta.
- Gently push down the load lever and pull it to the side to open the CPU socket retention frame.
- Kohdista suorittimen kolmionmuotoinen merkki huolellisesti kannan vastaavaan merkkiin.
- Aseta suoritin kantaan pakottamatta sitä.
- Sulje kiinnityskehys ja kiinnitä se kuormanvarrella.
- Levitä ohut, tasainen kerros lämpötahnaa suorittimen integroituun lämmönlevittimeen (IHS).
- Asenna CPU-jäähdytin valmistajan ohjeiden mukaisesti.
3.2. Muistin (RAM) asennus
- Locate the four DDR3 DIMM slots. For optimal performance, refer to the motherboard's specific memory population guidelines, typically starting with slots closest to the CPU or specific colored slots for dual-channel configurations.
- Avaa DIMM-paikan molemmissa päissä olevat pidikkeet.
- Kohdista DDR3-muistimoduulin lovi DIMM-paikan kiilaan.
- Työnnä muistimoduuli tiukasti muistipaikkaan, kunnes pidikkeet napsahtavat paikoilleen.
- Ensure both clips are fully closed and the module is seated correctly.
3.3. Tallennuslaitteen asennus
Connect SATA storage devices (HDDs/SSDs) to the SATA ports on the motherboard using SATA data cables. Connect the power cables from your power supply unit (PSU) to the storage devices.
3.4. Laajennuskortin asennus
This motherboard features PCI Express (PCIe) slots. To install an expansion card:
- Remove the corresponding slot cover from your chassis.
- Align the expansion card with the PCIe slot.
- Paina korttia lujasti alas, kunnes se on kokonaan paikallaan korttipaikassa.
- Kiinnitä kortti ruuvilla tai pidikkeellä kotelosta.
3.5. Virtaliitännät
- 24-nastainen ATX-virtaliitin: Connect the main 24-pin power cable from your PSU to the ATX power connector on the motherboard.
- 8-pin EPS/CPU Power Connector: Connect the 8-pin (or 4+4 pin) CPU power cable from your PSU to the EPS connector near the CPU socket.
3.6. Etupaneelin ja takapaneelin I/O-liitännät
- Etupaneelin liittimet: Connect the power switch, reset switch, power LED, and HDD activity LED cables from your chassis to the corresponding pins on the motherboard's front panel header. Refer to the motherboard's silkscreen labels for correct orientation.
- USB-otsikot: Connect front panel USB ports to the onboard USB headers.
- Ääniotsikot: Connect front panel audio jacks to the onboard audio header.
- Taka I/O-paneeli: Connect peripherals such as keyboard, mouse, monitor (via VGA), and network cables (to the Gigabit Ethernet ports) to the rear I/O panel.
4. Käyttöohjeet
4.1. Ensimmäinen käynnistys ja BIOS/UEFI-asetukset
- After all components are installed and connected, connect the power cord to the PSU and turn on the power switch on the PSU.
- Paina rungon virtapainiketta.
- Käynnistystestin (POST) aikana paina toistuvasti DEL or F2 -näppäintä (tai näytöllä osoitetulla tavalla) siirtyäksesi BIOS/UEFI-asetusohjelmaan.
- In the BIOS/UEFI, configure essential settings such as date and time, boot order, and enable/disable specific features as required for your operating system and hardware.
- Tallenna muutokset ja poistu BIOSista/UEFI:sta. Järjestelmä käynnistyy uudelleen.
4.2. Käyttöjärjestelmän asennus
To install an operating system (e.g., Windows, Linux, VMware ESXi):
- Insert the operating system installation media (USB drive or DVD) into the system.
- Boot from the installation media (you may need to adjust the boot order in BIOS/UEFI).
- Asenna käyttöjärjestelmä valitsemaasi tallennuslaitteeseen noudattamalla näytön ohjeita.
- After installation, install all necessary drivers for the motherboard components (chipset, LAN, VGA, etc.) from the Supermicro website or the provided driver disc.
5. Huolto
Säännöllinen huolto auttaa varmistamaan emolevyn ja järjestelmän pitkän käyttöiän ja vakaan toiminnan.
5.1. Puhdistus
- Puhdista emolevy ja järjestelmän komponentit säännöllisesti pölystä paineilmalla. Varmista, että järjestelmä on sammutettu ja irrotettu pistorasiasta ennen puhdistamista.
- Vältä nestemäisten puhdistusaineiden käyttöä suoraan komponenttien pinnalla.
- Ensure proper airflow within the chassis by keeping fan vents clear.
5.2. Firmware and Driver Updates
- Tarkista Supermicro website periodically for updated BIOS/UEFI firmware and drivers for your motherboard model.
- Follow the provided instructions carefully when updating firmware to avoid system instability.
5.3. Ympäristönäkökohdat
- Käytä emolevyä suositeltujen lämpötila- ja kosteusrajojen sisällä vaurioiden välttämiseksi.
- Ensure adequate ventilation in the server chassis.
6. Vianmääritys
Tässä osiossa on ratkaisuja yleisiin ongelmiin, joita saatat kohdata.
6.1. Ei virtaa / Ei POST-testiä (käynnistyksen itsetestaus)
- Verify that the power supply unit (PSU) is connected correctly to the motherboard (24-pin ATX and 8-pin EPS connectors).
- Ensure the PSU is switched on and receiving power from the wall outlet.
- Check that the front panel power switch cable is correctly connected to the motherboard header.
- Reseat the CPU, RAM modules, and any expansion cards.
- Try booting with only essential components (CPU, one RAM stick, CPU cooler) to isolate the issue.
- Listen for beep codes from the system speaker, which can indicate specific hardware failures. Refer to the Supermicro website for beep code interpretations.
6.2. Näyttöongelmat
- Ensure the monitor is properly connected to the motherboard's VGA port.
- Varmista, että näyttöön on kytketty virta ja että se on asetettu oikealle tulolähteelle.
- If using a discrete graphics card, ensure it is properly seated and connected to power (if required).
6.3. Käyttöjärjestelmä ei käynnisty
- Check the boot order in the BIOS/UEFI to ensure the correct storage device is prioritized.
- Verify that the operating system is installed correctly on the storage device.
- Ensure SATA data and power cables are securely connected to the storage device and motherboard.
7. Tekniset tiedot
Below are the technical specifications for the Supermicro X10SLM+-LN4F motherboard:
| Ominaisuus | Yksityiskohta |
|---|---|
| Merkki | Supermicro |
| Mallin nimi | X10SLM+-LN4F-B |
| CPU-liitäntä | LGA1150 |
| Piirisarjan tyyppi | Intel C224 |
| RAM-muistitekniikka | DDR3 SDRAM |
| Muistin nopeus | 1600 MHz |
| Muistin tallennuskapasiteetti | Jopa 64 Gt |
| USB 2.0 -porttien määrä | 2 (takaosan I/O) |
| Grafiikkakortin käyttöliittymä | Integrated, PCI |
| Yhteensopivat laitteet | Palvelin |
| Alusta | Windows 10 |
| Tuotteen paino | 5.8 kiloa |
| Tuotteen mitat (PxLxK) | 10 x 10 x 2 tuumaa |
| Päivämäärä ensimmäinen saatavilla | 4. kesäkuuta 2013 |
Note: Specifications are subject to change without notice. For the most current information, please refer to the official Supermicro product page.
8. Takuu ja tuki
Tarkemmat takuutiedot löytyvät tuotteen mukana toimitetusta takuukortista tai Supermicron viralliselta verkkosivustolta. website. Technical support is available through Supermicro's customer service channels, including their support portal, email, and phone. Please have your product model number (X10SLM+-LN4F) and serial number ready when contacting support.
For the latest drivers, BIOS updates, and additional documentation, please visit: www.supermicro.com


