
1. Johdanto
This manual provides detailed instructions for the installation, operation, and maintenance of your ZSUS X99-8D4 Motherboard Set Kit. This kit includes the ZSUS X99-8D4 motherboard, an Intel Xeon E5 2650 V4 CPU, and 16GB (1x16GB) of DDR4 2133MHz memory. Please read this manual thoroughly before proceeding with installation to ensure proper setup and optimal performance.
2. Tuote ohiview
The ZSUS X99-8D4 motherboard is designed for high-performance computing, supporting Intel LGA2011-3 processors and DDR4 memory. It features an NVMe M.2 slot for high-speed storage and Gigabit Ethernet for reliable network connectivity.
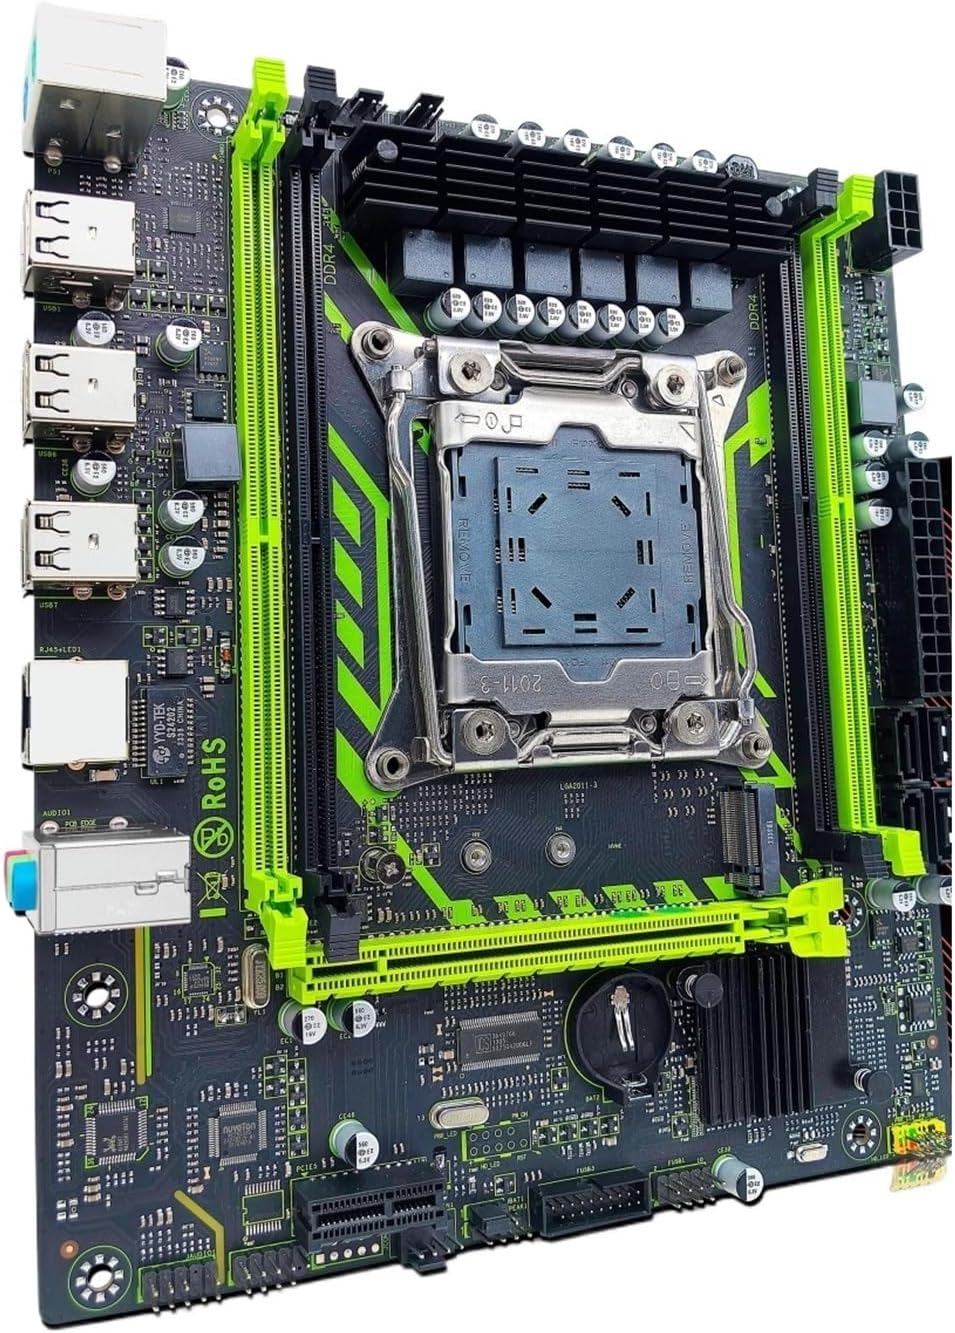
Kuva 2.1: ZSUS X99-8D4 Motherboard Set Kit. This image displays the complete motherboard kit, including the motherboard, CPU, and RAM, ready for installation.
Tärkeimmät ominaisuudet:
- CPU-tuki: LGA2011-3 socket for Intel Xeon E5 V3/V4 series processors.
- Muisti: 4x DDR4 memory slots, supporting up to 128GB of RAM.
- Varastointi: NVMe M.2 slot (2280 form factor) for high-speed SSDs, and multiple SATA 2.0 ports.
- Laajennus: 1x PCIe x16 slot (PCI-E 3.0) for graphics cards, 1x PCIe x1 slot.
- Verkostoituminen: Integrated Gigabit Ethernet (1000Mbps).
- USB: Multiple USB 2.0 ports.
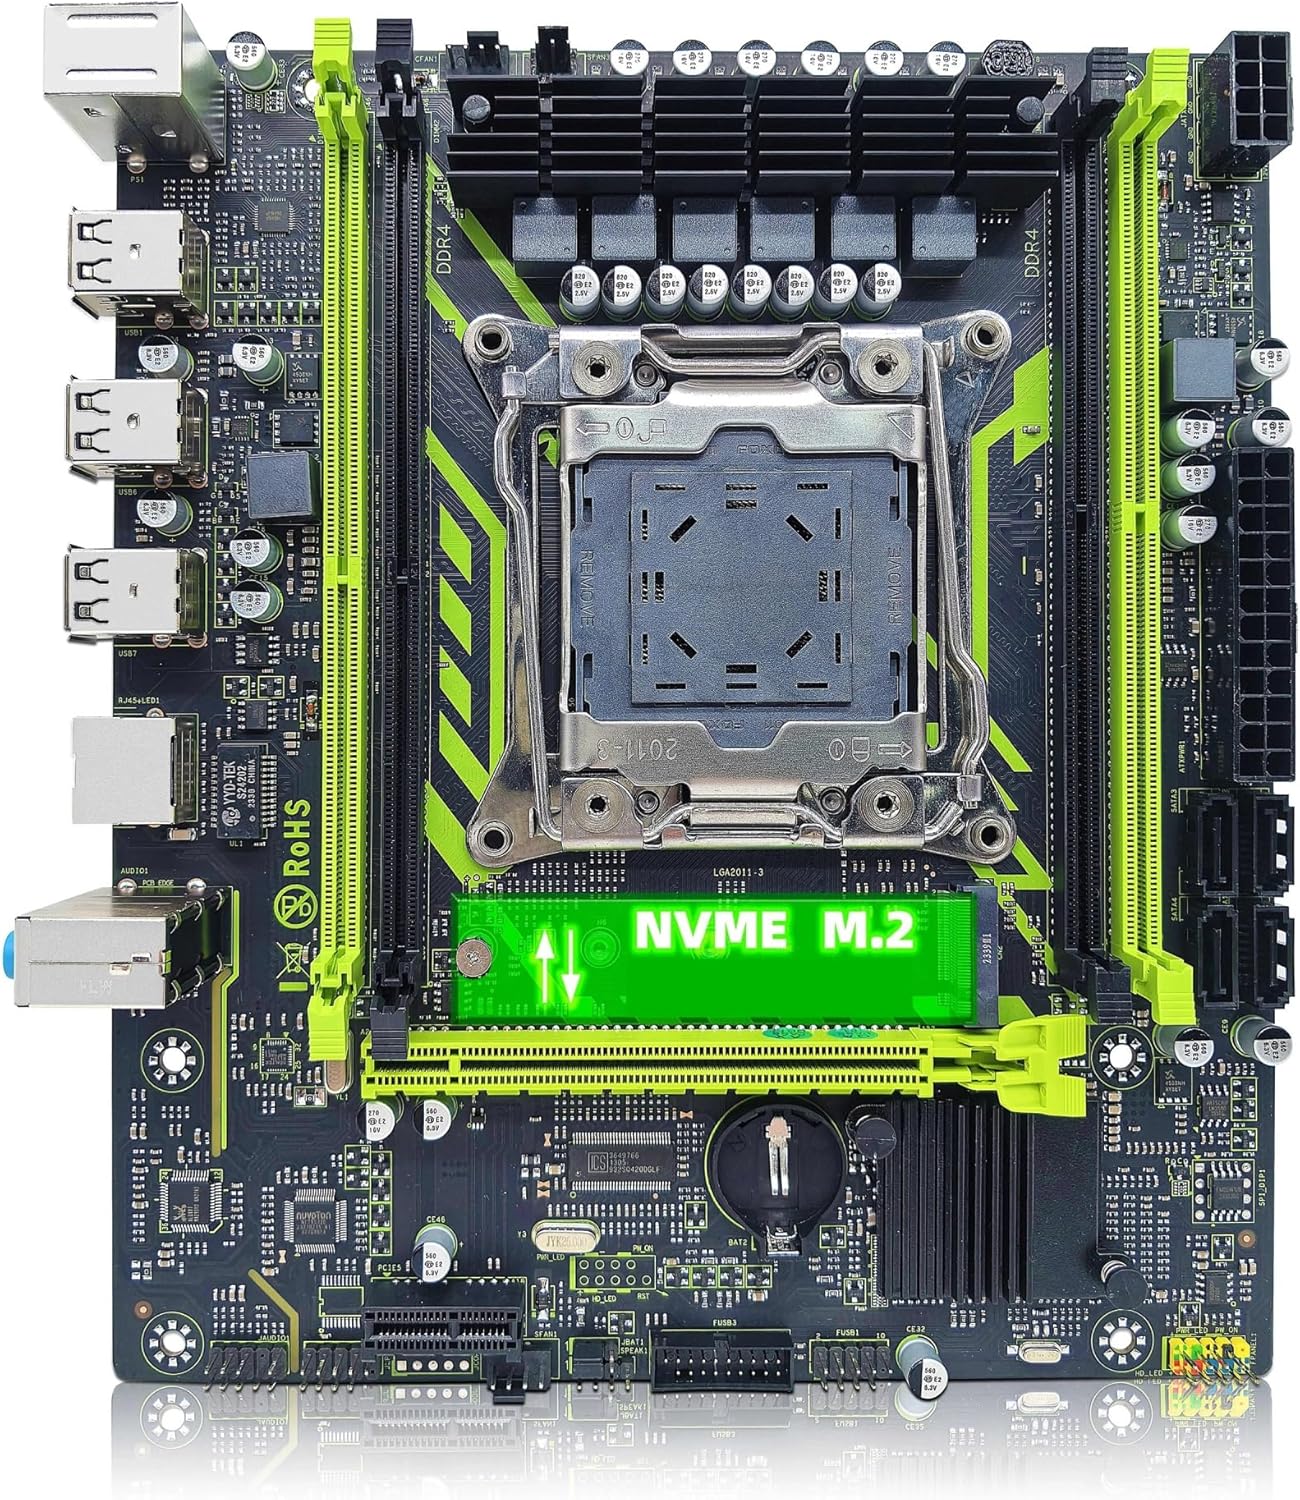
Kuva 2.2: ZSUS X99-8D4 Motherboard highlighting the NVMe M.2 slot. This image shows the motherboard with the NVMe M.2 slot clearly visible, indicating its location for SSD installation.
3. Asennus ja asennus
Before beginning installation, ensure your system is powered off and unplugged. Wear an anti-static wrist strap to prevent electrostatic discharge (ESD) damage to components.
3.1 Pakkauksesta purkaminen ja tarkastus
Carefully remove all components from their packaging. Verify that all items listed in your kit are present and undamaged. The kit typically includes the motherboard, CPU, RAM, I/O shield, and SATA cable.
3.2 Emolevyn asennus
- Asenna I/O-suoja tietokoneen kotelon takaosaan.
- Align the motherboard with the standoffs inside your computer case.
- Secure the motherboard with screws, ensuring it is firmly seated and not touching any metal parts of the case directly.

Kuva 3.1: ZSUS X99-8D4 Motherboard with dimensions. This image illustrates the physical dimensions of the motherboard, showing a width of 215mm and a length of 190mm, which is useful for case compatibility.
3.3 CPU:n asennus (Intel Xeon E5 2650 V4)
- Paikanna emolevyn LGA2011-3-suorittimen kanta.
- Avaa suorittimen kannan kiinnitysmekanismi painamalla vipua/vipuja alas- ja ulospäin.
- Aseta Intel Xeon E5 2650 V4 -suoritin varovasti kantaan kohdistamalla suorittimen kultainen kolmio kannan vastaavaan merkkiin. Älä väkisin työnnä suoritinta paikalleen.
- Sulje kiinnitysmekanismi CPU:n kiinnittämiseksi.
- Levitä ohut, tasainen kerros lämpötahnaa suorittimen päälle.
- Asenna CPU-jäähdytin valmistajan ohjeiden mukaisesti.
3.4 RAM-muistin asennus (DDR4)
- Paikanna emolevyn neljä DDR4-muistipaikkaa.
- Avaa muistipaikan molemmissa päissä olevat pidikkeet.
- Align the notch on the 16GB DDR4 memory module with the key in the memory slot.
- Paina muistimoduulin molempia päitä lujasti alas, kunnes klipsit napsahtavat paikoilleen.
3.5 NVMe M.2 SSD Installation
- Paikanna NVMe M.2 -paikka emolevyltä.
- Irrota M.2-väliruuvi.
- Aseta M.2 SSD -levy paikkaan 30 asteen kulmassa.
- Paina SSD-levy alas ja kiinnitä se tukiruuvilla.
3.6 Graphics Card and Other PCIe Devices
- Locate the PCIe x16 slot for your graphics card.
- Avaa paikan päässä oleva pidike.
- Kohdista näytönohjain korttipaikkaan ja paina sitä lujasti alaspäin, kunnes se napsahtaa paikalleen.
- Kiinnitä näytönohjain koteloon ruuvilla.
- Install any other PCIe x1 expansion cards as needed.
3.7 Virtalähteen liitännät
- Kytke virtalähteen 24-nastainen ATX-virtaliitin emolevyyn.
- Connect the 8-pin CPU power connector (and 4-pin if available/needed) to the corresponding sockets near the CPU.
- Connect SATA power cables to your storage devices.
3.8 Etupaneelin ja oheislaitteiden liitännät
- Connect the front panel headers (Power SW, Reset SW, HDD LED, Power LED) to the designated pins on the motherboard. Refer to the motherboard diagram for correct pin assignments.
- Connect USB 2.0 headers from your case to the motherboard.
- Liitä etupaneelin ääniliitäntä.
- Connect SATA data cables from your storage devices to the SATA 2.0 ports on the motherboard.

Kuva 3.2: ZSUS X99-8D4 Motherboard with labeled ports and connectors. This image provides a detailed layout of the motherboard, indicating the locations of the CPU socket, DDR4 slots, PCIe slots, SATA ports, USB headers, and power connectors.

Kuva 3.3: ZSUS X99-8D4 Motherboard I/O Shield and SATA Cable. This image shows the included I/O shield for the rear panel and a SATA data cable, essential accessories for system assembly.
4. Käyttöohjeet
4.1 Ensimmäinen käynnistys
- After all connections are made, connect your monitor, keyboard, and mouse.
- Plug in the power cord and turn on your power supply.
- Paina tietokoneen kotelon virtapainiketta.
- Järjestelmän pitäisi käynnistyä ja näyttää BIOS/UEFI-aloitusnäyttö.
4.2 BIOS/UEFI-asetukset
During the initial boot, press the designated key (usually DEL or F2) to enter the BIOS/UEFI setup utility. Here you can configure boot order, system time, and other hardware settings. Ensure your storage device with the operating system is set as the primary boot device.
4.3 Ohjaimen asennus
After installing your operating system, install the necessary drivers for the motherboard chipset, LAN, and audio. These drivers are typically provided on a CD/DVD or can be downloaded from the manufacturer's websivusto. Oikeiden ajureiden asentaminen varmistaa optimaalisen suorituskyvyn ja vakauden.
5. Huolto
5.1 Puhdistus
Regularly clean your computer's interior to prevent dust buildup, which can lead to overheating. Use compressed air to remove dust from fans, heatsinks, and motherboard components. Ensure the system is powered off and unplugged before cleaning.
5.2 BIOS-päivitykset
Tarkista säännöllisesti valmistajan webBIOS/UEFI-päivitysten sivusto. Päivitykset voivat parantaa järjestelmän vakautta, lisätä tukea uusille laitteille tai korjata virheitä. Noudata päivitysohjeita huolellisesti, jotta emolevy ei vahingoitu.
6. Vianmääritys
Tässä osiossa käsitellään yleisiä ongelmia, joita saatat kohdata.
6.1 Ei virtaa / Ei käynnistystä
- Check all power connections: 24-pin ATX, 8-pin CPU, and power button header.
- Varmista, että virtakytkin on 'ON'-asennossa.
- Testaa virtalähde toisella järjestelmällä tai virtalähdetesterillä, jos mahdollista.
6.2 Ei näyttöä
- Ensure your monitor is connected to the graphics card (not the motherboard's I/O if no integrated graphics are present).
- Aseta näytönohjain ja muistimoduulit uudelleen paikoilleen.
- Kokeile eri näyttökaapelia tai näyttöä.
6.3 Memory Errors
- Ensure memory modules are fully seated in their slots.
- Try booting with one memory module at a time to identify a faulty stick or slot.
- Verify memory compatibility with the motherboard.
6.4 Järjestelmän epävakaus / kaatumiset
- Tarkista suorittimen ja näytönohjaimen lämpötilat varmistaaksesi, että ne ovat turvallisten käyttörajojen sisällä.
- Varmista, että kaikki ajurit ovat ajan tasalla.
- Suorita muistidiagnostiikkatyökalut RAM-virheiden tarkistamiseksi.
7. Tekniset tiedot
| Ominaisuus | Erittely |
|---|---|
| Malli | ZSUS X99-8D4 |
| CPU-liitäntä | LGA 2011-3 |
| Tuettu suoritin | Intel Xeon E5 V3/V4 series (e.g., E5 2650 V4 included) |
| Muistin tyyppi | DDR4 |
| Muistipaikkoja | 4 |
| Maksimimuistikapasiteetti | 128 Gt |
| Tallennusliittymä | M.2 (NVMe 2280), SATA 2.0 |
| PCIe x16 -paikat | 1 (PCI-E 3.0) |
| PCIe x1 -paikat | 1 |
| LAN-nopeus | 1000 Mbps (gigabitin Ethernet) |
| USB-portit | 6 x USB 2.0 (rear I/O) |
| Audioportit | 3 x Jacks |
| Muototekijä | ATX (approx. 215mm x 190mm) |
| Sertifiointi | RoHS, CE |
8. Takuu ja tuki
Takuutietoja ja teknistä tukea varten katso ostoksesi mukana toimitettuja asiakirjoja tai ota yhteyttä suoraan myyjään. Säilytä ostokuitti takuuvaatimuksia varten.