JideTech BC9
JideTech 5MP PoE IP Bullet Camera User Manual
Malli: BC9
1. Tuote ohiview
The JideTech 5MP PoE IP Bullet Camera is designed for both indoor and outdoor surveillance, offering high-resolution video and advanced detection capabilities. It features a 1/2.8" Mstar SSC30KQ Chip and IMX335 Sensor, delivering smooth 2560 x 1920 resolution at 30 frames per second. Key features include 120 feet color night vision, human/vehicle detection, two-way audio, and IP66 weatherproofing.

Figure 1.1: JideTech 5MP PoE IP Bullet Camera. This image displays the main unit of the JideTech 5MP PoE IP Bullet Camera.
2. Mitä laatikossa on
Varmista, että pakkauksessa on kaikki osat:
- 1x JideTech 5MP PoE Camera (Outdoor)
- 1x käyttöopas
- 1x Installation Screw Package
- 1x Tail Line Waterproof Cap
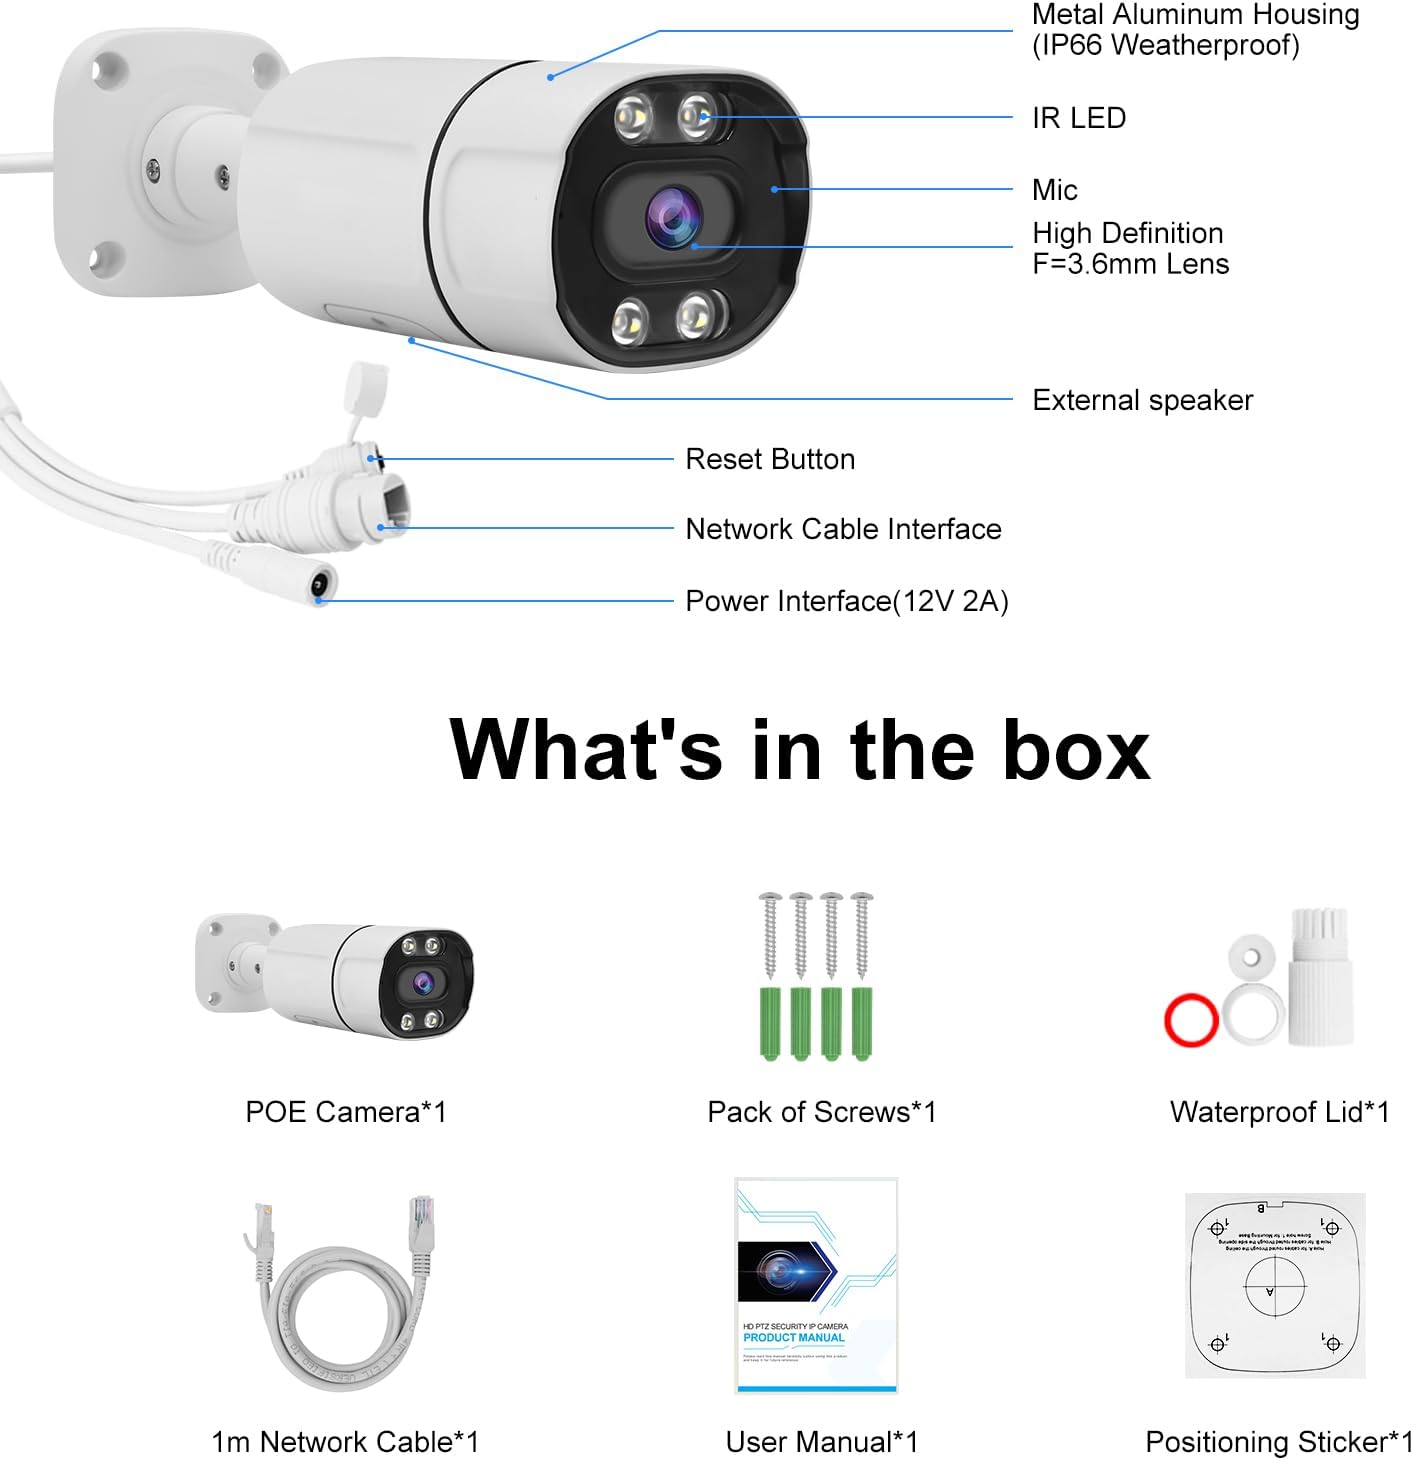
Figure 2.1: Package Contents. This image displays the JideTech 5MP PoE camera, installation screws, user manual, and tail line waterproof cap.
3. Asennus ja asennus
The JideTech 5MP PoE IP Bullet Camera offers flexible connection options. Ensure proper power and network connections for optimal performance.
3.1 Yhteysmenetelmät
There are three primary ways to connect your PoE IP camera:
- Connect via NVR PoE (Power over Ethernet)
- Connect by DC12V Power Supply
- Connect via PoE Injector or PoE Switch
Video 3.1: PoE IP Camera 3 Ways to Connect. This video demonstrates the three different methods for connecting the JideTech PoE IP camera to your network and power source.
3.2 Detailed Connection Steps
Method 1: Connect via NVR PoE
This method simplifies installation by providing both power and data through a single Ethernet cable from a Power over Ethernet (PoE) Network Video Recorder (NVR).
- Liitä Ethernet-kaapelin toinen pää kameran PoE-porttiin.
- Connect the other end of the Ethernet cable to a PoE port on your NVR.
- Ensure the NVR is connected to your router and a power source.
- Connect a monitor to the NVR to view kameran syötettä.
- Access the NVR interface to configure and view kameraa.

Figure 3.2: NVR PoE Connection Diagram. This diagram illustrates how to connect the camera to a PoE NVR, which then connects to a router and monitor for local viewing, and allows remote access via mobile devices.
Method 2: Connect by DC12V Power Supply
This method uses a separate power adapter for the camera and connects to your network via a standard Ethernet cable to a router.
- Connect the DC12V power adapter to the camera's power input.
- Liitä verkkolaite tavalliseen pistorasiaan.
- Connect one end of an Ethernet cable to the camera's LAN port.
- Liitä Ethernet-kaapelin toinen pää reitittimesi vapaana olevaan LAN-porttiin.
- Ensure your router is powered on and connected to the internet for remote access.

Figure 3.3: DC12V Power Supply Connection Diagram. This diagram illustrates connecting the camera to a router using a DC12V power supply for power and an Ethernet cable for data, enabling access via mobile devices and laptops.
Method 3: Connect via PoE Injector or PoE Switch
This method is suitable when you need to power the camera over Ethernet but do not have a PoE NVR. A PoE injector or switch provides the necessary power.
- Liitä Ethernet-kaapelin toinen pää kameran PoE-porttiin.
- Connect the other end of this Ethernet cable to a PoE output port on a PoE injector or PoE switch.
- Connect the PoE injector/switch to a power source.
- Connect a standard Ethernet cable from the PoE injector/switch's data input (or an uplink port on the switch) to a LAN port on your router.
- Varmista, että kaikki laitteet ovat päällä.

Figure 3.4: PoE Injector/Switch Connection Diagram. This diagram illustrates connecting the camera to a PoE switch, which provides both power and data, and then connects to a router for network access.
4. Käyttöohjeet
4.1 Alkuperäinen käyttöoikeus ja konfigurointi
After connecting the camera, you will need to access its interface for initial setup. This typically involves using a dedicated mobile application (e.g., "Viedolink" for iOS/Android) or a web selain samaan verkkoon kytketyssä tietokoneessa.
- Download the "Viedolink" app from your device's app store.
- Follow the in-app instructions to add your camera. This usually involves scanning a QR code on the camera or manually entering its ID.
- Set up a secure password for your camera.
- Configure network settings if necessary (e.g., static IP address).
4.2 Videovalvonta ja -tallennus
The camera provides Ultra HD 5MP resolution (2560 x 1920@30fps) for clear video monitoring.

Figure 4.1: 5MP Full HD Image Quality. This image demonstrates the superior clarity and detail provided by the 5MP resolution compared to a 2MP image.
The camera supports up to a 512GB MicroSD card for local storage. Recording options typically include continuous recording, scheduled recording, and event-triggered recording (e.g., motion detection).
4.3 Pimeänäkö
The camera features advanced night vision capabilities, providing clear images up to 120 feet (36 meters) in low-light conditions, including color night vision.

Figure 4.2: 5MP Day & Night Vision. This image illustrates the camera's ability to capture clear video both during the day and at night, with night vision extending up to 120 feet.
4.4 Human/Vehicle Detection and Motion Alerts
Utilizing cutting-edge detection algorithms, the camera can accurately identify people and vehicles, reducing false alarms from other movements. When a person or vehicle is detected, the camera sends real-time alert messages to your mobile phone or email.

Figure 4.3: Smart Human/Vehicle Detection. This image demonstrates the camera's intelligent detection capabilities, distinguishing between human and vehicle movement.

Figure 4.4: Motion Detection and Alarm. This image illustrates how the camera detects motion and sends instant alerts via email or app notifications, allowing for timely action.
4.5 Kaksisuuntainen ääni
The built-in microphone and speaker enable two-way communication through the camera. This allows you to speak with visitors or deter intruders directly via the app.

Figure 4.5: Two-Way Audio Communication. This image demonstrates the camera's two-way audio feature, allowing real-time conversation with individuals near the camera.
5. Huolto
To ensure the longevity and optimal performance of your JideTech 5MP PoE IP Bullet Camera, follow these maintenance guidelines:
- Puhdistus: Puhdista kameran linssi säännöllisesti pehmeällä,amp cloth to remove dust, dirt, or smudges that may affect image quality. Avoid abrasive cleaners.
- Sääsuojaus: The camera features an IP66 waterproof rating and a stable aluminum casing, designed to withstand various weather conditions (hot, snow, rain). However, ensure the tail line waterproof cap is securely installed to protect connections.
- Laiteohjelmistopäivitykset: Tarkista säännöllisesti valmistajan website or the Viedolink app for firmware updates. Keeping the firmware updated ensures access to the latest features and security enhancements.
- Kaapelin hallinta: Ensure all cables are securely connected and protected from environmental damage or tamperehtyvä.
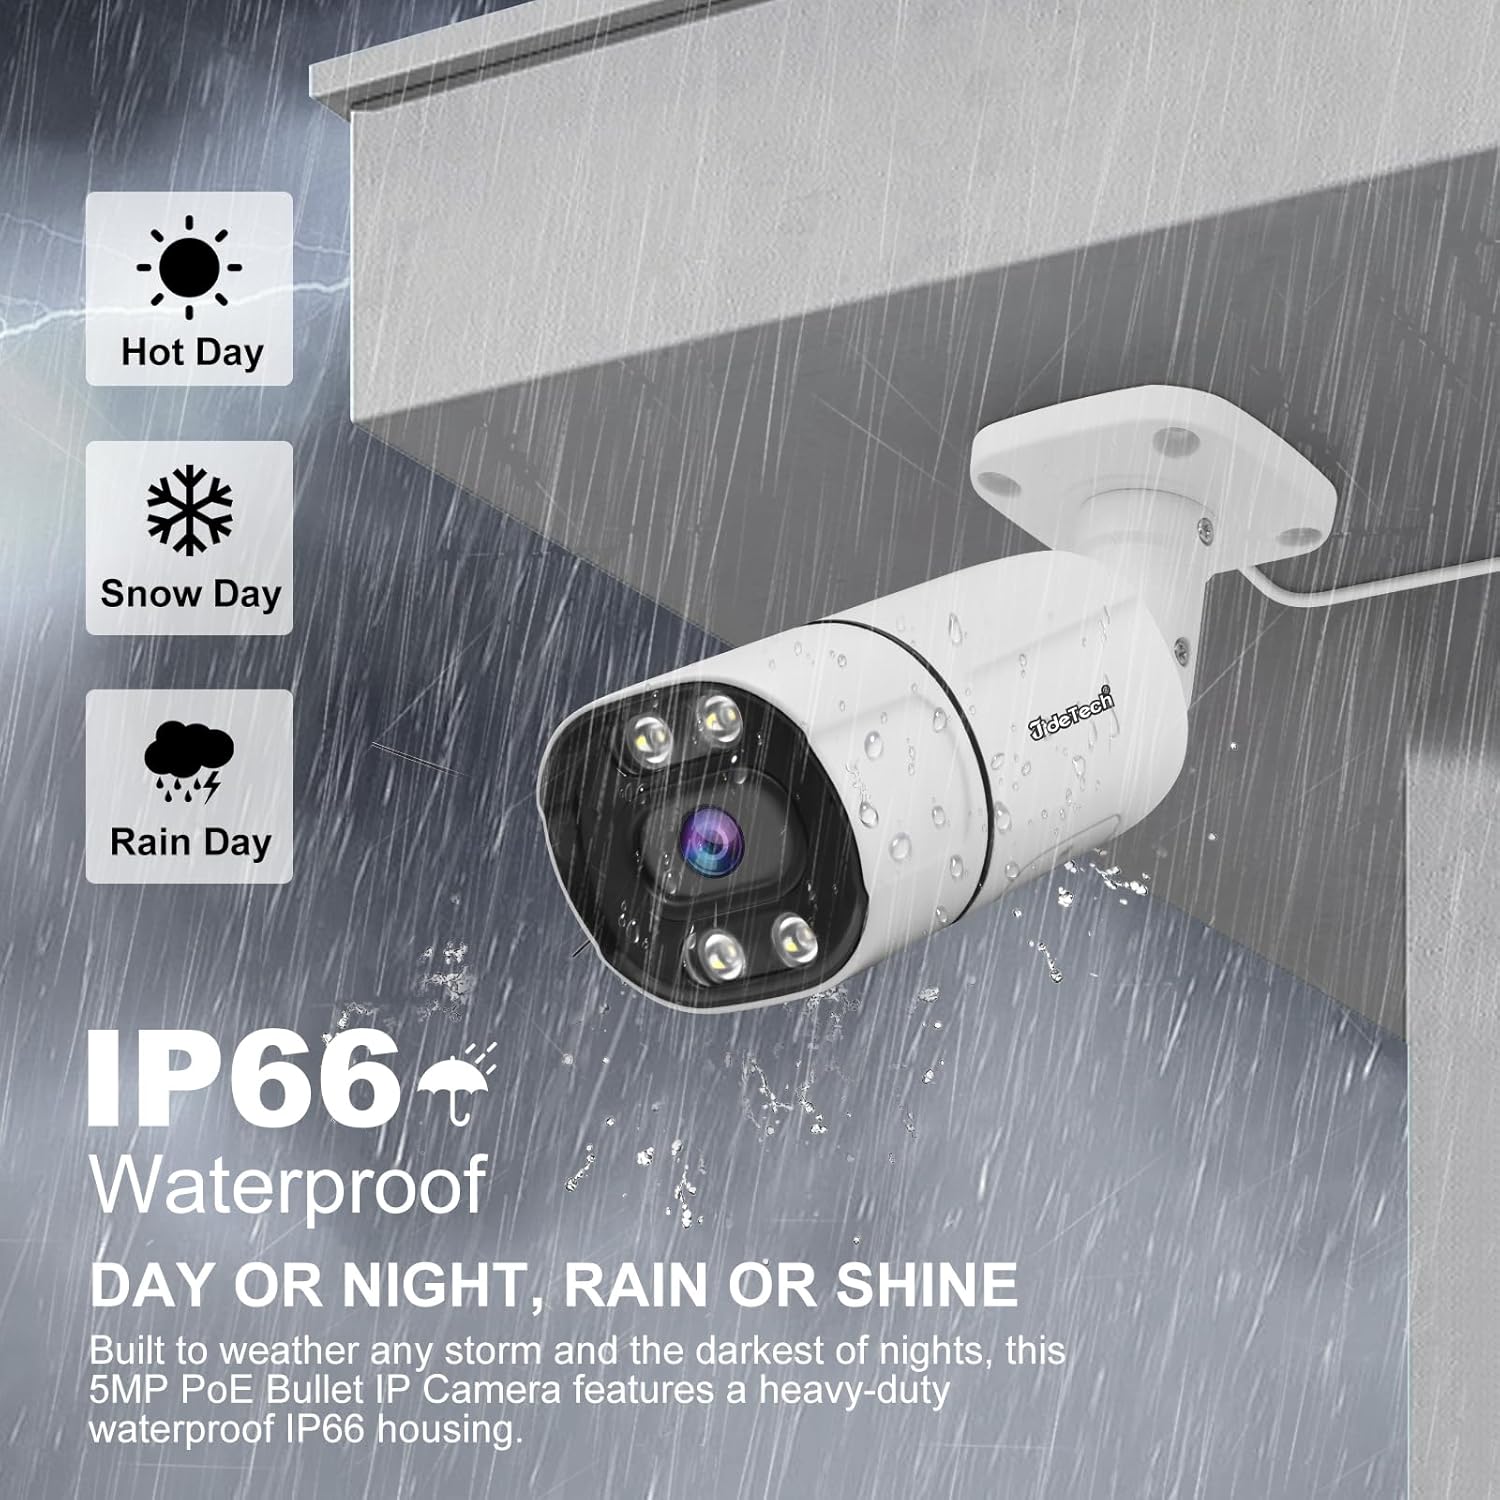
Figure 5.1: IP66 Waterproof Rating. This image emphasizes the camera's robust design, capable of operating reliably in diverse weather conditions.
6. Vianmääritys
If you encounter issues with your JideTech 5MP PoE IP Bullet Camera, refer to the following common troubleshooting steps:
- Ei kuvaa/offline-tilassa:
- Check all power connections to the camera, NVR, PoE switch/injector, and router.
- Verify that Ethernet cables are securely connected and not damaged.
- Ensure the camera and NVR/router are on the same network segment.
- Restart the camera, NVR, and router.
- Huono kuvanlaatu:
- Puhdista kameran linssi.
- Tarkista, onko kameran kuvausalueella esteitä view.
- Ensure sufficient lighting for night vision if applicable.
- Verify camera resolution settings in the app or NVR.
- Liiketunnistus ei toimi:
- Check motion detection sensitivity settings in the app.
- Varmista, että tunnistusalueet on määritetty oikein.
- Verify notification settings (app push, email) are enabled and correctly configured.
- Kaksisuuntaiset ääniongelmat:
- Tarkista mikrofonin ja kaiuttimen äänenvoimakkuusasetukset sovelluksesta.
- Ensure there are no physical obstructions blocking the microphone or speaker.
- Test network connectivity, as audio streaming requires a stable connection.
If these steps do not resolve the issue, please refer to the support section of this manual.
7. Tekniset tiedot
| Ominaisuus | Yksityiskohta |
|---|---|
| Mallin nimi | BC9 |
| Tehokas videoresoluutio | 5 MP (2560 1920 x XNUMX XNUMX) |
| Kuvataajuus | 30 kuvaa sekunnissa |
| Linssi | 3.6mm kiinteä tarkennus |
| Yönäköalue | Jopa 120 jalkaa (36 metriä) |
| Pimeänäön tyyppi | Color Night Vision, Infrared+LED |
| Audio | Kaksisuuntainen ääni (sisäänrakennettu mikrofoni ja kaiutin) |
| Havaitseminen | Human/Vehicle Detection, Motion Detection |
| Varastointi | Micro SD -kortti (jopa 512 Gt) |
| Yhteydet | PoE (Power over Ethernet), Ethernet (Wired), ONVIF, RTMP, RTSP |
| Virtalähde | Corded Electric (DC12V or PoE) |
| Sisä-/ulkokäyttö | Sisällä, ulkona |
| Vedenkestävyystaso | IP66 Vedenpitävä |
| Materiaali | Metalli |
| Mitat (P x L x K) | 7.87 x 3.94 x 2.76 tuumaa |
| Tuotteen paino | 1.26 kiloa |
| Yhteensopivat laitteet | Desktop, Digital Video Recorder, Laptop, Smartphone, Tablet |
| Videon koodaus | H.264, H.265, H.265+ |
8. Takuu ja tuki
JideTech is committed to providing quality products and customer satisfaction. For any issues or inquiries regarding your camera, please contact JideTech customer service.
- Ota yhteyttä: Refer to the contact information provided in the product packaging or on the official JideTech website. You may also contact the seller via the Amazon platform.
- Takuu: Information regarding the product warranty period and terms can be found in the included warranty card or on the manufacturer's websivusto.
Ask a question about this manual
Ask about setup, troubleshooting, compatibility, parts, safety, or missing instructions. Manuals+ will review the question and use this page’s manual context to help answer it.