
Tecmojo 12U/10in
Tecmojo 12U 10-inch Mini Server Rack Instruction Manual
Model: 12U/10in
Merkki: Tecmojo
1. Johdanto
This manual provides detailed instructions for the assembly, installation, operation, and maintenance of your Tecmojo 12U 10-inch Mini Server Rack. Please read this manual thoroughly before installation and operation to ensure proper use and to prevent damage or personal injury. Keep this document for future reference.
Tärkeimmät ominaisuudet:
- Compact 10-Inch Width & 12U Height: Designed for efficient equipment organization, ideal for desktops, home labs, small offices, or AV setups.
- Versatile Accessory Compatibility: Supports 10-inch rack-mountable equipment, including patch panels, network switches, cable organizers, and power strips.
- Durable Steel & Acrylic Construction: High-strength steel frame with premium acrylic side panels for durability and stability, suitable for NAS, custom clusters, and sensitive electronics.
- Open-Frame & Translucent Panel Design: Ensures superior airflow for optimal cooling. Translucent side panels offer dust protection and allow easy monitoring of device indicators.
- Complete Accessory Kit Included: Comes with 3 blank panels, 2 rack shelves, 1 SBC shelf, 2 micro adapter boards, and all necessary mounting hardware for a streamlined installation.
2. Pakkauksen sisältö
Varmista, että kaikki alla luetellut osat ovat mukana ja vahingoittumattomia ennen kokoamisen aloittamista.

Figure 2.1: Included Accessories and Hardware
Paketti sisältää:
- 12U Rack Frame (White)
- 2 Translucent Side Panels
- 2 Top Handles
- 3 Blank Panels (1U each)
- 2 Rack Shelves (10-inch)
- 1 SBC Shelf
- 2 Micro Adapter Boards (for Raspberry Pi 4/5)
- Asennuslaitteisto:
- 48 x 10-32 Screws
- 48 x 10-32 Cage Nuts
- 4 x M5x10mm ruuveja
- 4 x M4x14mm ruuveja
- 8 x M4x8mm ruuveja
- Ruuvimeisseli x 1
3. Asennus ja asennus
Follow these steps to assemble your Tecmojo 12U Mini Server Rack.
3.1. Rack Frame Assembly
- Attach Cross Beams and Side Panels:
Secure the two cross beams to the side panels using the provided M5x10mm screws. Ensure the panels are oriented correctly with the rack unit markings facing outwards.
Video 3.1.1: 1U Rack Mount SBC Shelf Assembly Demonstration of 10" Rack
This video demonstrates the assembly process for the 10-inch rack, including attaching cross beams and side panels.
- Install Bottom Panel:
Place the bottom panel into the assembled frame and secure it with the M4x8mm screws.
- Place Top Cover and Attach Handles:
Position the top cover onto the frame. Attach the two top handles using the M4x14mm screws, securing them through the top cover and into the frame.
3.2. Installing Shelves and Blank Panels
The rack includes various components for organizing your equipment. Use the provided 10-32 screws and cage nuts for mounting.
- Blank Panels:
Install blank panels at desired locations to cover unused rack units, improving airflow and aesthetics.
- SBC Shelf:
Mount the SBC shelf using the appropriate screws and mounting brackets. This shelf is designed to accommodate single-board computers like Raspberry Pi.
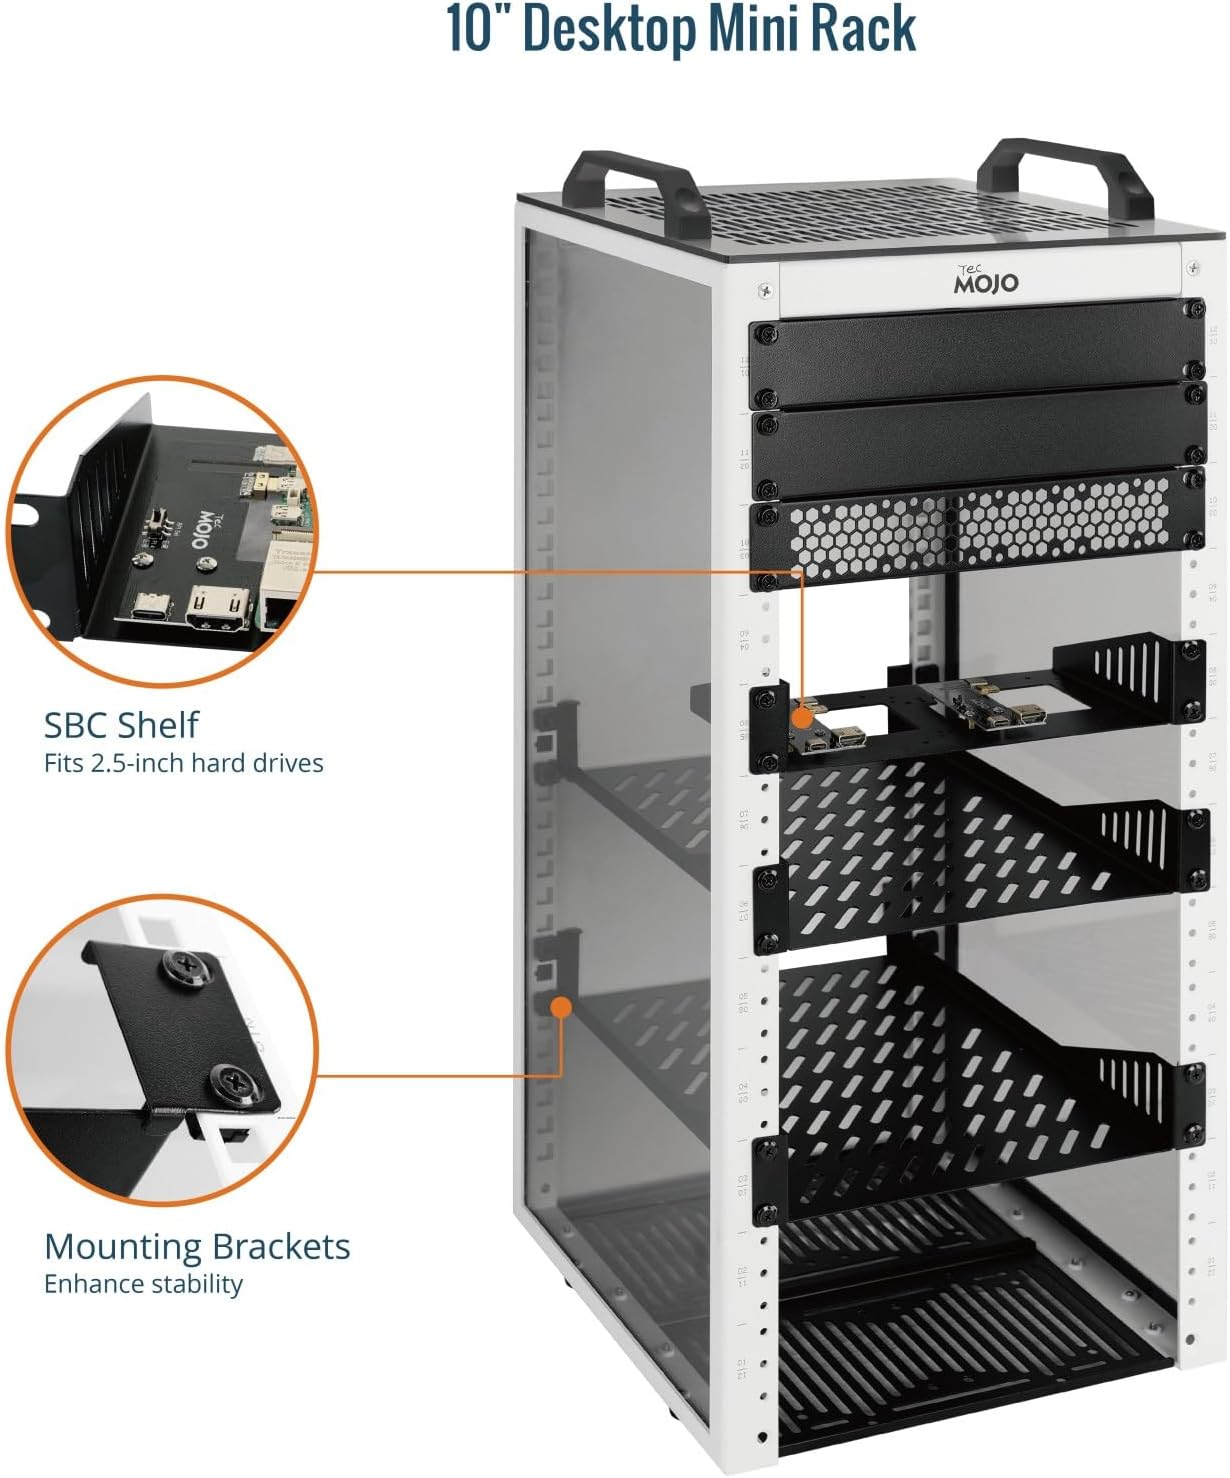
Figure 3.2.1: SBC Shelf and Mounting Brackets
This image shows the SBC shelf and its mounting brackets, designed to fit 2.5-inch hard drives and single-board computers.
- Rack Shelves:
Install the 10-inch rack shelves at your preferred height for other IT or AV equipment. Ensure they are securely fastened.

Figure 3.2.2: Rack Features including Shelves
This image highlights features like the acrylic top panel, non-slip feet, and tapped/square holes for versatile mounting of shelves and other accessories.
- Micro Adapter Boards:
Use the micro adapter boards to connect Raspberry Pi devices to the rack system. Refer to the specific Raspberry Pi documentation for proper connection.
Video 3.2.1: 1U Rack Mount SBC Shelf Assembly Demonstration of 10" Rack
This video demonstrates the assembly process for the 10-inch rack, including the installation of the SBC shelf and micro adapter boards.
Video 3.2.2: 10" Desktop Mini Rack Overview
Tämä video tarjoaa yleiskuvanview of the 10-inch desktop mini rack, showcasing its features and potential configurations.
Video 3.2.3: 10in Desktop Mini Rack Installation Guide
This video offers a detailed installation guide for the 10-inch desktop mini rack, covering various assembly steps.
4. Käyttöohjeet
The Tecmojo 12U Mini Server Rack is designed for passive operation, providing a structured environment for your IT and AV equipment.
- Laitteiden sijoitus: Distribute equipment evenly across the shelves to maintain balance and stability.
- Kaapelin hallinta: Utilize cable ties or other management solutions to keep cables organized and prevent obstruction of airflow.
- Ilmavirta: The open-frame design and perforated top cover promote natural convection. Ensure adequate space around the rack for optimal air circulation.
- Valvonta: The translucent side panels allow for visual inspection of device indicators without opening the rack.
5. Huolto
Regular maintenance ensures the longevity and optimal performance of your server rack.
- Puhdistus: Periodically wipe down the steel frame and acrylic panels with a soft, damp liinalla. Vältä hankaavia puhdistusaineita, jotka voivat naarmuttaa pintoja.
- Pölynpoisto: Use compressed air or a soft brush to remove dust from perforated areas and equipment.
- Ruuvien kireys: Tarkista säännöllisesti kaikki ruuvit ja kiinnikkeet varmistaaksesi, että ne ovat kireällä. Kiristä tarvittaessa uudelleen rakenteellisen eheyden säilyttämiseksi.
- Paneelin tarkastus: Inspect side panels for any cracks or damage. Replace if integrity is compromised.
6. Vianmääritys
Tässä osiossa käsitellään yleisiä ongelmia, joita saatat kohdata.
- Telineen epävakaus:
- Varmista, että kaikki ruuvit on kiristetty kunnolla.
- Verify the rack is placed on a flat, stable surface.
- Check that equipment weight is evenly distributed.
- Overheating Equipment:
- Ensure no cables are obstructing airflow through perforated panels.
- Verify adequate clearance around the rack for air circulation.
- Consider adding external cooling fans if necessary, especially for high-density setups.
- Difficulty Mounting Equipment:
- Ensure you are using the correct 10-32 screws and cage nuts for rack-mountable equipment.
- Verify the equipment is indeed 10-inch rack-compatible.
7. Tekniset tiedot

Kuva 7.1: Tuotteen mitat ja tärkeimmät tekniset tiedot
| Attribuutti | Yksityiskohta |
|---|---|
| Merkki | Tecmojo |
| Malli | 12U/10in |
| Väri | Valkoinen |
| Tuotteen mitat (S x L x K) | 10.23"S x 11.02"L x 25.03"K (260 mm S x 280 mm L x 635.8 mm K) |
| Materiaali | Alloy Steel (Frame), Acrylic (Side Panels) |
| Paino Kapasiteetti | 132 lbs (60 kg) |
| Tuotteen paino | 13.6 puntaa |
| Asennustyyppi | Rack Mount |
| Yhteensopivat laitteet | 10-inch Server, IT Equipment, A/V Devices, Raspberry Pi |
| Asennus vaaditaan | Kyllä |
8. Takuutiedot
This Tecmojo product is covered by a 3 vuoden valmistajan takuu. This warranty covers defects in materials and workmanship under normal use. It does not cover damage resulting from improper installation, accident, misuse, abuse, natural disaster, or unauthorized modification. For warranty claims, please contact Tecmojo customer support.
9. Tukea
For technical assistance, troubleshooting, or general inquiries, please contact Tecmojo customer support:
- Sähköposti: Sales@tecnmojo.com
- Puhelin: 806-878-mojo (6656)
- Websivusto: www.tecnmojo.com
Voit myös vierailla Tecmojo Official Store on Amazon lisätietoja tuotteesta ja tukiresursseista.
Ask a question about this manual
Ask about setup, troubleshooting, compatibility, parts, safety, or missing instructions. Manuals+ will review the question and use this page’s manual context to help answer it.