1. Johdanto
This user manual provides comprehensive instructions for the ASRock B860M-X Micro ATX motherboard. It covers installation, configuration, operation, and troubleshooting to ensure optimal performance and longevity of your system. The ASRock B860M-X is designed to support Intel Core Ultra processors with an LGA1851 socket, offering advanced features for a powerful computing experience.
2. Turvallisuustiedot
Noudata aina seuraavia turvaohjeita asennuksen ja käytön aikana:
- Irrota virtajohto pistorasiasta ennen kuin kosket mihinkään komponentteihin.
- Käytä antistaattista ranneketta estääksesi staattisten sähköpurkausten (ESD) aiheuttamat vauriot komponenteille.
- Käsittele komponentteja reunoista välttääksesi herkkien osien koskettamista.
- Varmista tietokoneen kotelon asianmukainen tuuletus ylikuumenemisen estämiseksi.
- Älä altista emolevyä kosteudelle tai äärimmäisille lämpötiloille.
3. Pakkauksen sisältö
Varmista, että emolevyn pakkauksessa on kaikki tarvittavat osat:
- ASRock B860M-X Micro ATX Motherboard
- Pika-asennusopas
- Lainsäädäntöä koskeva huomautus
- SATA-datakaapelit
- I / O-suojus
- M.2-ruuvit/tuet

Image: ASRock B860M-X Motherboard and included accessories.
4. Emolevyn asettelu
Familiarize yourself with the key components and connectors on your ASRock B860M-X motherboard.

Kuva: Ylhäältä alas view of the ASRock B860M-X Micro ATX Motherboard, highlighting the CPU socket, RAM slots, and various connectors.
Taka I/O-paneeli
Takapaneelissa on useita portteja oheislaitteiden kytkemistä varten.
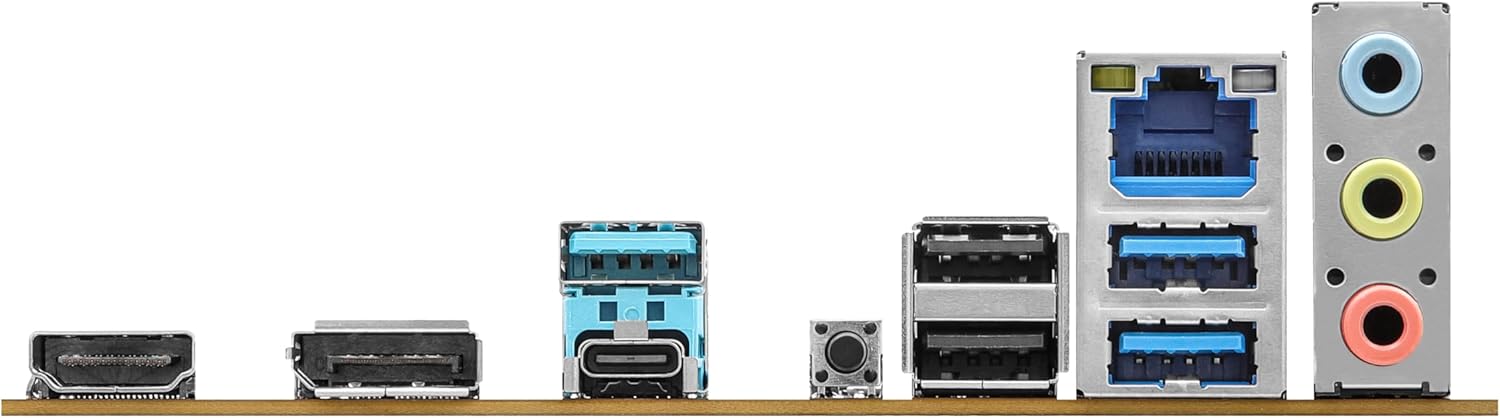
Image: Close-up of the rear I/O panel, showing USB ports, HDMI, DisplayPort, Ethernet, and audio jacks.
5. Asennus ja asennus
Noudata näitä ohjeita emolevyn ja komponenttien oikeanlaiseen asentamiseen.
5.1 Suorittimen asennus (LGA1851)
- Avaa suorittimen liitännän vipu.
- Carefully align the CPU with the socket, ensuring the notches match.
- Aseta suoritin varovasti kantaan pakottamatta sitä.
- Sulje liittimen vipu kiinnittääksesi suorittimen.
5.2 Muistin (RAM) asennus
The ASRock B860M-X supports 2 x DDR5 DIMMs for dual-channel memory up to 9066+ MHz (OC).
- Avaa DIMM-paikan molemmissa päissä olevat pidikkeet.
- Align the memory module with the slot, ensuring the notch on the module matches the slot key.
- Paina muistimoduulin molempia päitä lujasti alas, kunnes klipsit napsahtavat paikoilleen.
5.3 Tallennusaseman asennus (M.2 ja SATA)
The motherboard supports M.2 drives and up to 4 SATA3 6.0 Gb/s devices.
- M.2 SSD: Locate the M.2 slot(s). Insert the M.2 SSD into the slot at an angle and secure it with the provided screw/standoff.
- SATA-asemat: Connect SATA data cables from your storage devices (HDDs/SSDs) to the SATA3 ports on the motherboard. Connect power cables from your power supply to the SATA devices.
5.4 Laajennuskortin asennus (PCIe)
The motherboard features PCIe slots for graphics cards and other expansion cards.
- Align your graphics card or other PCIe card with the appropriate slot.
- Paina korttia lujasti alaspäin, kunnes se on oikein paikallaan ja pidike lukittuu.
- Secure the card to the PC case with a screw.
5.5 Virtalähteen liitännät
Kytke virtalähteen 24-nastainen ATX-virtaliitin ja 8-nastainen CPU-virtaliitin emolevyn vastaaviin portteihin.
5.6 Etupaneelin liitännät
Connect the front panel cables (power button, reset button, USB ports, audio jacks, etc.) to their respective headers on the motherboard. Refer to the motherboard diagram for exact locations.
6. Käyttöohjeet
6.1 Ensimmäinen käynnistys
After assembling your system, connect your monitor, keyboard, and mouse. Power on your system. The system should display the ASRock logo and enter the BIOS setup or begin the operating system installation process.
6.2 BIOS/UEFI-asetukset
Päästäksesi BIOS-asetusohjelmaan, paina Poistaa or F2 key during the Power-On Self-Test (POST) screen. Here you can configure various system settings, including boot order, CPU settings, memory timings, and fan speeds.
6.3 Ohjaimen asennus
After installing your operating system, install the necessary drivers for your motherboard components (chipset, audio, LAN, graphics, etc.) from the ASRock website or the included driver CD/USB drive.
7. Huolto
7.1 BIOS-päivitys
Keeping your BIOS updated ensures compatibility with new hardware and improves system stability. ASRock provides two methods for BIOS updates: USB BIOS Flashback and Instant Flash.
Video: ASRock Motherboard BIOS Update Tutorial. This video demonstrates two methods for updating your ASRock motherboard's BIOS: USB BIOS Flashback and Instant Flash.
7.2 Puhdistus
Regularly clean your PC case and motherboard to prevent dust buildup, which can lead to overheating and component failure. Use compressed air to remove dust from fans, heatsinks, and other components. Ensure the system is powered off and unplugged before cleaning.
8. Vianmääritys
If you encounter issues, refer to these common troubleshooting tips:
- Ei virtaa: Check all power connections (24-pin ATX, 8-pin CPU, GPU, SATA). Ensure the power supply switch is on.
- Ei näyttöä: Verify monitor connection and input source. Reseat the graphics card and memory modules.
- Järjestelmän epävakaus: Check memory compatibility and seating. Ensure CPU cooler is properly installed. Update BIOS and drivers.
- Käynnistysongelmat: Check boot order in BIOS. Verify storage device connections.
9. Tekniset tiedot
Key technical specifications for the ASRock B860M-X Micro ATX Motherboard:
| Ominaisuus | Erittely |
|---|---|
| Merkki | ASRock |
| Mallin nimi | B860M-X |
| CPU-liitäntä | LGA 1851 |
| Yhteensopivat prosessorit | Intel Core Ultra |
| Piirisarjan tyyppi | Intel B860 |
| RAM-muistitekniikka | DDR5 |
| Muistin kellonopeus | 9066 MHz (ylitaajuus) |
| Suurin muistikapasiteetti | 128 Gt |
| Muistipaikat saatavilla | 2 |
| SATA-porttien kokonaismäärä | 4 |
| Total PCIe Ports | 3 |
| Grafiikkatulostusasetukset | 1 HDMI, 1 DisplayPort |
| Ethernet-porttien lukumäärä | 1 |
| Äänikoodekki | Realtek ALC1220 7.1-kanavainen HD-äänikoodekki |
| Power Phase Design | 7+1+1+1+1 |
| RGB valaistus | Polykromaattinen RGB |
Video: Yliview of Intel B860 Series Motherboards. This video highlights key features and design aspects of the ASRock B860 motherboard series.
10. Takuu ja tuki
ASRock provides a 3-year warranty for this product. For technical support, driver downloads, and further information, please visit the official ASRock websivusto. Löydät sieltä myös lisää tukiresursseja ja usein kysyttyjä kysymyksiä.
For warranty claims or service, please contact your retailer or authorized ASRock service center with your proof of purchase.