1. Tuote ohiview
The GODIYMODULES 1.3 inch White OLED Display combined with an EC11 Rotary Encoder Module is an integrated component designed for microcontroller projects, particularly with Arduino. This module features a 1.3-inch OLED display with an IIC (I2C) interface and an EC11 rotary encoder for user input. It also includes independent return and confirmation buttons, offering a compact and versatile user interface solution.
2. Mitä laatikossa on
- 1 x 1.3 inch White OLED Display with EC11 Rotary Encoder Module
- 1 x Rotary Encoder Knob
- 1 x Set of Mounting Hardware (Nut and Washer for encoder)
- 1 x 9-pin Header (for connections)

Image: The 1.3 inch White OLED Display with EC11 Rotary Encoder Module, along with its rotary knob and separate header pins.
3. Tekniset tiedot
| Ominaisuus | Kuvaus |
|---|---|
| Näytön tyyppi | 1.3 inch White OLED |
| Enkooderin tyyppi | EC11 Rotary Encoder |
| Käyttöliittymä | IIC (I2C) |
| Käyttö Voltage | 3.3 V (tuotekuvauksen mukaisesti) |
| OLED Driver Chip | SH1106 |
| Encoder Handle Length | 15 mm |
| Enkooderin pulssit | 20 pulssia per kierros |
| Enkooderin kytkin | Integrated push-button switch |
| Lisäpainikkeet | Confirm and Back buttons |

Image: Module dimensions for integration into projects.
4. Asennus
4.1 Pin-kytkentäkaavio
Refer to the following diagram for the module's pin assignments to ensure correct wiring with your microcontroller.
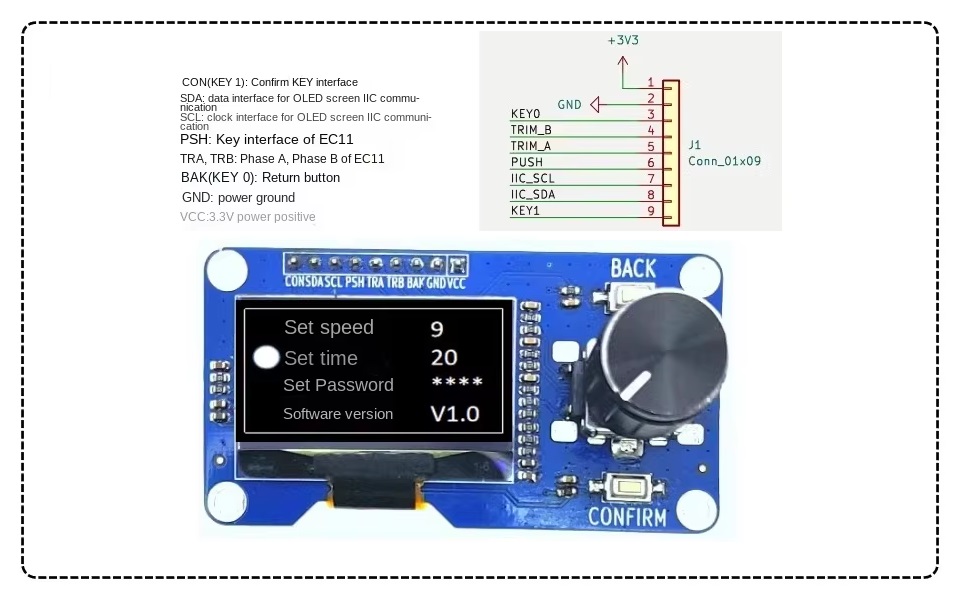
Image: Detailed pinout for connecting the module to a microcontroller.
- CON (KEY 1): Confirm Button Interface
- SDA: IIC Data Interface for OLED Screen Communication
- SCL: IIC Clock Interface for OLED Screen Communication
- PSH: Key Interface of EC11 (Push-button switch)
- TRA, TRB: Phase A, Phase B of EC11 (Rotary encoder outputs)
- BAK (KEY 0): Paluu-painike
- GND: Power Ground
- VCC: 3.3V Virtapositiivinen
4.2 Attaching the Rotary Knob
To use the rotary encoder, attach the provided knob to the encoder shaft. Ensure it is firmly seated for proper operation.
Video: Demonstration of attaching a rotary knob to an encoder module. This process is similar for the EC11 module.
5. Käyttöohjeet
5.1 Rotary Encoder Functionality
- Kierto: The EC11 rotary encoder provides incremental feedback when rotated clockwise or counter-clockwise. This can be used for menu navigation, value adjustment, or other continuous input.
- Paina nappia: The encoder shaft can be pressed down, acting as a push-button switch. This is typically used for selection or confirmation.
5.2 Dedicated Buttons
- Confirm Button (CON/KEY 1): Activates a selected option or confirms an action.
- Back Button (BAK/KEY 0): Navigates back in a menu or cancels an action.
5.3 OLED-näytön käyttö
The 1.3 inch White OLED display communicates via the IIC (I2C) interface. It can be programmed to display text, graphics, and user interface elements. Libraries such as Adafruit_SH110X (as noted by a user review for SH110X driver) are commonly used for controlling SH1106-based OLED displays with microcontrollers like Arduino.

Kuva: esimample of a menu interface displayed on the OLED screen, demonstrating typical usage.
6. Huolto
- Pidä moduuli puhtaana ja vapaana pölystä ja kosteudesta.
- Avoid exposing the OLED display to direct sunlight for extended periods to prevent screen degradation.
- Handle with care to prevent physical damage to the display or encoder components.
- Ensure proper power supply (3.3V) to avoid damage to the module.
7. Vianmääritys
- Näyttö ei syty:
- Verify power connections (VCC and GND) are correct and providing 3.3V.
- Check IIC (SDA, SCL) connections for continuity and correct pin assignment.
- Ensure the correct display library (e.g., Adafruit_SH110X) is installed and initialized in your code.
- Confirm the IIC address of the OLED module. Common addresses are 0x3C or 0x3D.
- Pyörivä enkooderi ei vastaa:
- Check connections for TRA, TRB, and PSH pins to your microcontroller.
- Ensure your code correctly reads the encoder's state changes and button presses.
- Verify the knob is securely attached to the encoder shaft.
- Painikkeet eivät toimi:
- Confirm the CON and BAK pins are correctly wired and configured as inputs in your code.
- Ensure pull-up resistors are enabled for the button pins if not externally provided.
8. Takuu ja tuki
This product is covered by a standard manufacturer's warranty against defects in materials and workmanship. For technical support, troubleshooting assistance, or warranty claims, please contact GODIYMODULES customer service through your purchase platform. Please provide your order number and a detailed description of the issue.