
1. Johdanto
This manual provides essential information for the safe and efficient operation of your TOPBULL 40A MPPT Solar Charge Controller. This device is designed to optimize power harvesting from your solar panels and efficiently charge various battery types in 12V or 24V systems. It features advanced Maximum Power Point Tracking (MPPT) technology, comprehensive protection functions, and a user-friendly LCD interface.

Kuva 1: Edessä view of the TOPBULL 40A MPPT Solar Charge Controller, showing the LCD display and control buttons.
2. Turvallisuusohjeet
Please read all safety instructions carefully before installation and operation. Failure to follow these instructions may result in personal injury or damage to the controller or other components.
- Varmista, että kaikki liitännät ovat oikein ja tukevasti kiinni ennen virran kytkemistä.
- Do not disassemble or attempt to repair the controller. Refer to qualified personnel for service.
- Asenna ohjain hyvin ilmastoituun tilaan, kauas syttyvistä materiaaleista ja kosteudesta.
- Kytke aina ensin akku ohjaimeen, sitten aurinkopaneeli ja lopuksi kuorma. Irrota päinvastaisessa järjestyksessä.
- Käytä asianmukaisia henkilönsuojaimia, mukaan lukien silmäsuojaimia, työskennellessäsi akkujen ja sähköjärjestelmien kanssa.
- The controller includes multiple electronic protections such as reverse polarity, overcharge, over-discharge, overload, short-circuiting, TVS lightning, overpower, reverse current, and overtemperature protection. However, proper installation is crucial for optimal safety.
3. Pakkauksen sisältö
Varmista, että pakkauksessa on kaikki tarvittavat osat:
- TOPBULL 40A MPPT Solar Charge Controller
- Kiinnitysruuvit
- Käyttöopas (tämä asiakirja)

Image 2: Contents of the product package, showing the controller, user manual, and mounting hardware.
4. Tuote ohiview
The TOPBULL 40A MPPT Solar Charge Controller features a clear LCD display and intuitive buttons for monitoring and configuration. It is equipped with terminals for solar panel input, battery connection, DC load output, and dual USB ports.
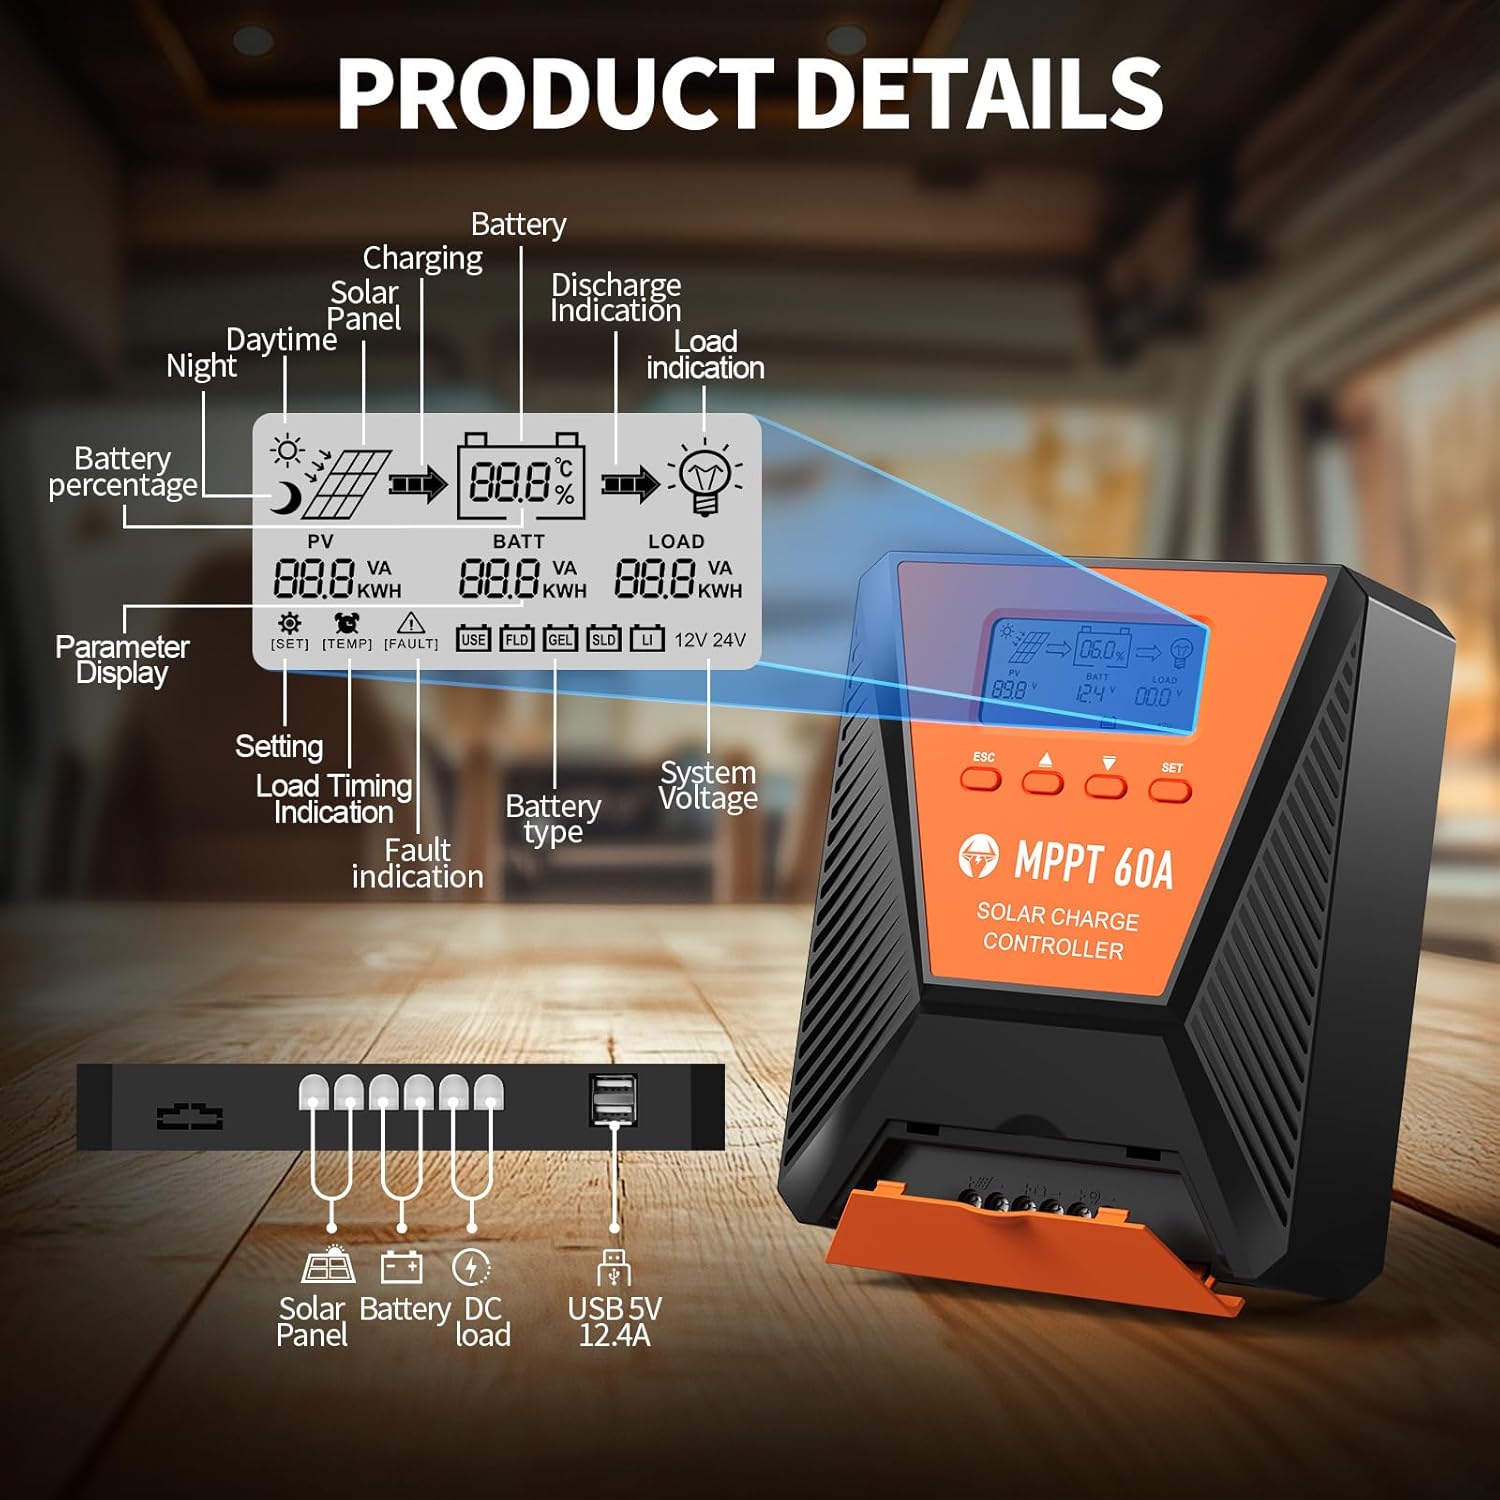
Kuva 3: Yksityiskohtainen view of the controller's LCD display, showing various indicators and parameters, along with the connection ports at the bottom.
LCD-näytön ilmaisimet:
- Reportteri: Aurinkopaneeli voltage ja teho.
- BATT: Akun tilavuustage, charge status, and type.
- LADATA: Load status and power.
- Akun prosenttiosuustage: Akun nykyinen varaustaso.
- Charging/Discharge Indication: Arrows indicating power flow.
- Vian ilmaisu: Error codes displayed if issues occur.
- System Voltage: Automatically detected 12V or 24V.
Ohjauspainikkeet:
- ESC: Exit menu or cancel setting.
- YLÖS/ALAS-nuolet: Navigoi valikoissa tai säädä arvoja.
- ASETA: Enter menu or confirm setting.
5. Asennus ja asennus
Asenna aurinkolatausohjain oikein noudattamalla näitä ohjeita:
- Asennus: Choose a suitable location for the controller, ensuring adequate ventilation and protection from direct sunlight, high temperatures, and moisture. Use the provided mounting screws to secure the controller.
- Akun liitäntä: Connect the battery to the controller's battery terminals first. Ensure correct polarity (positive to positive, negative to negative). The controller will automatically detect the 12V or 24V system voltage.
- Aurinkopaneelin liitäntä: Connect the solar panel to the controller's solar input terminals. Ensure correct polarity. The controller will begin charging the battery.
- DC Load Connection (Optional): Connect your DC loads to the load terminals. Ensure correct polarity.

Image 4: Connection diagram illustrating how to connect the solar panel, battery bank, inverter (for AC load), and DC load to the MPPT controller.
The controller supports various deep cycle battery types, including FLD, LiFePO4, SLD, GEL, and AGM. It also supports 0V lithium battery charging (lithium battery activation function).

Image 5: The controller is compatible with various 12V/24V battery types, automatically identifying voltage and supporting custom parameters and 0V lithium battery charging.
6. Käyttöohjeet
LCD Display and Parameter Settings:
The LCD display provides real-time information about your solar charging system. Use the four buttons (ESC, UP, DOWN, SET) to navigate menus and adjust parameters.
- Paina SARJA päästäksesi päävalikkoon.
- Käyttää YLÖS/ALAS to scroll through options such as battery type, load timer settings, and other customizable parameters.
- Paina SARJA again to select an option and then use YLÖS/ALAS muuttaa arvoja.
- Paina SARJA to confirm changes, or ESC poistuaksesi tallentamatta.
Latausprosessi:
The controller utilizes a smart 4-staglatausprosessi akun kunnon ja käyttöiän optimoimiseksi:
- Irtolataus: Pikalataus, jolla akku latautuu noin 80 prosenttiin.
- Absorptiomaksu: Charging at a constant voltage to bring the battery to 100% capacity.
- Kelluva veloitus: Maintaining the battery at full charge with a lower voltage.
- Equalization Charge (for specific battery types): Periodically overcharging to balance cell voltages.
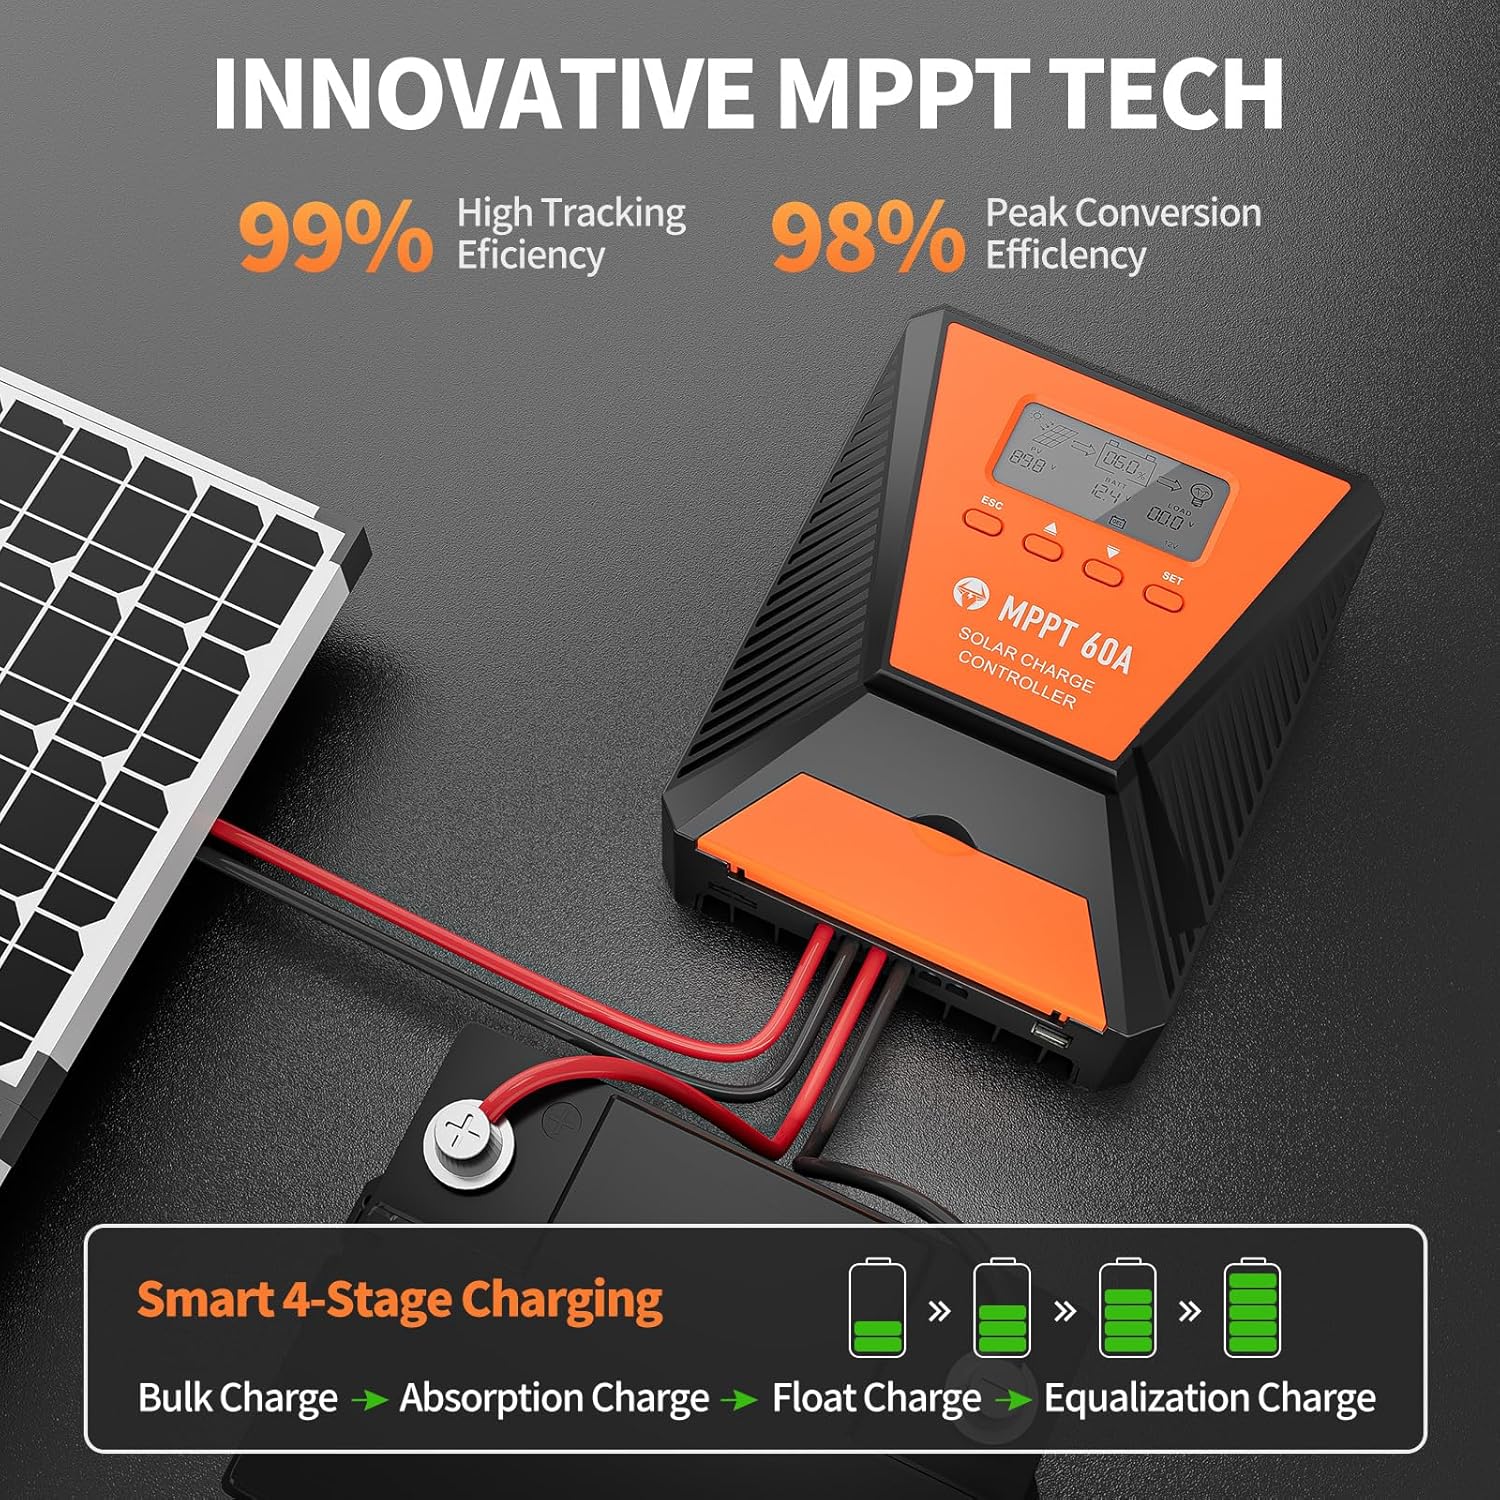
Image 6: The controller features 99% high tracking efficiency and 98% peak conversion efficiency, along with a smart 4-stage latausprosessi.
USB-lataus:
The controller includes dual USB ports for charging electronic devices. These ports provide 5V DC output.
7. Huolto
Regular maintenance ensures optimal performance and extends the lifespan of your solar charge controller and battery system.
- Tarkista liitännät: Tarkista säännöllisesti kaikkien johtojen liitännät kireyden ja korroosion varalta.
- Puhdas ohjain: Pidä ohjain puhtaana pölystä ja roskista. Käytä puhdistukseen kuivaa liinaa.
- Ilmanvaihto: Ensure the installation area remains well-ventilated to prevent overheating. The controller is designed with a metal case and dual high-speed intelligent fans for enhanced heat dissipation.
- Akun tarkastus: Follow the manufacturer's maintenance guidelines for your specific battery type.
- Lämpötilan kompensointi: The controller features a temperature compensation function that automatically adjusts charging and discharging parameters to prolong battery life.
8. Vianmääritys
If you encounter issues with your controller, refer to the LCD display for error codes and consult the following common troubleshooting steps:
- Ei näyttöä: Tarkista akun liitännät ja varmista, että akussa on riittävästi virtaatage.
- Ei latausta: Verify solar panel connections and ensure adequate sunlight. Check for any fault indications on the LCD.
- Lataus ei toimi: Check load connections and ensure the load is within the controller's rated capacity. Verify load timer settings.
- Virhekoodit: The LCD display will show specific error codes for various issues (e.g., overvoltage, aliarvioitage, overtemperature, short circuit). Refer to the controller's internal error code list (if provided in a separate document) for detailed explanations and solutions.
The controller incorporates 9 intelligent protection features to safeguard your system:
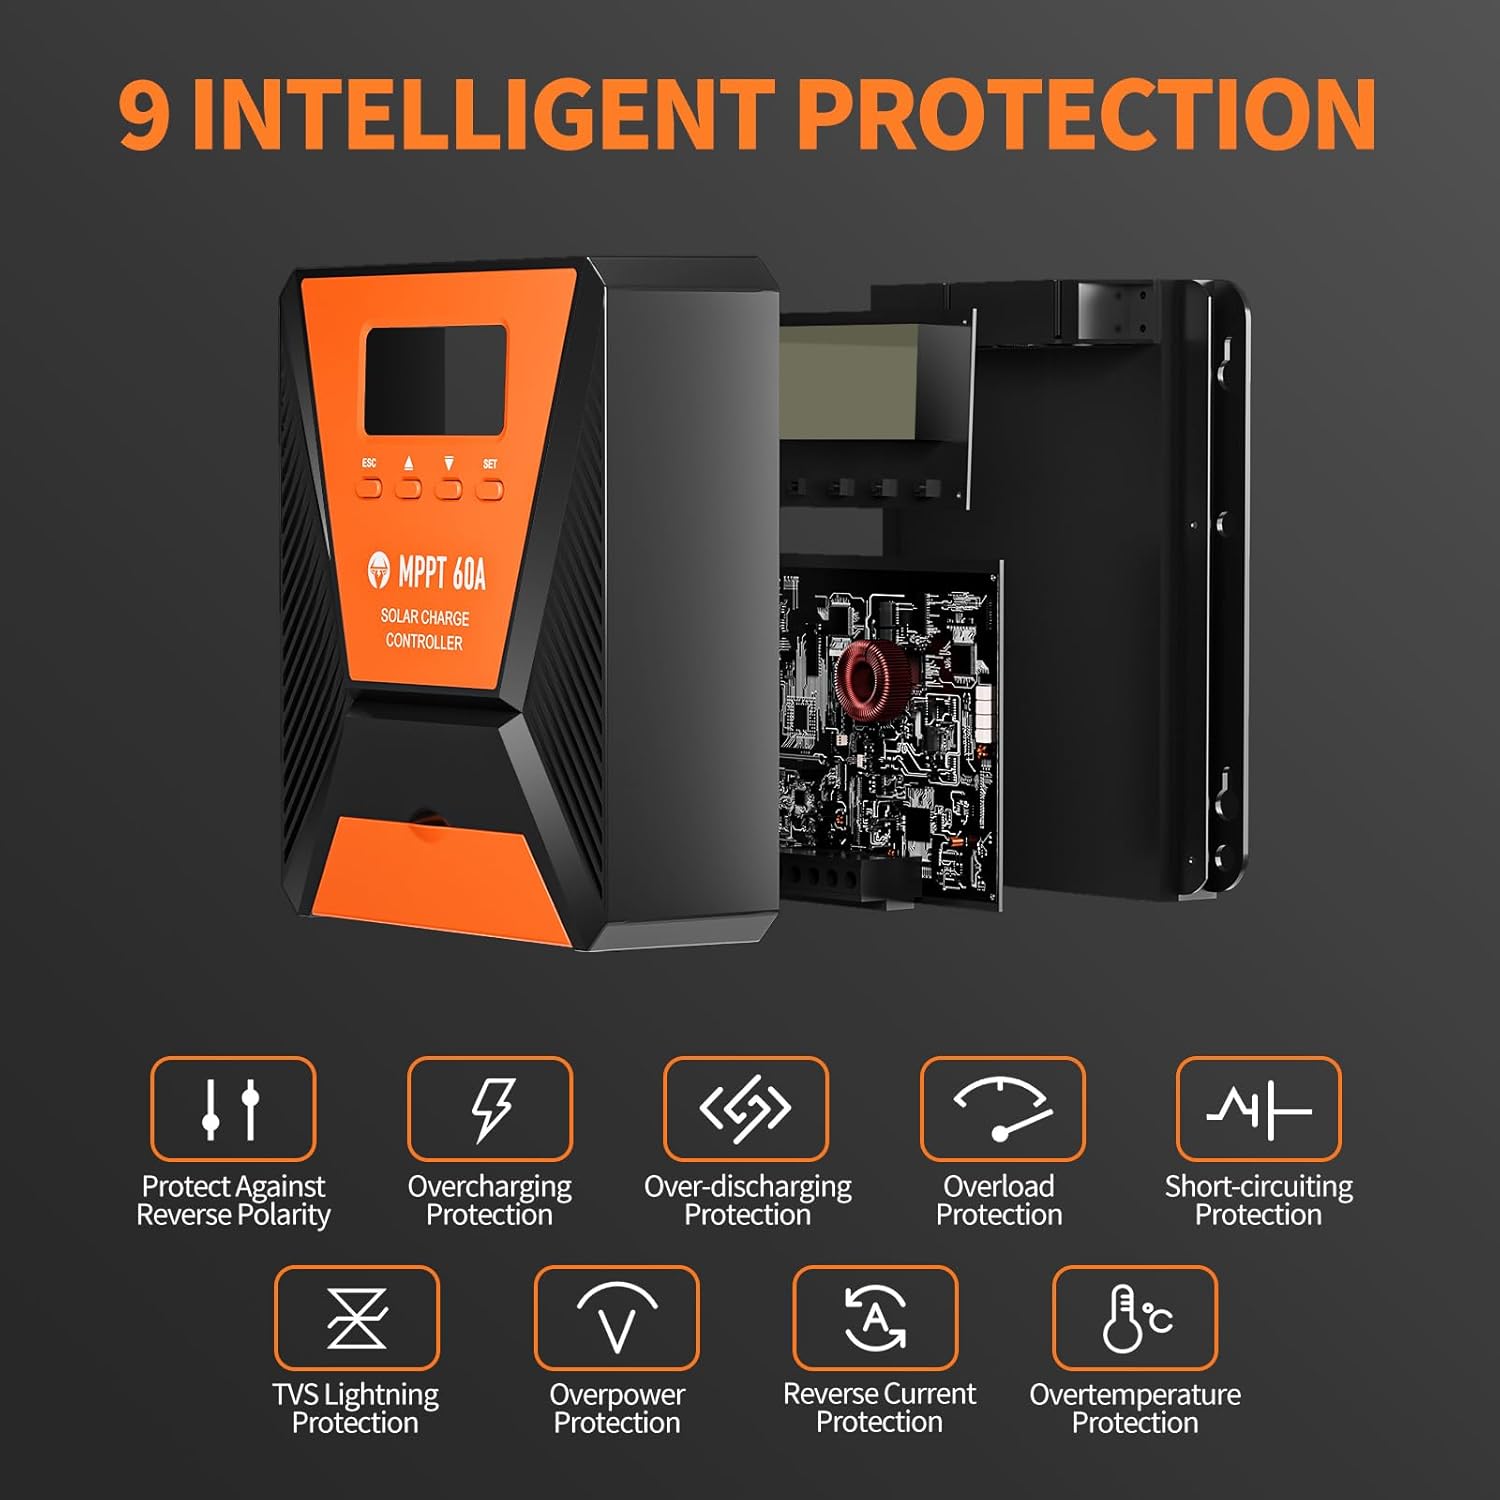
Image 7: The controller provides 9 intelligent protection features, including protection against reverse polarity, overcharging, over-discharging, overload, short-circuiting, TVS lightning, overpower, reverse current, and overtemperature.
9. Tekniset tiedot
| Ominaisuus | Erittely |
|---|---|
| Malli | 40A |
| Merkki | TOPBULL |
| System Voltage | 12V/24V Automatic Recognition |
| Seurannan tehokkuus | >99 % |
| Huippukonversiotehokkuus | Max 98 % |
| Yhteensopivat akkutyypit | FLD, LiFePO4, SLD, GEL, AGM |
| Max PV Input Voltage | 100V DC |
| Max Solar Input Power (12V System) | 720W |
| Max Solar Input Power (24V System) | 1440W |
| USB-lähtö | Dual USB Ports, 5V DC |
| Näytön tyyppi | LCD |
| Mitat (paketti) | 23.6 x 22.1 x 10.59 cm |
| Paino (pakkaus) | 1.25 kg |
| Mukana tarvikkeet | Kiinnitysruuvit |
10. Takuu ja tuki
TOPBULL is committed to providing professional technical support. If you have any questions or require assistance with your MPPT solar charge controller, please contact our customer service. We strive to meet your needs and provide the best possible support.