
1. Johdanto
This manual provides instructions for the installation, operation, and maintenance of your TOPBULL 60A MPPT Solar Charge Controller. This intelligent regulator is designed to efficiently manage power flow from solar panels to various battery types, ensuring optimal charging and system protection. Please read this manual thoroughly before installation and use.
2. Tärkeimmät ominaisuudet
- Edistynyt MPPT-teknologia: Achieves up to 99% tracking efficiency and 98% peak conversion efficiency for maximum power harvest from solar panels.
- Automaattinen VoltagTunnustus: Tunnistaa automaattisesti 12V tai 24V DC -järjestelmän tilavuustage.
- Laaja akkuyhteensopivuus: Supports various deep cycle battery types including Sealed, Gel, Flooded (FLD), Lithium Iron Phosphate (LiFePO4), and AGM batteries. Includes 0V Li-ion battery charging (activation) support.
- Comprehensive Electronic Protections: Built-in safeguards against reverse polarity, battery overcharge, battery overdischarge, overload, short-circuit, TVS lightning, overpower, over-temperature, and reverse current.
- Intuitiivinen LCD-näyttö: Provides real-time solar charging and battery operation information, customizable parameters, and error codes.
- Dual USB -portit: Conveniently charge electronic devices (5V, 2.4A total).
- Tehokas lämmönpoisto: Features a durable metal casing and dual high-speed intelligent fans for optimal thermal management, enhancing longevity and performance.
- Lämpötilan kompensointi: Automatically adjusts charging and discharging parameters based on ambient temperature to prolong battery life.
3. Tuote ohiview
Familiarize yourself with the components and display of the solar charge controller.

Kuva 3.1: Edessä view of the TOPBULL 60A MPPT Solar Charge Controller, showing the LCD display and control buttons.
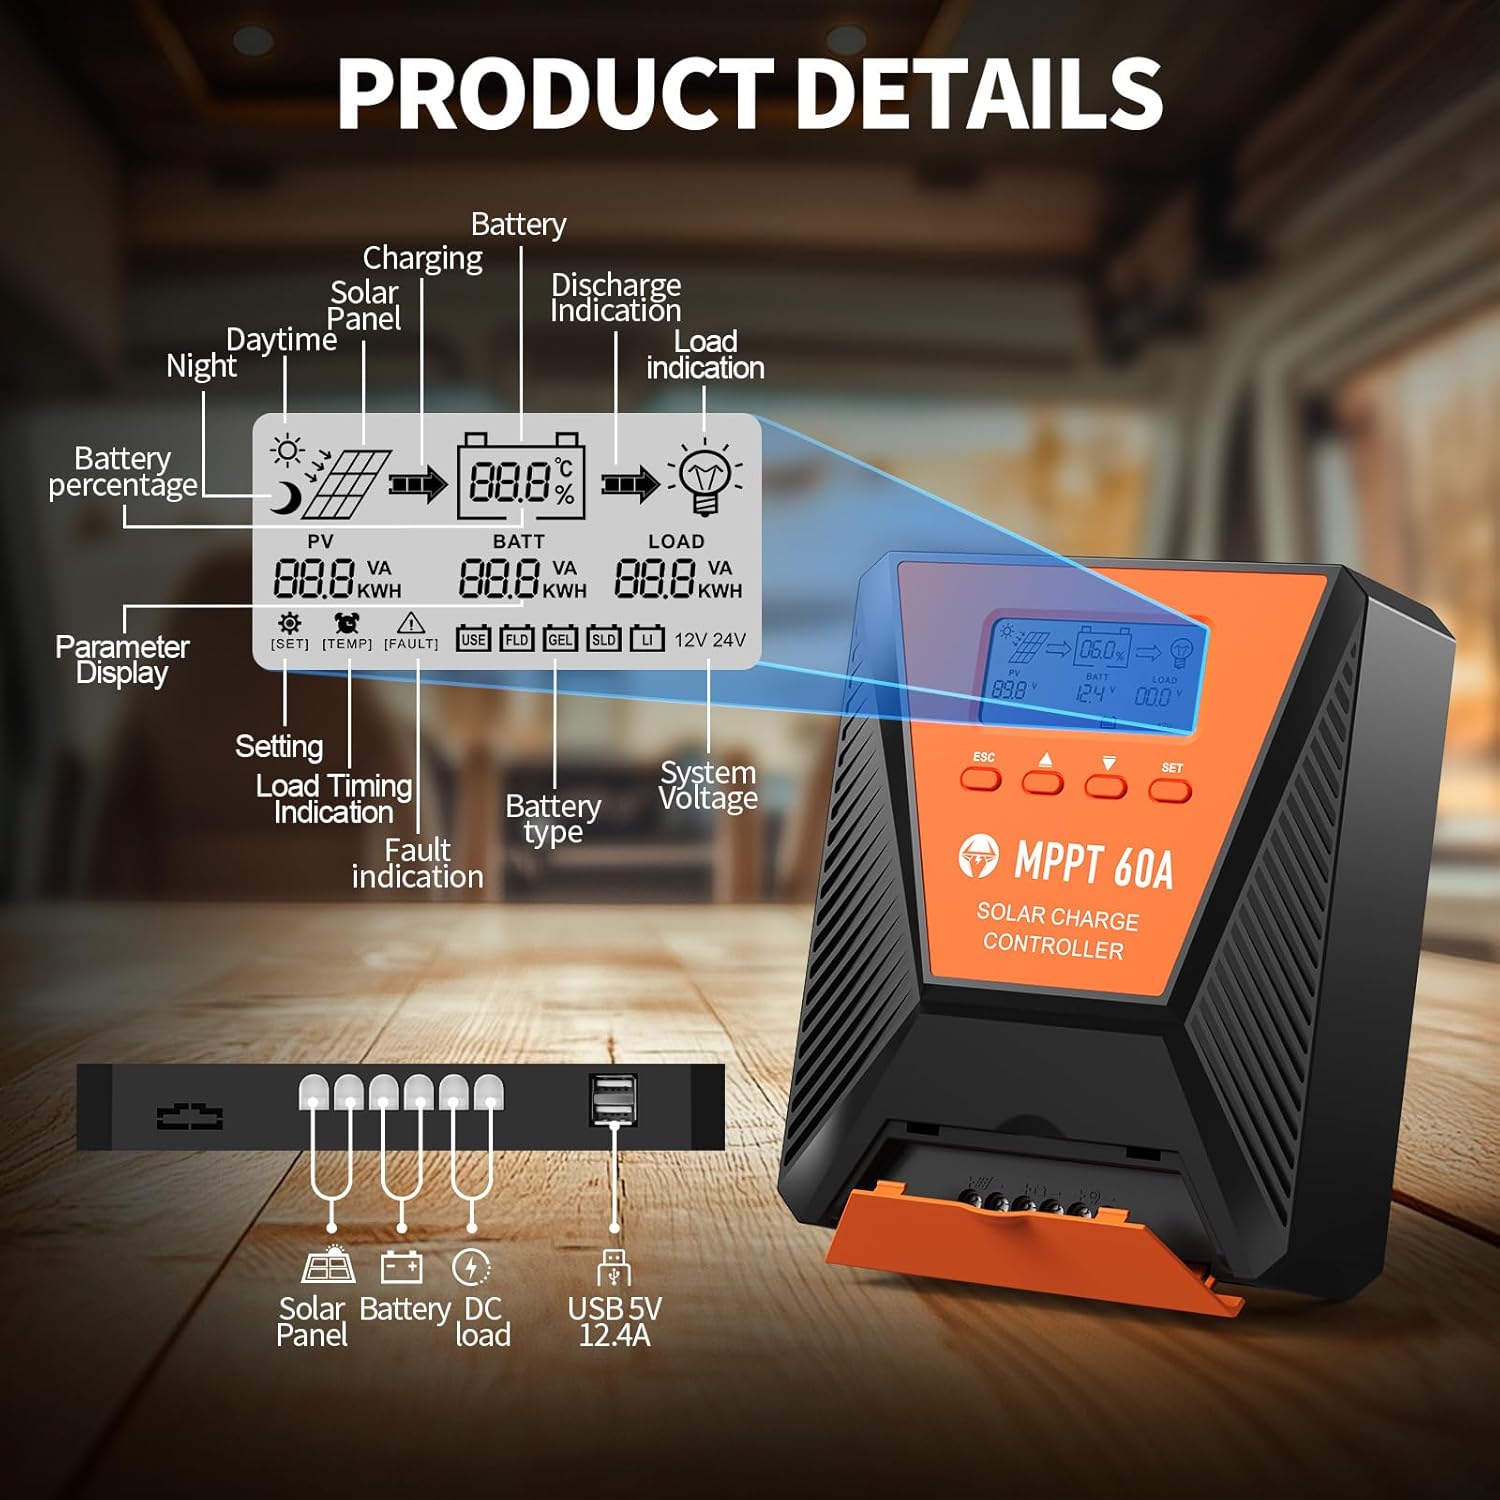
Kuva 3.2: Detailed diagram illustrating the LCD display elements and the connection ports at the bottom of the controller. The display shows PV voltage, akkutilavuustage, load status, battery percentage, and various indicators. The ports include connections for solar panel, battery, DC load, and dual USB 5V 2.4A outputs.
3.1. LCD-näytön ilmaisimet
- PV (Photovoltaic): Näyttää aurinkopaneelien tilavuudentage ja teho.
- Akku: Näyttää akun tilavuudentage, charge status, and type.
- LADATA: Indicates load status and power consumption.
- Akun prosenttiosuustage: Akun varaustason visuaalinen esitys.
- System Voltage: Displays 12V or 24V system recognition.
- Parametrinäyttö: Shows current settings and values.
- Vian ilmaisu: Alerts for system errors.
3.2. Ohjauspainikkeet
- ESC: Used to switch load (manual switch) and exit setup menus.
- Ylöspäin osoittava nuoli (▲): Navigates up through main interface pages to view parameters; increases values in setup mode.
- Alaspäin osoittava nuoli (▼): Navigates down through main interface pages to view parameters; decreases values in setup mode.
- ASETA: Enters setting mode, confirms selections, and saves changes. If no key operation for 10 seconds, it exits setting mode automatically.
4. Asennus ja asetukset
4.1. Turvaohjeet
- Varmista, että kaikki liitännät ovat oikein ja tukevasti kiinni ennen virran kytkemistä.
- Kytke aina ensin akku, sitten aurinkopaneeli ja lopuksi kuorma. Irrota liitännät käänteisessä järjestyksessä.
- Asenna ohjain hyvin ilmastoituun tilaan, kauas syttyvistä materiaaleista ja suorasta auringonvalosta.
- Käytä kaikissa liitoksissa sopivia johtopaksuuksia ylikuumenemisen estämiseksi.
4.2. Ohjaimen asentaminen
Mount the controller vertically on a flat, non-flammable surface using the provided mounting screws. Ensure adequate clearance around the unit for proper airflow and heat dissipation, especially for the cooling fans located on the top.

Kuva 4.1: Image showing the dimensions of the controller (approximately 9.0 inches long, 7.3 inches wide, 2.8 inches high) and the included mounting screws and user manual.
4.3. Johdotusliitännät
Follow the connection order carefully to avoid damage to the controller or other components.
- Liitä akku: Connect the positive and negative terminals of your battery bank to the corresponding battery terminals on the controller. The controller will automatically detect the system voltage (12V tai 24V).
- Liitä aurinkopaneeli: Connect the positive and negative leads from your solar panel array to the solar panel terminals on the controller. Ensure the maximum PV input voltage does not exceed 100VDC. For a 12V system, maximum solar input power is 720W; for a 24V system, it is 1440W.
- Kytke tasavirtakuorma (valinnainen): Connect your DC loads to the load terminals on the controller. This allows the controller to manage load discharge and provide protection.

Kuva 4.2: Wiring diagram illustrating the correct connection sequence: Battery first, then Solar Panel, then DC Load. An optional inverter for AC loads is also shown connected to the battery bank.
4.4. Akkutyypin valinta
The controller is compatible with various battery types. It is crucial to select the correct battery type for optimal charging and battery longevity. Refer to the display and settings section to adjust this parameter if needed. The controller supports FLD (Flooded), LiFePO4 (Lithium Iron Phosphate), SLD (Sealed Lead-Acid), GEL, and AGM batteries.

Kuva 4.3: Illustration showing the controller connected to a battery, with icons representing compatible battery types: LI (Lithium), FLD (Flooded), GEL, SLD (Sealed), and AGM. The controller automatically identifies battery voltage and supports custom parameters, including lithium battery 0V charging.
5. Käyttö
5.1. Näytön valvonta
The LCD display provides real-time information about your solar system. Use the Up (▲) and Down (▼) buttons to cycle through different display screens, showing parameters such as PV voltage, akkutilavuustage, charging current, load current, and battery state of charge.
5.2. Parametriasetukset
To enter the parameter setting stage:
- Press the "SET" button to enter the setting mode. The value to be adjusted will flash.
- Use the Up (▲) or Down (▼) buttons to adjust the value.
- Press the "SET" button again to confirm and save the new value.
If no button is pressed for 10 seconds in setting mode, the controller will automatically exit without saving changes.
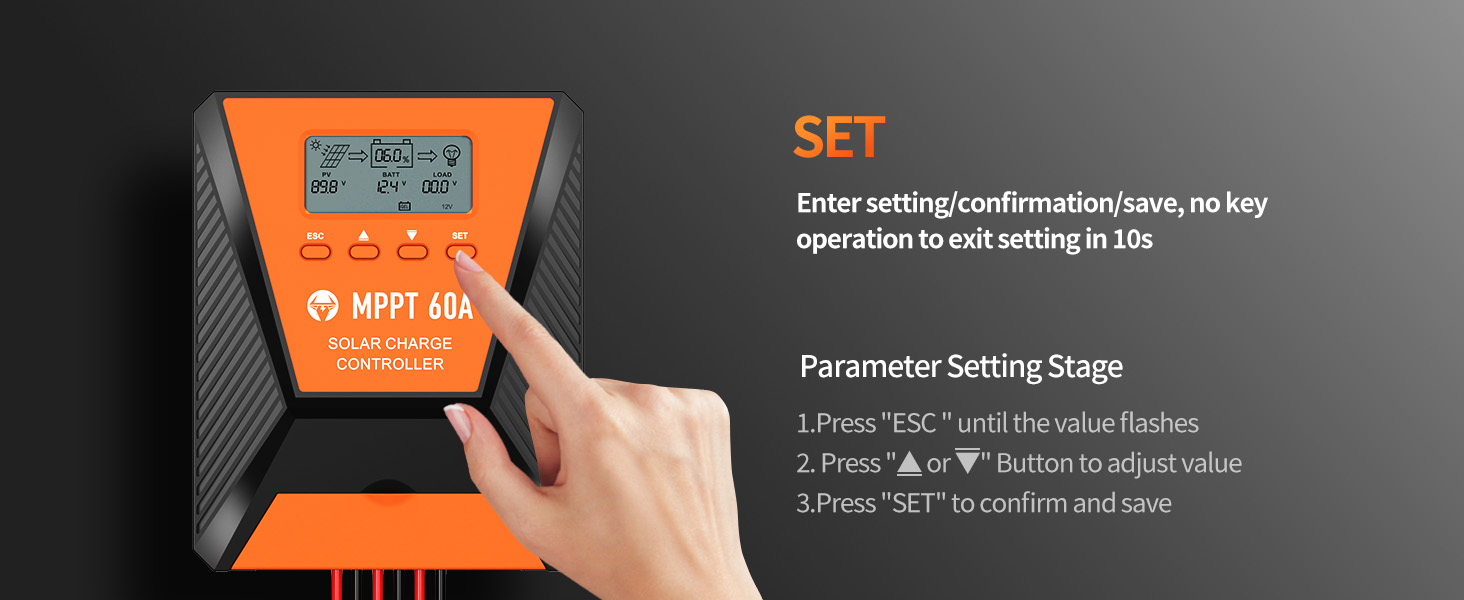
Kuva 5.1: Visual guide for using the SET button to enter, adjust, and confirm parameter settings on the controller's LCD display.
5.3. Työtilojen lataaminen
The controller supports three distinct load working modes:
- Lighting Time Control Mode (1H-23H): The load automatically turns on or off based on the intensity of sunlight and a set timer.
- Normal OFF Mode (0H): The load remains off. This mode is useful for specific loads or during debugging.
- Normal ON Mode (24H): The load remains continuously on. This mode is suitable for loads requiring a 24-hour power supply.

Kuva 5.2: Diagram explaining the three load working modes: Lighting time control (1H-23H), Normal OFF (0H), and Normal ON (24H).
6. Huolto
Säännöllinen huolto varmistaa aurinkolataussäätimesi pitkän käyttöiän ja optimaalisen suorituskyvyn.
- Tarkista liitännät: Tarkista säännöllisesti kaikkien johtojen liitännät kireyden ja korroosion varalta. Löysät liitännät voivat aiheuttaa vastusta ja lämmön kertymistä.
- Puhdista ohjain: Keep the controller clean and free from dust and debris. Ensure the cooling fan vents are unobstructed. Use a dry cloth for cleaning.
- Monitorin suorituskyky: Regularly check the LCD display for normal operation and any error codes. Compare actual performance with expected values.
- Akun tarkastus: Inspect battery terminals for corrosion and ensure proper ventilation around the batteries.
7. Vianmääritys
Tässä osiossa käsitellään yleisiä ongelmia, joita saatat kohdata aurinkolataussäätimen kanssa.
| Ongelma | Mahdollinen syy | Ratkaisu |
|---|---|---|
| Ei näyttöä/Ohjain ei käynnisty | Akkua ei ole kytketty tai akku on tyhjätage; reverse polarity; loose wiring. | Tarkista akun liitännät ja voltage. Ensure correct polarity. Tighten all wiring. |
| Akku ei lataudu | Solar panel not connected; insufficient sunlight; solar panel fault; incorrect battery type setting. | Verify solar panel connections. Ensure adequate sunlight. Check solar panel output. Confirm correct battery type setting. |
| Kuorma ei toimi | Load disconnected; overload protection activated; incorrect load working mode. | Check load connections. Reduce load to within controller limits. Adjust load working mode settings. |
| Virhekoodi näytetään | Specific system fault (e.g., over-temperature, short-circuit). | Refer to the controller's display for the specific error code and consult the full user manual for detailed explanations and solutions. Address the underlying issue (e.g., reduce temperature, clear short-circuit). |
8. Tekniset tiedot
| Parametri | Arvo |
|---|---|
| Malli | 60A |
| System Voltage | 12 V / 24 V automaattinen tunnistus |
| Max. PV -tulo Voltage | 100VDC |
| Max. Solar Input Power (12V System) | 720W |
| Max. Solar Input Power (24V System) | 1440W |
| Seurannan tehokkuus | ≥ 99 % |
| Huippukonversiotehokkuus | Jopa 98 % |
| Tuetut akkutyypit | FLD, LiFePO4, SLD, GEL, AGM |
| USB-lähtö | Dual 5V, 2.4A (Total) |
| Mitat (noin) | 10.71 x 8.62 x 4.33 tuumaa (pakkaus) |
| Tuotteen paino | 3.36 kiloa |
| Materiaali | Metalli |
| Näytön tyyppi | LCD |
9. Takuu ja tuki
TOPBULL products are designed for reliability and performance. For warranty information or technical assistance, please contact TOPBULL customer support through the retailer where the product was purchased or visit the official TOPBULL websivusto. Pidä tuotteen mallinumero ja ostopäivämäärä saatavilla, kun otat yhteyttä tukeen.
Lisätietoja saat osoitteesta TOPBULL Store on Amazon.