
1. Johdanto
The ZOYI VC17B+ is a high-performance, True-RMS digital multimeter designed for accurate measurement of various electrical parameters. It features a large, backlit display for clear readings in diverse environments and a robust design suitable for electricians, students, and maintenance professionals. This manual provides essential information for the safe and effective operation of your device.
Keskeisiä ominaisuuksia ovat:
- AC/DC Voitage ja Virran mittaus
- Resistance, Capacitance, and Frequency measurement
- Continuity and Diode testing
- Lämpötilan mittaus
- Käyttömäärä
- Additional functions: True-RMS, Data Hold, Backlight, Low Battery Alert, Auto Power Off, MAX/MIN, Relative Measurement (REL)
2. Turvallisuustiedot
Noudata aina turvaohjeita käyttäessäsi sähköisiä testauslaitteita. Näiden noudattamatta jättäminen voi aiheuttaa sähköiskun, vamman tai vahingoittaa mittaria tai testattavaa laitetta.
- Lue tämä käyttöopas huolellisesti ennen leikkausta.
- The ZOYI VC17B+ is rated for CAT IV 600V ja CATIII 600V. Do not exceed these voltage rajoja.
- Tarkista mittausjohdot vaurioiden varalta ennen jokaista käyttökertaa. Vaihda, jos eristys on vaurioitunut.
- Älä käytä mittaria, jos se näyttää vaurioituneelta tai ei toimi oikein.
- Ensure the function dial is set to the correct range before making measurements.
- Vältä yksin työskentelemistä.
- Ole varovainen, kun työskentelet voltagyli 30 V AC RMS, 42 V huippu tai 60 V DC, koska ne aiheuttavat sähköiskun vaaran.
- Vaihda paristot viipymättä, kun heikon pariston varoitusvalo tulee näkyviin.
3. Pakkauksen sisältö
Varmista, että pakkauksessasi on kaikki tarvittavat osat:
- ZOYI VC17B+ Digital Multimeter
- Testijohdot (2)
- AA-paristot (2)
- Thermocouple Probe (1)
- Käyttöopas (tämä asiakirja)
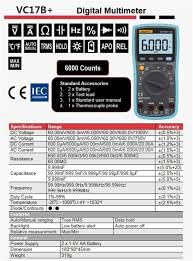
Figure 3.1: Standard Accessories included with the ZOYI VC17B+ Multimeter.
4. Tuote ohiview
Familiarize yourself with the components of the ZOYI VC17B+ multimeter:
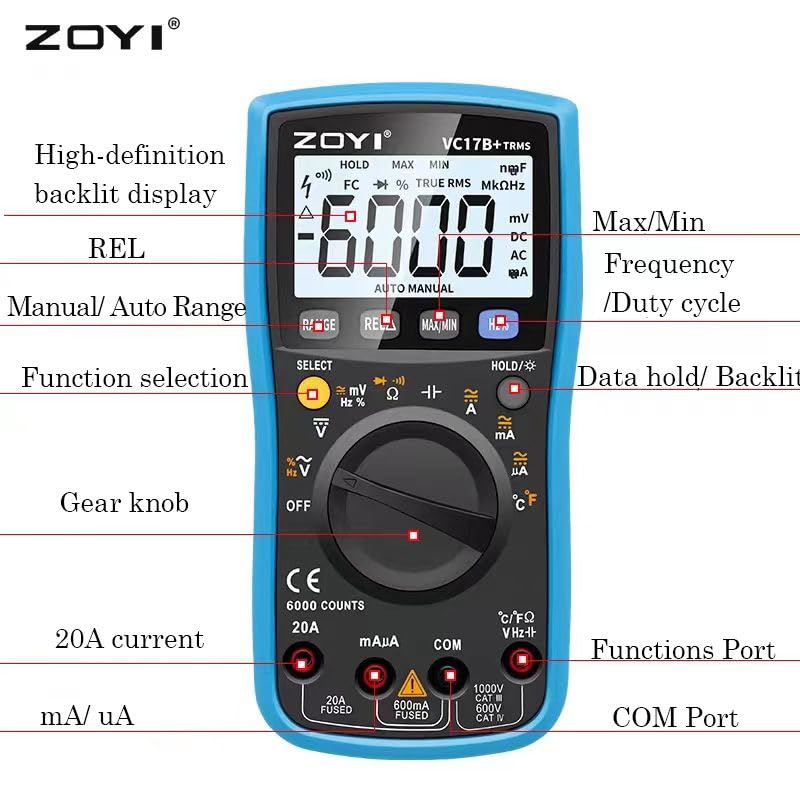
Figure 4.1: ZOYI VC17B+ Multimeter Components.
- Näyttö: Large, high-definition backlit LCD for reading measurements.
- Function Dial (Gear Knob): Used to select the desired measurement function.
- Tuloliittimet:
- COM: Yhteinen (negatiivinen) tulo kaikille mittauksille.
- VHzΩ: Positiivinen tulo vol.tage, Frequency, Resistance, Capacitance, Diode, Continuity, and Temperature measurements.
- mA/uA: Positiivinen syöte millimetrilleampere ja mikroampvirtamittaukset (sulakkeella).
- 20A: Positiivinen syöte arvolle 20 Ampvirtamittaukset (sulakkeella).
- Painikkeet:
- ALUE: Manual/Auto Range selection.
- REL: Suhteellinen mittausfunktio.
- MAX/MIN: Tallentaa maksimi- ja minimiarvot.
- Hz %: Selects Frequency or Duty Cycle.
- HOLD/☀: Data Hold function and Backlight activation.
- VALITSE: Toggles between functions on a single dial position (e.g., AC/DC, Diode/Continuity).
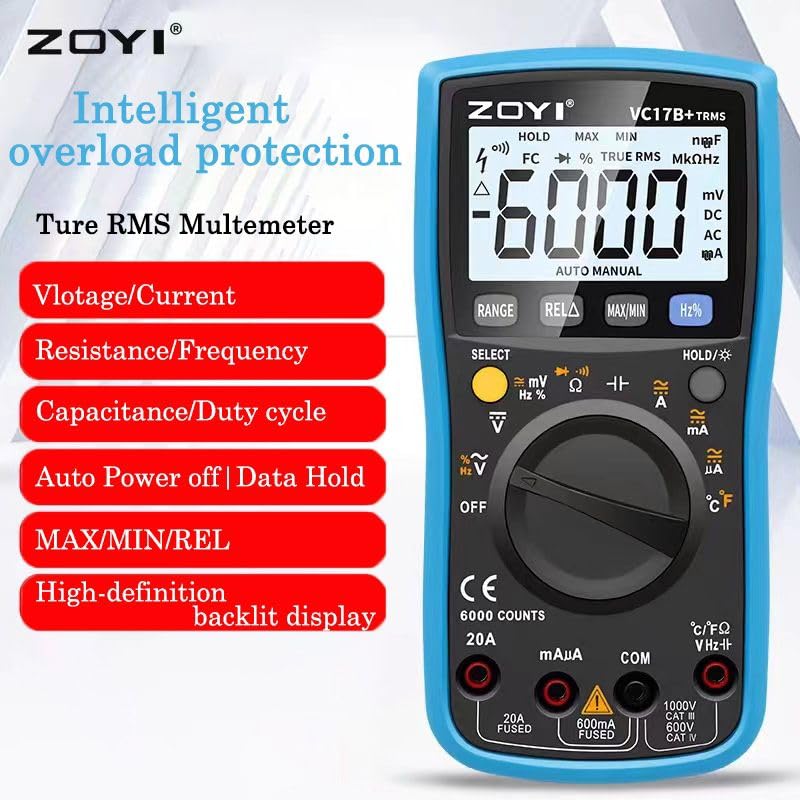
Figure 4.2: ZOYI VC17B+ Multimeter Front View.
5. Asennus
5.1 Akun asennus
- Varmista, että yleismittari on sammutettu.
- Paikanna paristolokero mittarin takaa.
- Avaa paristokotelon kansi ruuvitaltalla.
- Insert two AA batteries, observing correct polarity (+/-).
- Aseta akun kansi takaisin paikalleen ja kiinnitä se ruuvilla.
5.2 Mittausjohtojen kytkeminen
Liitä musta mittausjohto aina COM-liittimeen. Liitä punainen mittausjohto mittaustyypin mukaiseen sopivaan tuloliittimeen:
- VHzΩ: Osalle Voltage, Resistance, Capacitance, Frequency, Diode, Continuity, and Temperature.
- mA/uA: For small current measurements.
- 20A: For large current measurements (up to 20A).
5.3 Jalustan käyttö
The multimeter includes a built-in kickstand for convenient hands-free operation. Gently pull out the kickstand from the back of the unit to prop it up at an angle. Push it back in when not needed.


Figure 5.1: Multimeter back view (left) and with kickstand deployed (right).
6. Käyttöohjeet
6.1 Yleinen käyttö
- Virta päälle/pois: Rotate the function dial from 'OFF' to any measurement function to turn the meter ON. Rotate back to 'OFF' to power OFF.
- Automaattinen virrankatkaisu (APO): The meter will automatically power off after approximately 15 minutes of inactivity to conserve battery life. Press any button or rotate the function dial to wake it up.
- Taustavalo: Press and hold the 'HOLD/☀' button to turn the backlight ON or OFF.
- Tietojen pito: Press the 'HOLD/☀' button briefly to freeze the current reading on the display. Press again to release.
- Automaattinen/manuaalinen alueen valinta: The meter defaults to auto-ranging. Press the 'RANGE' button to switch to manual ranging. In manual ranging, press 'RANGE' repeatedly to cycle through available ranges. Press and hold 'RANGE' to return to auto-ranging.
- SELECT -painike: In certain dial positions (e.g., Voltage, Diode/Continuity), press 'SELECT' to toggle between AC/DC, Diode Test, or Continuity Test.
6.2 Erityiset mittausfunktiot
6.2.1 VuosikertatagMittaus (AC/DC)
- Insert the black test lead into the COM jack and the red test lead into the VHzΩ jack.
- Rotate the function dial to the 'V~' (AC Voltage) tai 'V=' (DC-volyymitage) position. If both are on one position, use 'SELECT' to choose.
- Kytke mittausjohtimet rinnan mitattavan piirin tai komponentin kanssa.
- Lue voltage -arvo näytössä.
6.2.2 Virran mittaus (AC/DC)
VAROITUS: Never connect the meter in parallel to a voltagvirtaa mitattaessa. Tämä voi polttaa sulakkeen tai vahingoittaa mittaria.
- Liitä musta mittausjohto COM-liittimeen.
- For mA/uA measurements, insert the red test lead into the mA/uA jack. For 20A measurements, insert the red test lead into the 20A jack.
- Rotate the function dial to the appropriate 'A~' (AC Current) or 'A=' (DC Current) position (mA, uA, or 20A). Use 'SELECT' if needed.
- Avaa virtapiiri ja kytke mittausanturit sarjaan kuorman kanssa.
- Lue nykyinen arvo näytöltä.
6.2.3 Resistanssin mittaus (Ω)
VAROITUS: Varmista, että virtapiiri on jännitteetön ja kaikki kondensaattorit ovat purkautuneet ennen resistanssin mittaamista.
- Insert the black test lead into the COM jack and the red test lead into the VHzΩ jack.
- Rotate the function dial to the 'Ω' position.
- Kytke mittausjohdot mitattavan komponentin päälle.
- Lue vastuksen arvo näytöltä.
6.2.4 Jatkuvuustesti
- Insert the black test lead into the COM jack and the red test lead into the VHzΩ jack.
- Rotate the function dial to the 'Ω' position and press 'SELECT' until the continuity symbol (buzzer icon) is displayed.
- Kytke mittausjohdot piiriin tai komponenttiin.
- If continuity exists (resistance below approx. 50Ω), the buzzer will sound.
6.2.5 Dioditesti
- Insert the black test lead into the COM jack and the red test lead into the VHzΩ jack.
- Rotate the function dial to the 'Ω' position and press 'SELECT' until the diode symbol (->|) is displayed.
- Kytke punainen anturi diodin anodiin ja musta anturi diodin katodiin. Näytössä näkyy eteenpäin suuntautuva jännite.tage pudota.
- Käännä mittauspäät. Näytössä pitäisi näkyä 'OL' (avoin silmukka), joka osoittaa toimivan diodin.
6.2.6 Kapasitanssin mittaus (F)
VAROITUS: Discharge capacitors completely before testing to prevent damage to the meter.
- Insert the black test lead into the COM jack and the red test lead into the VHzΩ jack.
- Rotate the function dial to the 'F' (Capacitance) position.
- Liitä testianturit kondensaattorin yli.
- Lue kapasitanssin arvo näytöstä.
6.2.7 Frequency Measurement (Hz) and Duty Cycle (%)
- Insert the black test lead into the COM jack and the red test lead into the VHzΩ jack.
- Rotate the function dial to the 'Hz%' position.
- Press the 'Hz%' button to toggle between Frequency (Hz) and Duty Cycle (%).
- Kytke mittausjohtimet rinnan signaalilähteen kanssa.
- Lue näytöltä taajuuden tai käyttösuhteen arvo.
6.2.8 Lämpötilan mittaus (°C/°F)
- Insert the thermocouple probe into the VHzΩ (positive) and COM (negative) jacks, observing polarity.
- Rotate the function dial to the '°C/°F' position.
- The display will show the ambient temperature. Place the thermocouple tip on or near the object whose temperature is to be measured.
- Read the temperature value. The unit can be toggled between Celsius and Fahrenheit using the 'SELECT' button if available in this mode.
6.2.9 MAX/MIN-toiminto
In any measurement mode, press the 'MAX/MIN' button to activate this function. The meter will display the maximum or minimum reading recorded since the function was activated. Press again to cycle between MAX, MIN, and current reading. Press and hold to exit.
6.2.10 REL (Relative Measurement) Function
Press the 'REL' button to store the current reading as a reference value. Subsequent measurements will be displayed as the difference from this reference value. Press 'REL' again to exit this mode.
7. Huolto
7.1 Puhdistus
Pyyhi mittari mainoksellaamp liinalla ja miedolla pesuaineella. Älä käytä hankaavia aineita tai liuottimia. Varmista, että mittari on täysin kuiva ennen käyttöä.
7.2 Pariston vaihto
When the low battery indicator appears on the display, replace the batteries as described in Section 5.1. Use two new AA batteries.
7.3 Sulakkeen vaihto
Jos virranmittaustoiminto ei toimi, sulake saattaa olla tarpeen vaihtaa. Katso oikean sulaketyypin ja -arvon tiedot teknisistä tiedoista. Sulakkeen vaihdon saa suorittaa vain pätevä henkilöstö.
7.4 Varastointi
Jos mittaria ei käytetä pitkään aikaan, poista paristot vuotojen estämiseksi. Säilytä mittaria viileässä, kuivassa paikassa, poissa suorasta auringonvalosta ja äärimmäisistä lämpötiloista.
8. Vianmääritys
| Ongelma | Mahdollinen syy | Ratkaisu |
|---|---|---|
| Ei näyttöä tai himmeä näyttö | Tyhjät tai heikot paristot; Paristojen virheellinen asennus. | Vaihda paristot; Tarkista paristojen napaisuus. |
| Ei virran mittausta | Blown fuse; Incorrect input jack used. | Replace fuse (if qualified); Ensure red lead is in mA/uA or 20A jack. |
| 'OL' (ylikuormitus) näkyy | Mittaus ylittää valitun alueen tai mittarin maksimikapasiteetin. | Switch to a higher range (if in manual mode); Ensure measurement is within meter's limits. |
| Epätarkkoja lukemia | Poor test lead connection; External interference; Damaged meter. | Check connections; Move away from strong electromagnetic fields; Contact support if meter is damaged. |
9. Tekniset tiedot
Detailed technical specifications for the ZOYI VC17B+ Digital Multimeter:
9.1 Yleiset tiedot
- Merkki: ZOYI
- Mallinumero: VC17B+
- Näyttö: 6000 Counts, Large Backlit LCD
- Todellinen RMS: Kyllä
- Virtalähde: 2 x AA-paristot
- Turvallisuusluokitus: CAT IV 600V, CAT III 600V
- Mitat (P x L x K): 180 x 90 x 45 mm (noin)
- Paino: Noin 310 g (ilman paristoja)
- Automaattinen virrankatkaisu: Kyllä
- Tietojen pito: Kyllä
- Alhaisen akun varoitus: Kyllä

Figure 9.1: Physical Dimensions of the Multimeter.
9.2 Sähköiset tiedot
Figure 9.2: Detailed Electrical Specifications.
| Toiminto | Alue | Tarkkuus |
|---|---|---|
| DC Voitage | 60.00mV/600.0mV/6.000V/60.00V/600.0V/1000V | ±(0.5 %+3) |
| AC Voitage | 60.00mV/600.0mV/6.000V/60.00V/600.0V/750V | ±(1.0 %+3) |
| DC virta | 600.0uA/6000uA/60.00mA/600.0mA/6.000A/20.00A | ±(1.2 %+3) |
| Vaihtovirta | 600.0uA/6000uA/60.00mA/600.0mA/6.000A/20.00A | ±(1.5 %+3) |
| Resistanssi | 600.0Ω/6.000kΩ/60.00kΩ/600.0kΩ/6.000MΩ/60.00MΩ | ±(1.0 %+3) |
| Kapasitanssi | 9.999nF/99.99nF/999.9nF/9.999uF/99.99uF/999.9uF/9.999mF | ±(5.0 %+20) |
| Taajuus | 9.999Hz/99.99Hz/999.9Hz/9.999kHz/99.99kHz/999.9kHz/9.999MHz | ±(0.1 %+2) |
| Lämpötila | -20°C ~ 1000°C / -4°F ~ 1832°F | ±(2.5 %+5) |
| Diodi/jatkuvuus | Kyllä | Kyllä |
10. Takuu ja tuki
For warranty information, please refer to the warranty card included with your product or visit the official ZOYI website. For technical support or service inquiries, please contact your retailer or the manufacturer directly.
- Valmistaja: ZOYI & ZOTEK Instruments
- Packer Contact Information: Skyking Instruments, Mumbai, INDIA