
1. Johdanto
This manual provides essential information for the safe and efficient operation of your Pretul DESI-36P2 3.6V Cordless Screwdriver. Please read it thoroughly before first use and keep it for future reference. This compact cordless screwdriver is designed for light-duty fastening tasks, featuring a two-position handle and an integrated LED work light.

Kuva 1: Pretul DESI-36P2 Cordless Screwdriver. This image shows the screwdriver in its straight configuration, highlighting its compact design and yellow and black color scheme.
2. Turvallisuustiedot
Noudata aina sähkötyökaluja käyttäessäsi perusturvallisuusohjeita tulipalon, sähköiskun ja henkilövahinkojen riskin vähentämiseksi.
- Työalueen turvallisuus: Pidä työalueesi puhtaana ja hyvin valaistuna. Sotkuiset tai tummat alueet aiheuttavat onnettomuuksia.
- Sähköturvallisuus: Älä altista sähkötyökaluja sateelle tai märille olosuhteille. Sähkötyökaluun pääsevä vesi lisää sähköiskun vaaraa.
- Henkilökohtainen turvallisuus: Pysy valppaana, katso mitä olet tekemässä ja käytä maalaisjärkeä käyttäessäsi sähkötyökalua. Älä käytä sähkötyökalua, kun olet väsynyt tai huumeiden, alkoholin tai lääkkeiden vaikutuksen alaisena.
- Työkalun käyttö ja hoito: Älä käytä sähkötyökalua väkisin. Käytä sovellukseesi sopivaa sähkötyökalua. Se tekee työn paremmin ja turvallisemmin sillä nopeudella, jota varten se on suunniteltu.
- Akun hoito: Lataa vain valmistajan määrittelemällä laturilla. Yhden tyyppiselle akulle sopiva laturi voi aiheuttaa tulipalon vaaran, kun sitä käytetään toisen akun kanssa.
3. Tuotteen osat ja ominaisuudet
Familiarize yourself with the parts of your Pretul DESI-36P2 cordless screwdriver.
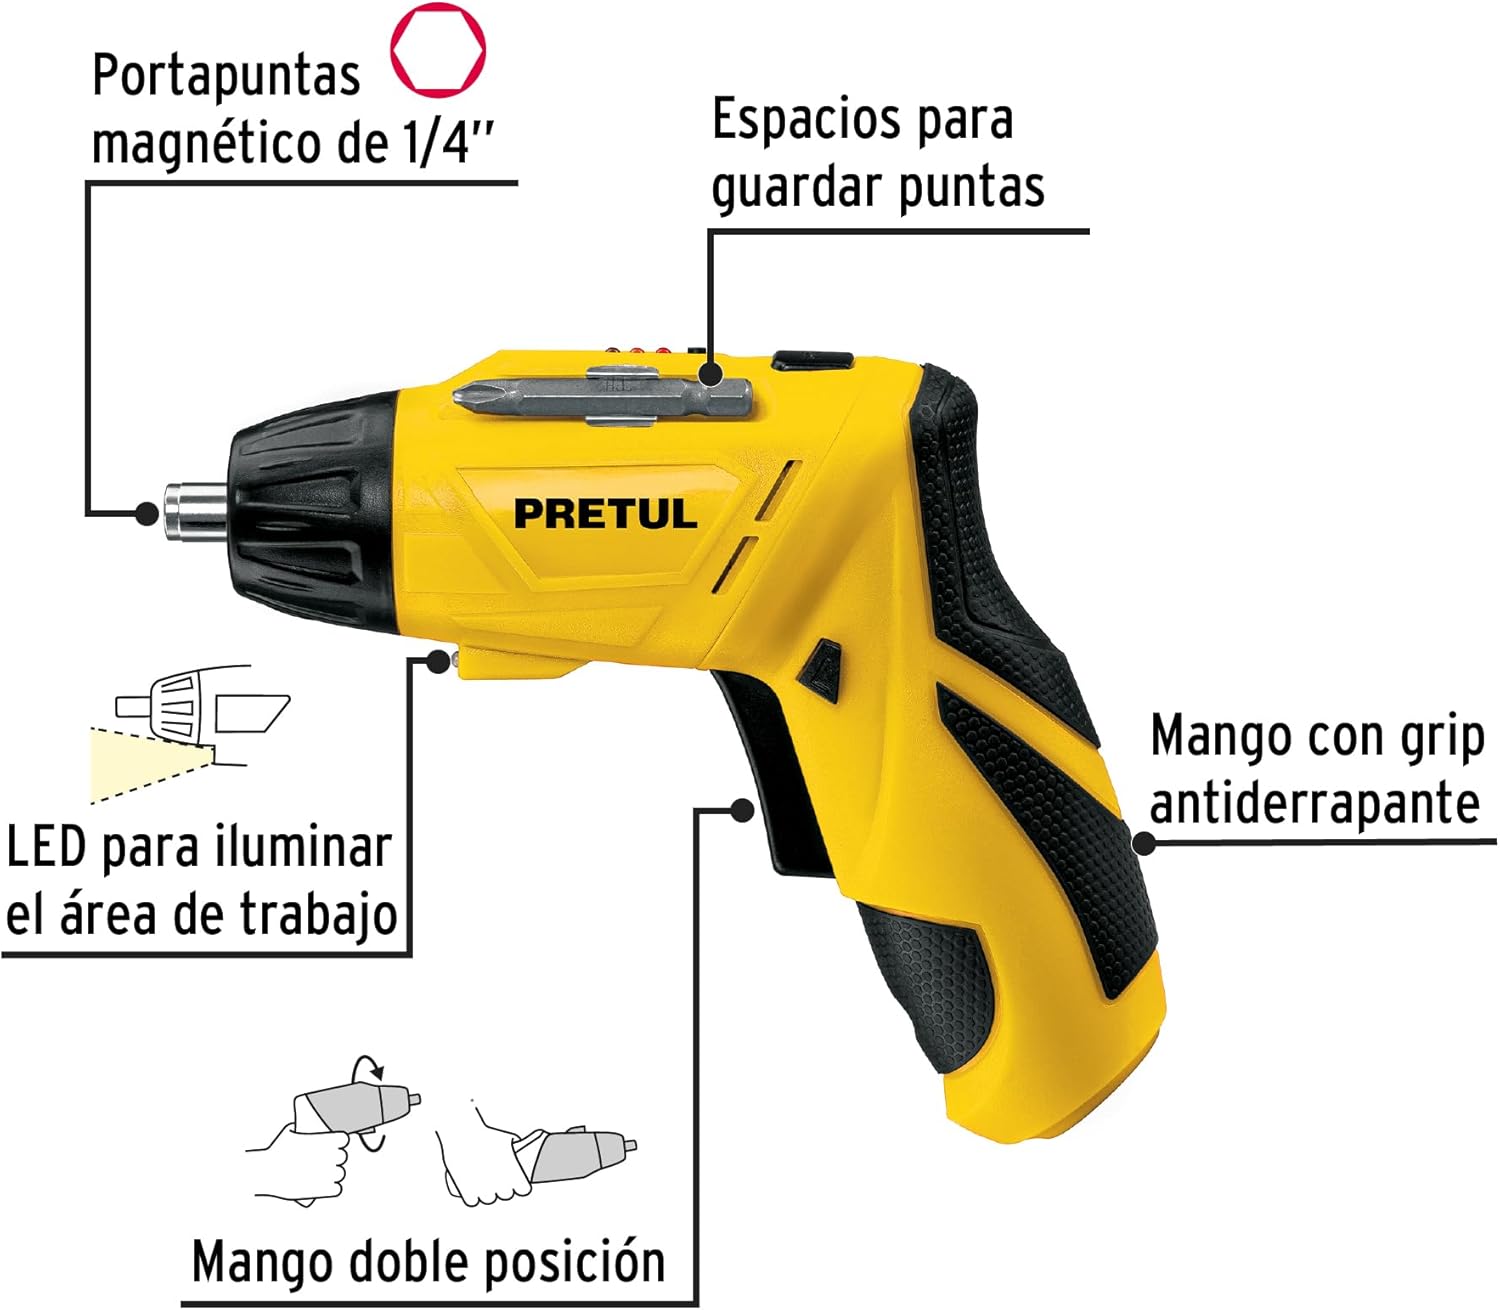
Kuva 2: Key features of the Pretul DESI-36P2. This diagram illustrates the magnetic 1/4" bit holder, bit storage slots, anti-slip grip handle, LED work light, and the two-position handle mechanism.
- Magnetic 1/4" Hex Bit Holder: Securely holds screwdriver bits for quick changes.
- Bit Storage Slots: Conveniently located on the tool for storing extra bits.
- Anti-slip Grip Handle: Tarjoaa mukavan ja turvallisen käsittelyn käytön aikana.
- LED työvalo: Valaisee työalueen parantaen näkyvyyttä hämärässä valaistuksessa.
- Two-Position Handle: Allows the screwdriver to be used in a straight or pistol-grip configuration for versatility and access in tight spaces.
- Eteen-/taaksepäin-kytkin: Controls the direction of rotation for tightening and loosening screws.
- Virtapainike: Activates the screwdriver.
4. Asennus
4.1 Ensimmäinen lataus
Before first use, fully charge the screwdriver's internal battery. Connect the charger to a standard electrical outlet and then to the charging port on the screwdriver. The charging indicator (if present) will show the charging status. Disconnect the charger once the battery is fully charged.
4.2 Ruuvimeisselin terien kiinnittäminen
- Select the appropriate 1/4" hex screwdriver bit for your task.
- Insert the bit firmly into the magnetic bit holder at the front of the screwdriver until it is securely seated.
- To remove a bit, simply pull it out from the holder.
4.3 Kahvan asennon säätäminen
The screwdriver features a two-position handle for enhanced versatility:
- Pistoolin kahva: Standard configuration for most tasks.
- Suora ote: For reaching into confined spaces. To change the handle position, firmly grasp the handle and the body of the screwdriver, then pivot the handle until it locks into the desired position.
5. Käyttöohjeet
5.1 Virran kytkeminen päälle/pois
Press and hold the power button to activate the screwdriver. Release the button to stop operation. The LED work light will activate when the power button is pressed.
5.2 Pyörimissuunnan valinta
Use the forward/reverse switch, typically located near the trigger, to select the desired rotation direction:
- Push the switch to the left for forward rotation (tightening screws).
- Push the switch to the right for reverse rotation (loosening screws).
- Ensure the switch is in the center position to lock the tool and prevent accidental activation.
5.3 kiinnitysruuvia
- Ensure the correct bit is installed and the rotation direction is set to forward.
- Place the bit onto the screw head, applying gentle pressure.
- Press the power button to start driving the screw. Release the button once the screw is fully seated or the desired torque is reached.
5.4 Ruuvien irrotus
- Ensure the correct bit is installed and the rotation direction is set to reverse.
- Place the bit onto the screw head, applying gentle pressure.
- Press the power button to start loosening the screw. Release the button once the screw is free.
6. Huolto
Säännöllinen huolto varmistaa optimaalisen suorituskyvyn ja pidentää työkalusi käyttöikää.
- Puhdistus: Pidä työkalun tuuletusaukot vapaina roskista. Käytä pehmeää, kuivaaamp liinalla ulkopuolen puhdistamiseen. Älä käytä voimakkaita kemikaaleja tai hankaavia puhdistusaineita.
- Bits-pidike: Periodically inspect the bit holder for wear or damage. Clean any accumulated dust or metal shavings.
- Akun säilytys: Store the screwdriver in a cool, dry place away from direct sunlight and extreme temperatures. For long-term storage, ensure the battery is partially charged (around 50%).
- Tarkastus: Regularly check for loose screws, damaged cords (if applicable), or any other conditions that may affect safe operation.
7. Vianmääritys
Jos ruuvimeisselin kanssa ilmenee ongelmia, katso seuraavat yleiset ongelmat ja ratkaisut:
| Ongelma | Mahdollinen syy | Ratkaisu |
|---|---|---|
| Ruuvimeisseli ei käynnisty. | Akku on tyhjä. | Lataa akku täyteen. |
| Ruuvimeisselin teho on heikko. | Akku on vähissä. | Lataa akku uudelleen. |
| Ruuvin kärki irtoaa ruuvin kannasta. | Väärä terän koko tai kulunut terä. | Käytä oikean kokoista terää; vaihda kuluneet terät. |
| Handle does not lock into position. | Not fully pivoted. | Ensure the handle is fully pivoted until it clicks into place. |
Jos ongelma jatkuu näiden ratkaisujen kokeilemisen jälkeen, ota yhteyttä asiakastukeen.
8. Tekniset tiedot
Technical specifications for the Pretul DESI-36P2 Cordless Screwdriver.

Kuva 3: Dimensions of the Pretul DESI-36P2. This image shows the screwdriver with measurements indicating a length of 17.5 cm and a height of 13 cm.
| Ominaisuus | Erittely |
|---|---|
| Mallinumero | DESI-36P2 (26402) |
| Merkki | Hinta |
| Virtalähde | Akku |
| Akku Voltage | 3.6 volttia |
| Nopeus | 230 RPM |
| Vääntömomentti | 3E+1 Pound-inches (approximately 30 in-lbs) |
| Bit Holder | 1/4" Hex Magnetic |
| Materiaali | Muovia, metallia |
| Mitat (L x K) | 17.5 cm x 13 cm (approximate, based on image) |
| Paino | 530 0.53 g (XNUMX kg) |
| Mukana olevat komponentit | 5 Phillips bits 1" (PH1, PH2, PH3), Charger, 2 Phillips bits 2" (PH1, PH2), 1/4" Magnetic extension |
9. Takuu ja tuki
The Pretul DESI-36P2 Cordless Screwdriver comes with a 1 vuoden takuu ostopäivästä lukien. Säilytä ostokuitti takuuvaatimuksia varten.

Kuva 4: Product packaging showing the included components and a "1 year warranty" seal.
For technical support, service, or warranty inquiries, please contact Pretul customer service through their official channels or the retailer where the product was purchased.