
1. Johdanto
This manual provides detailed instructions for the safe and effective operation of your VAR TECH V92S Smart Digital Multimeter. The V92S is a True RMS, fully auto-ranging digital multimeter designed for precise measurements across various electrical parameters. Please read this manual thoroughly before use and retain it for future reference.
2. Turvallisuustiedot
Always adhere to basic safety precautions when using this multimeter to prevent personal injury or damage to the instrument. Improper use can result in electric shock or fire.
- Älä ylitä kullekin toiminnolle määritettyjä enimmäissyöttöarvoja.
- Ensure test leads are properly connected and in good condition before making measurements.
- Do not use the multimeter if it appears damaged or if the battery cover is not securely closed.
- Ole erittäin varovainen, kun työskentelet voltagyli 60 V DC:n tai 30 V AC:n RMS-jännitteille, koska ne aiheuttavat sähköiskun vaaran.
- Katkaise aina virta testattavasta piiristä ennen resistanssin, kapasitanssin tai jatkuvuuden mittaamista.
- Vaihda paristot viipymättä, kun heikon pariston varoitusvalo tulee näkyviin, jotta mittaustulokset ovat tarkkoja.
- Do not operate the multimeter in explosive atmospheres or near flammable materials.
3. Tärkeimmät ominaisuudet
The VAR TECH V92S Smart Digital Multimeter offers a range of advanced features for comprehensive electrical testing:
- Smart Digital Multimeter with Auto Detection TRMS (True Root Mean Square)
- 600 V AC/DC & 10 A AC/DC measurement capabilities
- 6000 Counts HD Display with Primary & Secondary display and Analog bar graph
- Capacitance Test: 6 nF to 60 mF
- Frequency Test: 6 Hz to 10 MHz
- Temperature Test: -40 ºC to 1000 ºC
- Diode & Continuity Test
- NCV (Non-Contact Voltage) test for live wire detection
- Integrated Torch for illumination in dark environments
- Auto Power Off function to conserve battery life
- Data Hold function to freeze readings on the display
- Akun varaustason ilmaisin
- Jack Prompt for correct test lead insertion
- Burnt Fuse Prompt for safety and easy maintenance
- Resistance measurement: 600 Ω to 60 MΩ

Kuva 3.1: Etuosa view of the VAR TECH V92S Smart Digital Multimeter, showcasing sen näyttö ja ohjauspainikkeet.

Figure 3.2: The VAR TECH V92S Multimeter held in hand, illustrating its compact and ergonomic design.
4. Tuotteen osat
The VAR TECH V92S Smart Digital Multimeter package includes the following items:
- VAR TECH V92S Digital Multimeter
- Mittausjohdot (punainen ja musta)
- Käyttöohje (tämä asiakirja)
- Kantolaukku
- 4 AAA-paristoa (esiasennettu tai toimitetaan erikseen)

Figure 4.1: Contents of the VAR TECH V92S package, including the multimeter, test leads, manual, and carrying pouch.
5. Asennus
5.1. Akun asennus
The VAR TECH V92S requires 4 AAA batteries for operation. If batteries are not pre-installed, or if replacement is needed:
- Varmista, että yleismittari on sammutettu.
- Paikanna paristolokero laitteen takana.
- Avaa paristolokeron kansi ruuvimeisselillä.
- Aseta 4 AAA-paristoa lokeroon ja huomioi oikea napaisuus (+/-) lokeron sisällä olevien merkkien mukaisesti.
- Sulje paristolokeron kansi kunnolla.
5.2. Testijohtojen liittäminen
Mittausjohtojen oikea kytkentä on ratkaisevan tärkeää tarkkojen ja turvallisten mittausten kannalta.
- Insert the black test lead into the “COM” (Common) jack.
- Useimmille volyymeilletage, resistance, continuity, capacitance, frequency, and temperature measurements, insert the red test lead into the “INPUT” jack.
- For current measurements (mA/A), insert the red test lead into the “mA/A” jack.

Figure 5.1: The input jack prompt light feature. When turning on or changing ranges, the corresponding input socket light flashes to indicate where to insert the probe.
6. Käyttöohjeet
6.1. Virta päälle/pois
Paina Tehoa button (red circle with line) to turn the multimeter on or off.
6.2. Toiminnon valinta
The V92S features an auto-ranging function, automatically detecting the measurement type in “SMART” mode. For specific functions, use the SEL ja TYÖNTEKIJÄ painikkeet:
- SEL (Valitse) -painike: Used to switch between different measurement types within a primary mode (e.g., AC Voltage ja DC Voitage, or Diode and Continuity).
- FUNC (Function) Buttons: Used to directly select specific measurement functions like Capacitance, Frequency, or Temperature.
6.3. Mittaustilat
Ensure test leads are correctly inserted for the desired measurement.
6.3.1. VoitagMittaus (AC/DC)
- Insert the red lead into the “INPUT” jack and the black lead into the “COM” jack.
- Turn on the multimeter. It will typically default to auto-ranging voltage mittaus.
- Tarvittaessa paina SEL to switch between AC and DC voltage.
- Kytke mittausjohtimet rinnan mitattavan piirin tai komponentin kanssa.
6.3.2. Virran mittaus (AC/DC)
- Insert the red lead into the “mA/A” jack and the black lead into the “COM” jack.
- Turn on the multimeter. The device automatically enters the current measurement function when the probe is inserted into the mA/A socket.
- Tarvittaessa paina SEL to switch between AC and DC current.
- Kytke mittausjohdot sarjaan mitattavan virtapiirin kanssa.
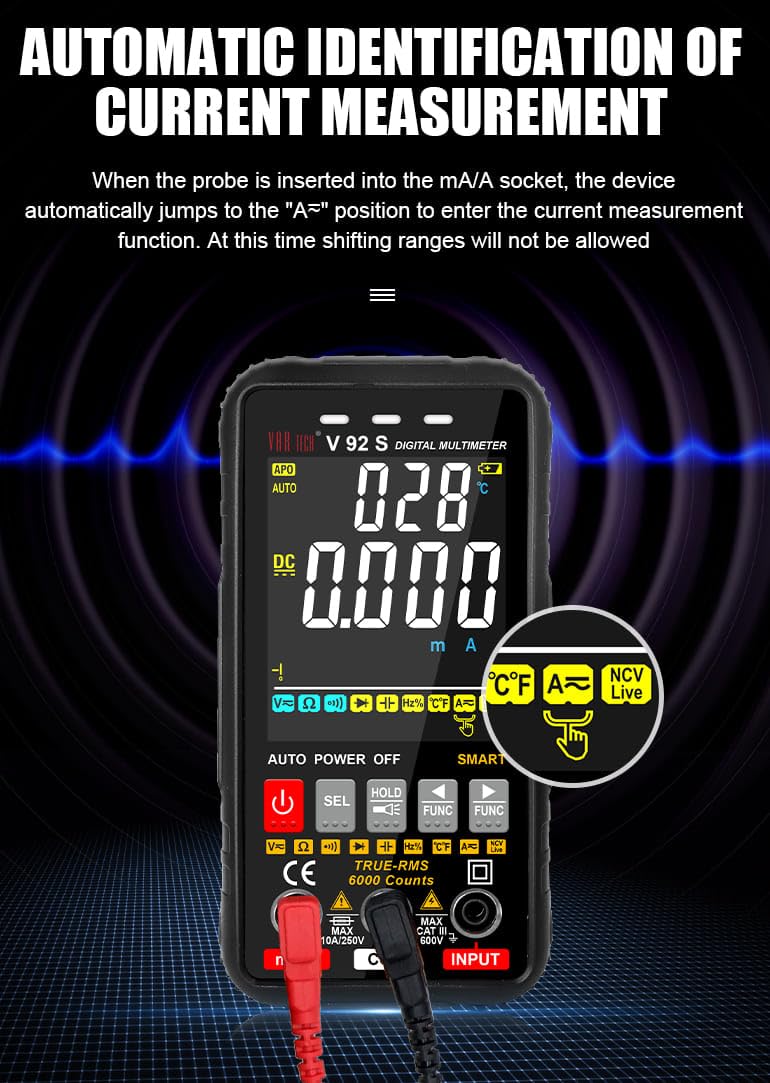
Figure 6.1: Automatic identification of current measurement. The multimeter automatically adjusts to the current measurement function when the probe is inserted into the mA/A socket.
6.3.3. Resistance, Capacitance, Frequency, Temperature, Diode, Continuity
For these measurements, ensure the red lead is in the “INPUT” jack and the black lead in the “COM” jack. Use the SEL or TYÖNTEKIJÄ buttons to select the desired mode. Connect probes to the component or circuit as appropriate for each measurement type.
6.3.4. NCV (Non-Contact Voltage) Testi
NCV-toiminto mahdollistaa vaihtovirtajännitteen havaitsemisentage ilman suoraa kosketusta johtimiin.
- Select the NCV function using the appropriate button.
- Bring the top of the multimeter near the conductor or outlet.
- The instrument will emit an audible beep and the alarm indicator light will illuminate when AC signals are detected. A “-H” display indicates a strong signal, while “-L” indicates a weak signal.

Figure 6.2: Auditory and visual alarm during NCV (Non-Contact Voltage) testing, indicating the presence of AC voltage.
6.4. Tiedonpitotoiminto
Paina PIDÄ -painiketta pysäyttääksesi nykyisen lukeman näytössä. Paina sitä uudelleen vapauttaaksesi pitotoiminnon.
6.5. Taskulampun toiminto
The multimeter includes a built-in flashlight for illuminating work areas. Activate the flashlight using the designated button (often integrated with the HOLD button or a separate light icon). Press again to turn it off.

Figure 6.3: The integrated flashlight function, useful for working in dimly lit environments.
7. Huolto
7.1. Puhdistus
Pyyhi kotelo mainoksellaamp cloth and mild detergent. Do not use abrasives or solvents. Ensure the multimeter is powered off and disconnected from all circuits before cleaning.
7.2. Pariston vaihto
Kun näyttöön tulee heikon pariston ilmaisin, vaihda paristot osiossa 5.1 kuvatulla tavalla.
7.3. Sulakkeen vaihto
The V92S features an intelligent anti-burn function with a built-in safety fuse to protect the circuit. If the safety fuse burns out, the display screen will show a “FUSE” symbol to prompt replacement.
- Varmista, että yleismittari on sammutettu ja kaikki mittausjohdot on irrotettu.
- Avaa laitteen takana oleva paristolokeron kansi.
- Carefully locate and remove the blown fuse.
- Replace it with a fuse of the same type and rating (refer to specifications for fuse type).
- Sulje paristolokeron kansi kunnolla.

Figure 7.1: The intelligent anti-burn function prompt, indicating the location of the fuse for replacement.
8. Vianmääritys
If you encounter issues with your VAR TECH V92S, refer to the following common problems and solutions:
- Ei näyttöä: Tarkista paristojen asennus ja varmista, että paristot eivät ole tyhjentyneet. Vaihda tarvittaessa.
- Väärät lukemat: Verify test lead connections. Ensure the correct measurement function is selected. Check if the fuse is intact for current measurements.
- “OL” or Overload Indication: The measured value exceeds the range of the selected function. Select a higher range if available, or ensure the input is within the multimeter’s capabilities.
- “FUSE” Display: The fuse has blown. Refer to Section 7.3 for fuse replacement.
If the problem persists, contact VAR TECH customer support for assistance.
9. Tekniset tiedot
| Parametri | Erittely |
|---|---|
| Malli | V92S |
| Näyttö | 6000 Counts HD Display |
| Todellinen RMS | Kyllä |
| DC Voitage | Jopa 600 V |
| AC Voitage | Jopa 600 V |
| DC virta | Jopa 10 A |
| Vaihtovirta | Jopa 10 A |
| Resistanssi | 600 Ω to 60 MΩ |
| Kapasitanssi | 6 nF - 60 mF |
| Taajuus | 6 Hz - 10 MHz |
| Lämpötila | -40 ºC - 1000 ºC |
| Jatkuvuustesti | Kyllä |
| Dioditesti | Kyllä |
| NCV (Non-Contact Voltage) | Kyllä |
| Virtalähde | 4 AAA-paristoa (mukana) |
| Tuotteen paino | 300 g |
| Tuotteen mitat (P x L x K) | 14 x 7 x 5 cm |
| Turvallisuusluokitus | CATIII 600V |
| Sertifikaatit | CE, ISO 9001 |

Figure 9.1: A comparison table illustrating the features of various VAR TECH multimeter models, including the V92S.
10. Takuu ja tuki
The VAR TECH V92S Smart Digital Multimeter comes with a 1-year warranty against manufacturing defects. For warranty claims or technical support, please contact VAR TECH directly.
Manufacturer: V A R TECH, www.var-tech.com