
1. Johdanto
This manual provides essential information for the safe and effective operation of your Pretul NL-12P Rechargeable Green Laser Level. Please read these instructions thoroughly before first use and keep them for future reference. This device is designed for precise leveling and alignment tasks in various applications.
2. Turvallisuusohjeet
WARNING: Laser Radiation. Avoid direct eye exposure.
- Älä katso suoraan lasersäteeseen.
- Älä suuntaa lasersädettä ihmisiä tai eläimiä kohti.
- Älä käytä laitetta räjähdysvaarallisissa tiloissa.
- Pidä laite poissa lasten ulottuvilta.
- Use only the charger provided with the device.
- Do not attempt to modify or disassemble the laser level. This can lead to hazardous laser exposure and voids the warranty.
- Varmista, että työalueella ei ole esteitä ja mahdollisia vaaroja.
3. Pakkauksen sisältö
Varmista, että pakkauksessa on kaikki tarvittavat osat:
- Pretul NL-12P Laser Level
- Li-ion akku
- Laturi
- Magneettikanta
- Seinäteline
- Quick-Release Tripod
- Kantolaukku

Figure 3.1: Included accessories: carrying case and quick-release tripod.
4. Tuote ohiview
Familiarize yourself with the components of your Pretul NL-12P laser level:

Figure 4.1: Key components of the Pretul NL-12P Laser Level.
- Lasertulostusikkunat: Lähettää vihreitä lasersäteitä.
- Magneettinen pohja: Allows for secure attachment to metallic surfaces.
- Li-ION akku: Rechargeable power source for the device.
- On/Off Knob: Controls the power and locking mechanism.
- Quick-Release Tripod: Provides a stable base for the laser level.
- Kuplataso: Assists in manual leveling when self-leveling is not active.
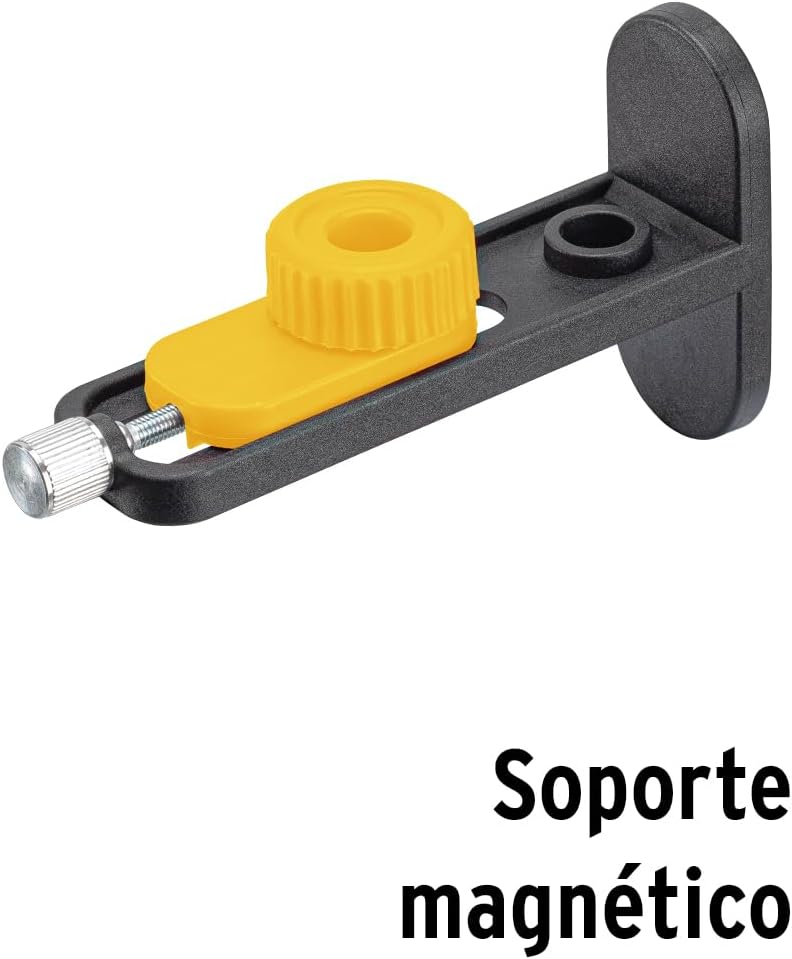
Kuva 4.2: Sivu view showing the magnetic base.

Kuva 4.3: Takaosa view of the laser level.
5. Asennus
5.1 Akun lataaminen
Before first use, fully charge the Li-ion battery. Connect the charger to the laser level and plug it into a power outlet. The charging indicator will show the charging status. Once fully charged, disconnect the charger.
5.2 Attaching the Tripod and Magnetic Base
The laser level can be mounted on the quick-release tripod or attached to metallic surfaces using the magnetic base.
- For Tripod: Screw the laser level onto the 1/4" thread of the quick-release tripod. Adjust the tripod legs for stability.
- For Magnetic Base: Attach the magnetic base to the bottom of the laser level. The base can then be secured to suitable metallic surfaces.
Figure 5.1: Laser level with magnetic base.
6. Käyttö
6.1 Powering On/Off and Self-Leveling
- To power on the device and activate self-leveling mode, rotate the On/Off knob to the unlocked position. The laser lines will automatically level within ±3°. If the device is outside this range, the laser lines will flash to indicate it cannot self-level.
- To power off, rotate the On/Off knob to the locked position. This also locks the pendulum for safe transport.
6.2 Laserlinjojen vaihtaminen
The NL-12P projects 12 lines (3 x 360° planes). Use the control buttons on the top of the device to switch between horizontal and vertical lines:
- Press the 'H' button to activate/deactivate horizontal laser lines.
- Press the 'V' button to activate/deactivate vertical laser lines.
- Multiple lines can be active simultaneously.
6.3 Manuaalitila (lukittu heiluri)
For projecting lines at an angle, you can use the manual mode:
- With the device powered off (knob in locked position), press and hold the 'H' or 'V' button for a few seconds to activate the laser lines in manual mode.
- In this mode, the self-leveling function is deactivated, and the laser lines can be projected at any angle. The lines will not flash.
- To exit manual mode, turn the device off using the On/Off knob.
Video 6.1: Demonstration of Pretul NL-12P Laser Level features, including setup and operation of laser lines.
7. Huolto
- Puhdistus: Käytä pehmeää, damp cloth to clean the device. Do not use abrasive cleaners or solvents. Keep the laser output windows clean for optimal performance.
- Akun hoito: Store the battery in a cool, dry place. If storing for extended periods, charge the battery every 3-6 months to maintain its lifespan.
- Varastointi: When not in use, store the laser level in its carrying case in a dry, dust-free environment. Ensure the pendulum is locked before storage or transport.
8. Vianmääritys
| Ongelma | Mahdollinen syy | Ratkaisu |
|---|---|---|
| Laserviivat vilkkuvat. | Laite on itsevaaitusalueensa (±3°) ulkopuolella. | Place the laser level on a more level surface. |
| Laserviivat ovat himmeitä tai eivät näy. | Akku on vähissä tai ympäristön valo kirkas. | Recharge the battery. Use the laser level in a less brightly lit environment or use a laser receiver (sold separately) for outdoor use. |
| Laite ei käynnisty. | Akku on tyhjä tai se ei ole asetettu oikein paikalleen. | Ensure the battery is charged and correctly inserted. Check the On/Off knob is in the unlocked position. |
| Laser lines are not level in self-leveling mode. | Device is damaged or requires calibration. | Ota yhteyttä asiakastukeen saadaksesi apua. Älä yritä korjata laitetta itse. |
9. Tekniset tiedot
| Ominaisuus | Yksityiskohta |
|---|---|
| Malli | NL-12P |
| Merkki | Hinta |
| Laser väri | Green (4X greater visibility than red laser) |
| Rivien lukumäärä | 12 lines (3 x 360° planes) |
| Itsetasaava alue | ± 3° |
| Toleranssi | 0.2 mm/m |
| Alue | Jopa 25 metriä |
| Virtalähde | Ladattava litium-ioni-akku |
| Materiaali | Muovi, akryylinitriilibutadieenistyreeni (ABS) |
| Väri | Keltainen |
| Tuotteen mitat | 12 cm (pituus) x 10 cm (leveys) |
| Tuotteen paino | 1 kiloa |
| IP-luokitus | IP54 (Splash Resistant, Protected against limited dust ingress) |
| Mukana olevat elementit | Charger, Wall mount, Magnetic base, Laser level, Case, Li-ion battery, Quick-release tripod |

Figure 9.1: IP54 Protection Rating details.
Figure 9.2: Product packaging highlighting key features and specifications.
For additional information and videos, please visit: Truper Product Page
10. Takuu ja tuki
Grupo Truper offers a comprehensive warranty covering over 25,000 accessories and spare parts, with minimal or no labor cost. There are 177 service centers in Mexico and 15 Latin American countries. No purchase receipt is required to validate the warranty.
For warranty claims or technical support, please contact your local Pretul service center or visit the official Pretul websivustolta lisätietoja.
For more information about Pretul products, visit the Pretul Store on Amazon.