1. Turvallisuustiedot
Lue kaikki turvallisuusohjeet huolellisesti ennen tuotteen käyttöä. Näiden ohjeiden noudattamatta jättäminen voi aiheuttaa sähköiskun, tulipalon tai muita vaaroja.
- Älä altista projektoria sateelle tai kosteudelle tulipalon tai sähköiskun välttämiseksi.
- Älä avaa projektorin koteloa.asing. Laitteen sisällä ei ole käyttäjän huollettavia osia. Anna kaikki huoltotoimenpiteet pätevän huoltohenkilöstön tehtäväksi.
- Varmista asianmukainen ilmanvaihto. Älä tuki tuuletusaukkoja.
- Käytä ainoastaan projektorin mukana toimitettua virtalähdettä.
- Vältä projektorin linssin suoraa altistumista silmille, kunamp on päällä.
- Pidä projektori poissa lämmönlähteistä ja suorasta auringonvalosta.
2. Pakkauksen sisältö
Varmista, että pakkauksessasi on kaikki alla luetellut tuotteet:
- 1 x Jectse Mini LED Projector
- 1 x Remote Control (2 AAA batteries not included)
- 1 x AV Line (3-in-1 RCA cable)
- 1 x käyttöohje
- 1 x virtalähde

Figure 2.1: Contents of the Jectse Mini LED Projector package.
3. Tuote ohiview
The Jectse Mini LED Projector is a compact and portable device designed for various multimedia applications. It features a 1080P resolution, LED light source, and multiple connectivity options.

Kuva 3.1: Edestä ja päältä view of the Jectse Mini LED Projector.
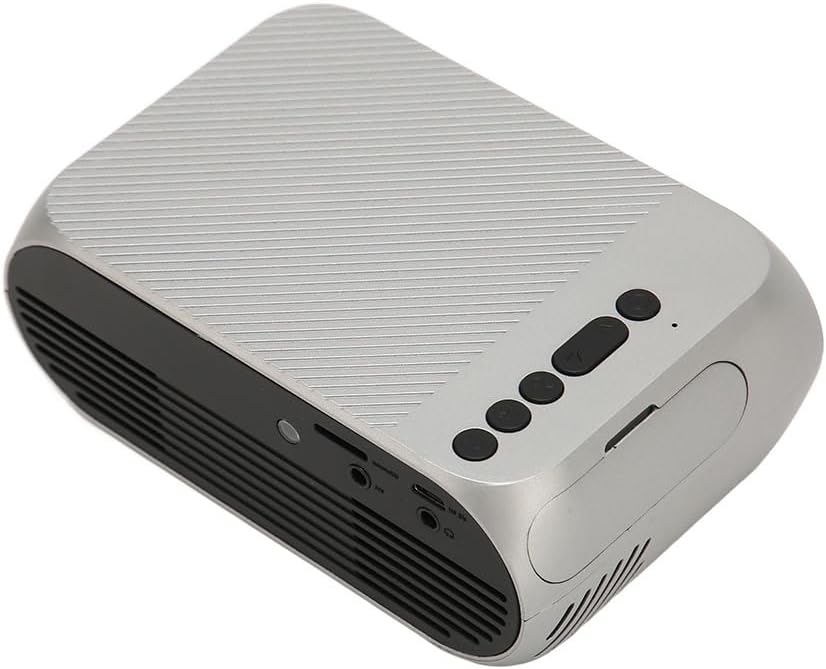
3.1 Projektorin osat

Figure 3.2: Top panel controls of the Jectse Mini LED Projector.
- Linssi: Heijastaa kuvan näytölle.
- Tuuletusritilä: Varmistaa asianmukaisen ilmankierron jäähdytykseen.
- Ohjauspainikkeet: (Refer to Figure 3.2) For basic navigation and power control.
- Tarkennuspyörä: Säätää kuvan selkeyttä.
Kuva 3.3: Takana ja sivulla view tulo-/lähtöporteilla.
3.2 Tulo-/lähtöportit
- HD Multimedia Interface (HDMI): For connecting devices like laptops, gaming consoles, and media players.
- AV-portti: Vanhempien laitteiden liittämiseen mukana toimitetulla AV-kaapelilla.
- USB-portti: USB-asemien liittämiseen median toistamista varten files suoraan.
- Tehon syöttö: Virtalähteen liittämiseen.
- Äänilähtö (3.5 mm:n liitin): Ulkoisten kaiuttimien tai kuulokkeiden kytkemiseen.
4. Asennus
4.1 Sijoitus
Place the projector on a stable, flat surface. Ensure there is adequate space around the projector for ventilation. The ideal projection distance is between 1.5 to 2 meters for optimal image size and clarity.

Figure 4.1: Recommended projection distance and screen sizes.
4.2 Virtaliitäntä
- Liitä virtalähde projektorin virransyöttöporttiin.
- Kytke virtalähde sopivaan pistorasiaan (100–240 V).
4.3 Tulolähteiden kytkeminen
The projector supports HD Multimedia Interface, AV, and USB inputs.

Figure 4.2: Projector compatibility with various devices.
- HD Multimedia Interface: Connect an HD Multimedia Interface cable from your source device (e.g., laptop, game console) to the projector's HD Multimedia Interface port.
- AV: Connect the included AV cable to the projector's AV port and the corresponding audio/video output ports on your source device.
- USB: Insert a USB flash drive into the projector's USB port.
4.4 Tarkennuksen säätö
After powering on the projector, rotate the focus wheel (usually located near the lens) until the projected image appears clear and sharp.
5. Käyttöohjeet
5.1 Virran kytkeminen päälle/pois
- Virran kytkeminen: Press the Power Switch button on the projector or the power button on the remote control.
- Virran sammuttaminen: Press the Power Switch button again. The projector will shut down.
5.2 Lähteen valinta
After powering on, use the "Signal Source Button" on the projector or the "Source" button on the remote control to cycle through available input sources (HD Multimedia Interface, AV, USB).
5.3 Navigointi valikossa
Use the Direction Buttons and Confirm Button on the projector or the arrow keys and OK button on the remote control to navigate through the projector's on-screen menu for settings adjustments (e.g., picture mode, aspect ratio, sound settings).
5.4 Kaukosäätimen käyttö
Insert two AAA batteries (not included) into the remote control. Point the remote control towards the projector's IR receiver to operate functions such as power, source selection, volume, and menu navigation.
6. Huolto
6.1 Linssin puhdistaminen
Pyyhi projektorin linssi varovasti pehmeällä, nukkaamattomalla liinalla, joka on erityisesti suunniteltu optisille linsseille. Älä käytä hankaavia puhdistusaineita tai liiallista voimaa, sillä se voi naarmuttaa linssiä.
6.2 Yleinen puhdistus
Wipe the exterior of the projector with a soft, dry cloth. Do not use liquid cleaners or solvents. Ensure the ventilation grilles are free from dust and debris to maintain optimal cooling.
7. Vianmääritys
| Ongelma | Mahdollinen syy | Ratkaisu |
|---|---|---|
| Ei kuvaa projisoituna |
|
|
| Kuva on epäselvä |
|
|
| Ei ääntä |
|
|
| Kaukosäädin ei toimi |
|
|
8. Tekniset tiedot
| Ominaisuus | Yksityiskohta |
|---|---|
| Merkki | Jectse |
| Mallinumero | Jectse3giz17bkpy |
| Resoluutio | 1920*1080p |
| Valon lähde | LED |
| LEDin käyttöikä | 3000 tuntia |
| Projektioetäisyys | 1.5-2m |
| Projektiosuhde | 1.6:1 |
| Kuvasuhde | 16:9 |
| Virransyöttö | 100-240V |
| Tuotteen koko | 13 x 8.5 x 5 cm (noin 5.1 x 3.3 x 2 tuumaa) |
| Tuotteen paino | 1.1 kiloa |
| Yhteystekniikka | HD Multimedia Interface, AV, USB |
| Erikoisominaisuudet | Adjustable, Portable Design |
9. Takuu ja tuki
For warranty information or technical support, please refer to the contact details provided with your purchase or visit the official Jectse websivusto. Säilytä ostokuitti takuuvaatimuksia varten.