
1. Johdanto
Thank you for choosing the WORKPRO 1500W Rotary Hammer Drill. This heavy-duty tool is designed for demanding tasks such as drilling in concrete, wood, and steel, as well as chiseling applications. This manual provides essential information for the safe and efficient operation, maintenance, and troubleshooting of your rotary hammer drill. Please read it thoroughly before first use and keep it for future reference.

Image 1.1: WORKPRO 1500W Rotary Hammer Drill and included accessories.
2. Yleiset turvallisuusohjeet
Noudata aina perusturvallisuusohjeita tulipalon, sähköiskun ja henkilövahinkojen riskin vähentämiseksi. Näiden ohjeiden noudattamatta jättäminen voi johtaa vakaviin vammoihin.
- Työalueen turvallisuus: Pidä työalue puhtaana ja hyvin valaistuna. Epäsotkuiset tai pimeät alueet altistavat onnettomuuksille. Älä käytä sähkötyökaluja räjähdysvaarallisissa ilmakehissä, kuten syttyvien nesteiden, kaasujen tai pölyn läsnä ollessa.
- Sähköturvallisuus: Sähkötyökalun pistokkeiden on sovittava pistorasiaan. Älä koskaan muuta pistoketta millään tavalla. Vältä kosketusta maadoitettuihin pintoihin. Älä altista sähkötyökaluja sateelle tai märille olosuhteille.
- Henkilökohtainen turvallisuus: Always wear eye protection. Use hearing protection when operating the tool for extended periods. Wear a dust mask if drilling in dusty conditions. Dress properly; avoid loose clothing or jewelry.
- Työkalun käyttö ja hoito: Älä pakota sähkötyökalua. Käytä työhösi sopivaa sähkötyökalua. Irrota pistoke virtalähteestä ennen säätöjen tekemistä, lisävarusteiden vaihtamista tai sähkötyökalun varastointia.
- Huolto: Huolla sähkötyökalut. Tarkista liikkuvien osien suuntaus tai kiinnittyminen, osien rikkoutuminen ja muut olosuhteet, jotka voivat vaikuttaa sähkötyökalun toimintaan.
3. Product Components and Included Items
Familiarize yourself with the parts of your WORKPRO Rotary Hammer Drill and the accessories provided.

Image 3.1: Key components of the rotary hammer drill, including SDS-PLUS Chuck, Four Functions Switch, Grease Pot, Shock Absorber, On/Off Switch, Cushioned Handle, Variable Speed Control, 360° Rotatable Handle, and Heat Outlet.
Mukana tulevat tarvikkeet:

Image 3.2: The complete set of accessories includes a carrying case, rotary hammer drill, SDS-plus point flat bit (250mm), SDS-plus point chisel bit (250mm), wrench, grease, SDS-plus drill bits (8mm, 10mm, 12mm), and a dust collector.
- 1 x Heavy-duty Rotary Hammer Drill
- 3 x SDS-plus Drill Bits (8 mm, 10 mm, 12 mm)
- 1 x Round Shank Chisel (Φ14 × 250 mm)
- 1 x Flat Chisel (Φ14 × 250 mm)
- 1 x Grease container
- 1 x Carbon Brush set
- 1 x pölysuoja
- 1 x jakoavain
- 1 x kantolaukku
4. Asennus ja kokoonpano
4.1 Apukahvan kiinnittäminen
The 360° rotatable handle provides better control and comfort. Loosen the handle clamp, aseta kahva haluamaasi kulmaan ja kiristä lukkoamp turvallisesti.
4.2 SDS-plus-kärkien asettaminen ja poistaminen
The SDS-plus chuck allows for quick and secure bit changes.
- Lisätään: Clean the bit shank. Pull back the chuck collar, insert the bit into the chuck until it clicks into place. Release the collar. Pull on the bit to ensure it is securely locked.
- Poistaminen: Pull back the chuck collar and pull the bit out.

Image 4.1: Illustration of the auto-lock SDS-plus chuck for secure bit clamping.
4.3 Attaching the Dust Collector
For cleaner operation and to protect the user, attach the dust collector to the front of the tool when drilling.

Image 4.2: The anti-dust cover protects users and the machine from dust and debris.
5. Käyttöohjeet
The WORKPRO Rotary Hammer Drill features four operating modes and variable speed control for versatile applications.
5.1 Tilan valinta
Use the four-function switch located on the side of the tool to select the desired operating mode:
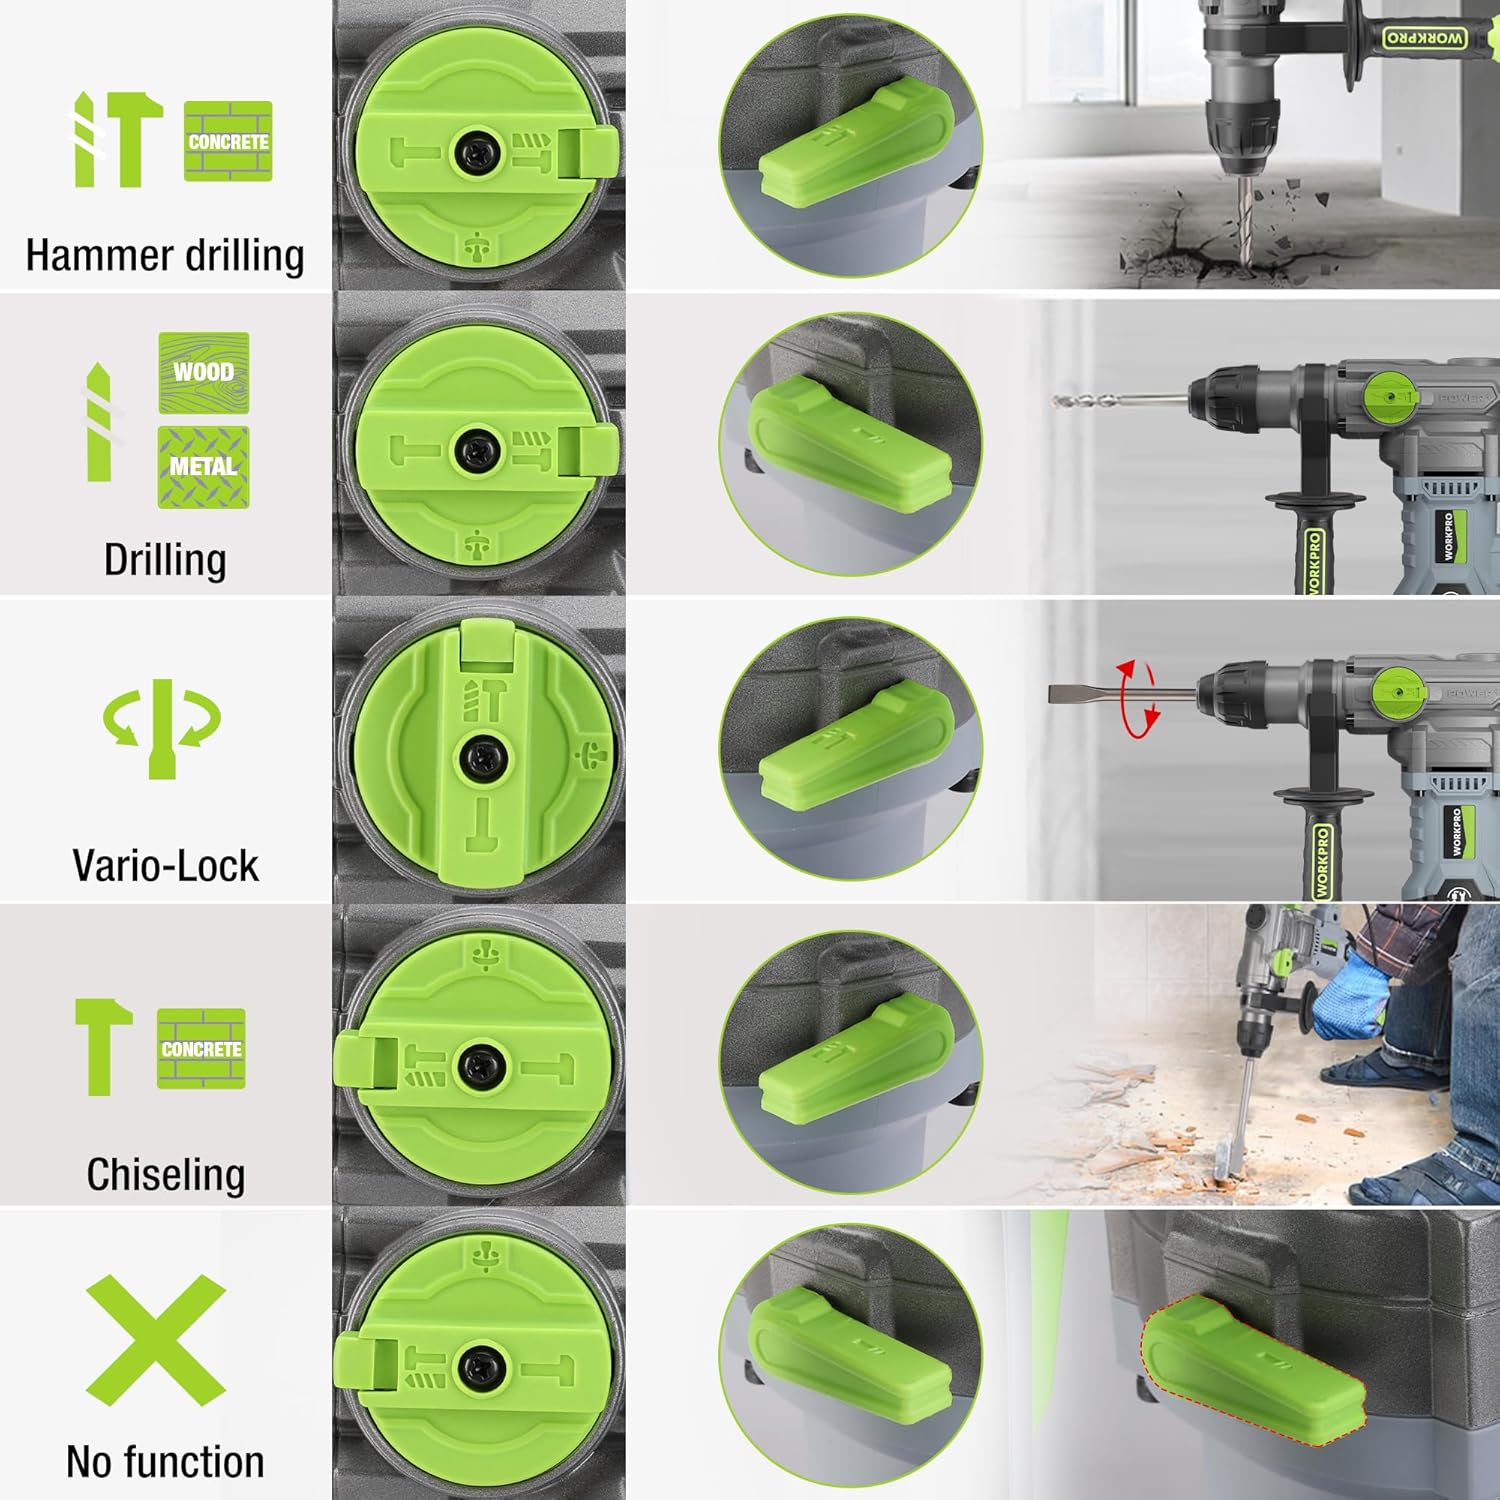
Image 5.1: The four-function switch allows selection between Hammer Drilling, Drilling, Vario-Lock (Chisel Adjust), and Chiseling modes.
- Vasaraporaus: For drilling in concrete and masonry with impact.
- Poraus: Puun, metallin ja muovin poraamiseen ilman iskua.
- Chiseling (Hammer Only): Kevyisiin piikkaustöihin betonissa ja muurauksessa.
- Vario-Lock (Chisel Adjust): Allows you to rotate and lock the chisel in various positions to optimize the working angle.

Image 5.2: Visual representation of the hammer drilling, drilling, hammer, and chisel adjust modes.
5.2 Portaaton nopeudensäätö
The variable speed control allows you to adjust the rotation speed (0-930 RPM) and impact frequency (0-4300 BPM) to match the material and application.
- Rotate the speed adjustment dial to increase or decrease the speed.
- Start with a lower speed for precise drilling and increase as needed.
5.3 Porauskapasiteetit
The tool offers excellent drilling performance across various materials:
- Betoni: Jopa 32 mm
- Puu: Jopa 42 mm
- Teräs: Jopa 13 mm
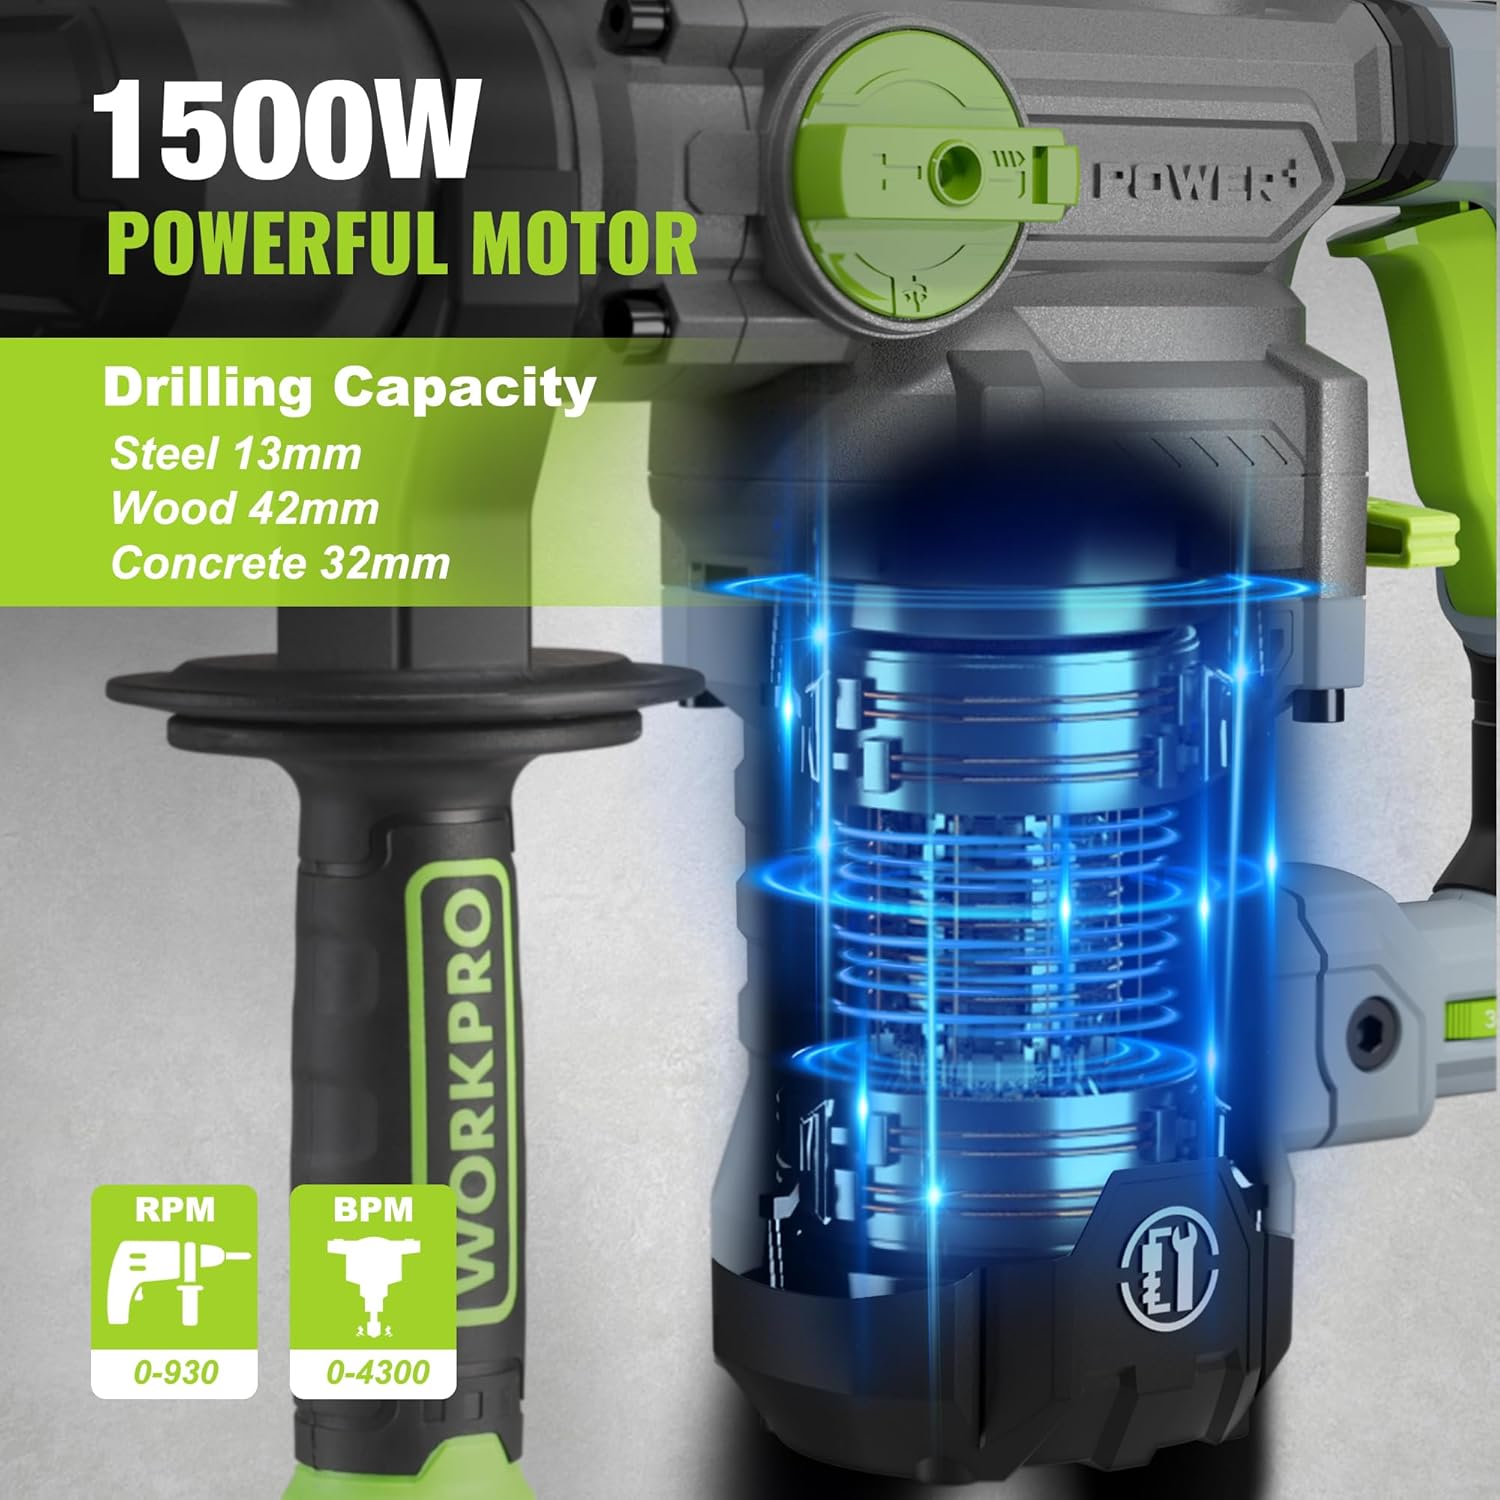
Image 5.3: The 1500W motor provides sufficient power for drilling in steel, wood, and concrete.
5.4 Sovellus Esimamples

Image 5.4: The tool is suitable for various tasks including chiseling concrete, removing tiles, concrete drilling, and floor breaking.
6. Huolto
Säännöllinen huolto varmistaa työkalusi pitkän käyttöiän ja optimaalisen suorituskyvyn.
6.1 Puhdistus
- Irrota työkalu aina virtalähteestä ennen puhdistamista.
- Puhdista tuuletusaukot säännöllisesti ylikuumenemisen estämiseksi.
- Pyyhi työkalun kotelo pehmeällä,amp kangas. Älä käytä voimakkaita kemikaaleja tai hankaavia puhdistusaineita.
- The tool features a dust-proof design and anti-dust bottom structure to extend its service life.
6.2 Grease Replenishment
To maintain optimal performance and durability, replenish the grease every 30-40 hours of cumulative use.
- Use the provided wrench to open the grease pot.
- Apply the advanced lubricant (grease) as instructed.
- Securely close the grease pot after replenishment.
Image 6.1: Instructions for grease replenishment using the provided spanner and grease.
6.3 Hiiliharjojen vaihto
Carbon brushes are wear parts and should be checked periodically. Replace them when they are worn down to their limit to ensure consistent motor performance.
7. Vianmääritys
Tässä osiossa käsitellään yleisiä ongelmia, joita saatat kohdata. Ongelmissa, joita ei ole lueteltu tässä, ota yhteyttä asiakastukeen.
| Ongelma | Mahdollinen syy | Ratkaisu |
|---|---|---|
| Työkalu ei käynnisty | Ei virtalähdettä; Viallinen kytkin; Kuluneet hiiliharjat | Tarkista virtaliitäntä; Testaa kytkin; Vaihda hiiliharjat |
| Heikentynyt porausteho | Dull drill bit; Incorrect mode selected; Insufficient grease | Replace or sharpen drill bit; Select correct mode; Replenish grease |
| Liiallinen tärinä/melu | Loose components; Damaged bit; Internal issue | Check all connections; Replace bit; Contact service center |
| Ylikuumeneminen | Blocked ventilation slots; Prolonged heavy use | Clean ventilation slots; Allow tool to cool down |
8. Tekniset tiedot
| Ominaisuus | Erittely |
|---|---|
| Mallinumero | W125244A |
| Tulo Voltage | 230-240 V |
| Taajuus | 50 Hz |
| Nimellissyöttöteho | 1500 W |
| Nopeus ilman kuormaa | 0-930 rpm ±10% |
| Iskutaajuus | 0-4300 bpm ±10% |
| Single Impact Force | 5.5 J |
| Porauskapasiteetti (betoni) | 32 mm |
| Porauskapasiteetti (puu) | 42 mm |
| Porauskapasiteetti (teräs) | 13 mm |
| Istukkatyyppi | SDS-plus |
| Tuotteen mitat (P x L x K) | 38.6 x 10.4 x 26.4 cm |
| Paino | 8.34 kg |
| Virtalähde | Johdollinen sähkö |
| Vaihteiden lukumäärä | 6 (Variable Speed) |
9. Takuu- ja tukitiedot
For warranty details, product support, or service inquiries, please refer to the warranty card included with your purchase or contact WORKPRO customer service directly. Keep your proof of purchase for any warranty claims.