
1. Johdanto
This manual provides detailed instructions for the installation, operation, and maintenance of the EVURU Digital Single Phase Energy Meter. This device is designed to measure active energy (kWh), voltage, current, and power consumption in single-phase AC circuits. Please read this manual thoroughly before installation and use to ensure safe and correct operation.
2. Turvallisuustiedot
- Asennuksen ja huollon saa suorittaa vain pätevä henkilöstö.
- Varmista, että virtalähde on irrotettu ennen asennus- tai johdotustöitä.
- Do not operate the meter in environments with excessive moisture, dust, or corrosive gases.
- Verify all connections are secure and correct according to the wiring diagrams to prevent damage to the meter or electrical system.
- Mittari on tarkoitettu vain sisäkäyttöön.
3. Tuote ohiview ja Ominaisuudet
The EVURU Digital Single Phase Energy Meter is a compact device for DIN rail installation, offering precise measurement of electrical parameters. Key features include:
- LCD-näyttö taustavalolla selkeitä lukemia varten.
- Measures total Energy (kWh), temporary Energy (kWh), real Voltage (V), real Current (A), and real Power (W).
- Pulse LED indicator for active energy measurement.
- 35mm DIN rail mounting.
- Temporary kWh can be reset to zero. Total kWh is non-resettable.

Kuva 1: Päättynytview of DDS662, DDS667, and DDS668 models.

Figure 2: Feature comparison table for DDS662, DDS667, and DDS668 models.
4. Tekniset tiedot
| Parametri | Arvo |
|---|---|
| Maksimivirta | 80A |
| Pulssin taajuus | 1000imp/kWh |
| Nimellinen voitage | 220V AC |
| Asennus | 35 mm DIN-kisko |
| Näytön tyyppi | LCD-näyttö taustavalolla |
| Mitatut parametrit | Total kWh, Temporary kWh, Voltage, virta, teho |
| Temporary kWh Reset | Yes (hold button for 6 seconds) |
| Total kWh Reset | Ei |
| Wiring Modes | Upper input lower output, Lower input upper output |
| Tuotteen paino | 0.035 unssia (noin 1 gramma) |
5. Asennus (asetus)
5.1 Mitat
Before installation, ensure adequate space for the meter. The dimensions are suitable for standard DIN rail enclosures.

Figure 3: Meter dimensions (example shown for DDS668).
5.2 Asennus DIN-kiskoon
The meter is designed for 35mm DIN rail installation. Simply clip the meter onto the DIN rail in your electrical panel.
5.3 Kytkentäkaaviot
Ensure all power is OFF before proceeding with wiring. Connect the meter according to the appropriate diagram for your model and desired wiring mode.
5.3.1 DDS662 Wiring
The DDS662 model typically uses a direct connection for single-phase two-wire systems.

Figure 4: Wiring diagram for DDS662 model.
5.3.2 DDS667 Wiring
The DDS667 model can be integrated with circuit breakers for protection.

Figure 5: Wiring diagram for DDS667 model, showing integration with circuit breakers.
5.3.3 DDS668 Wiring Modes
The DDS668 model supports two wiring configurations: upper input/lower output and lower input/upper output.
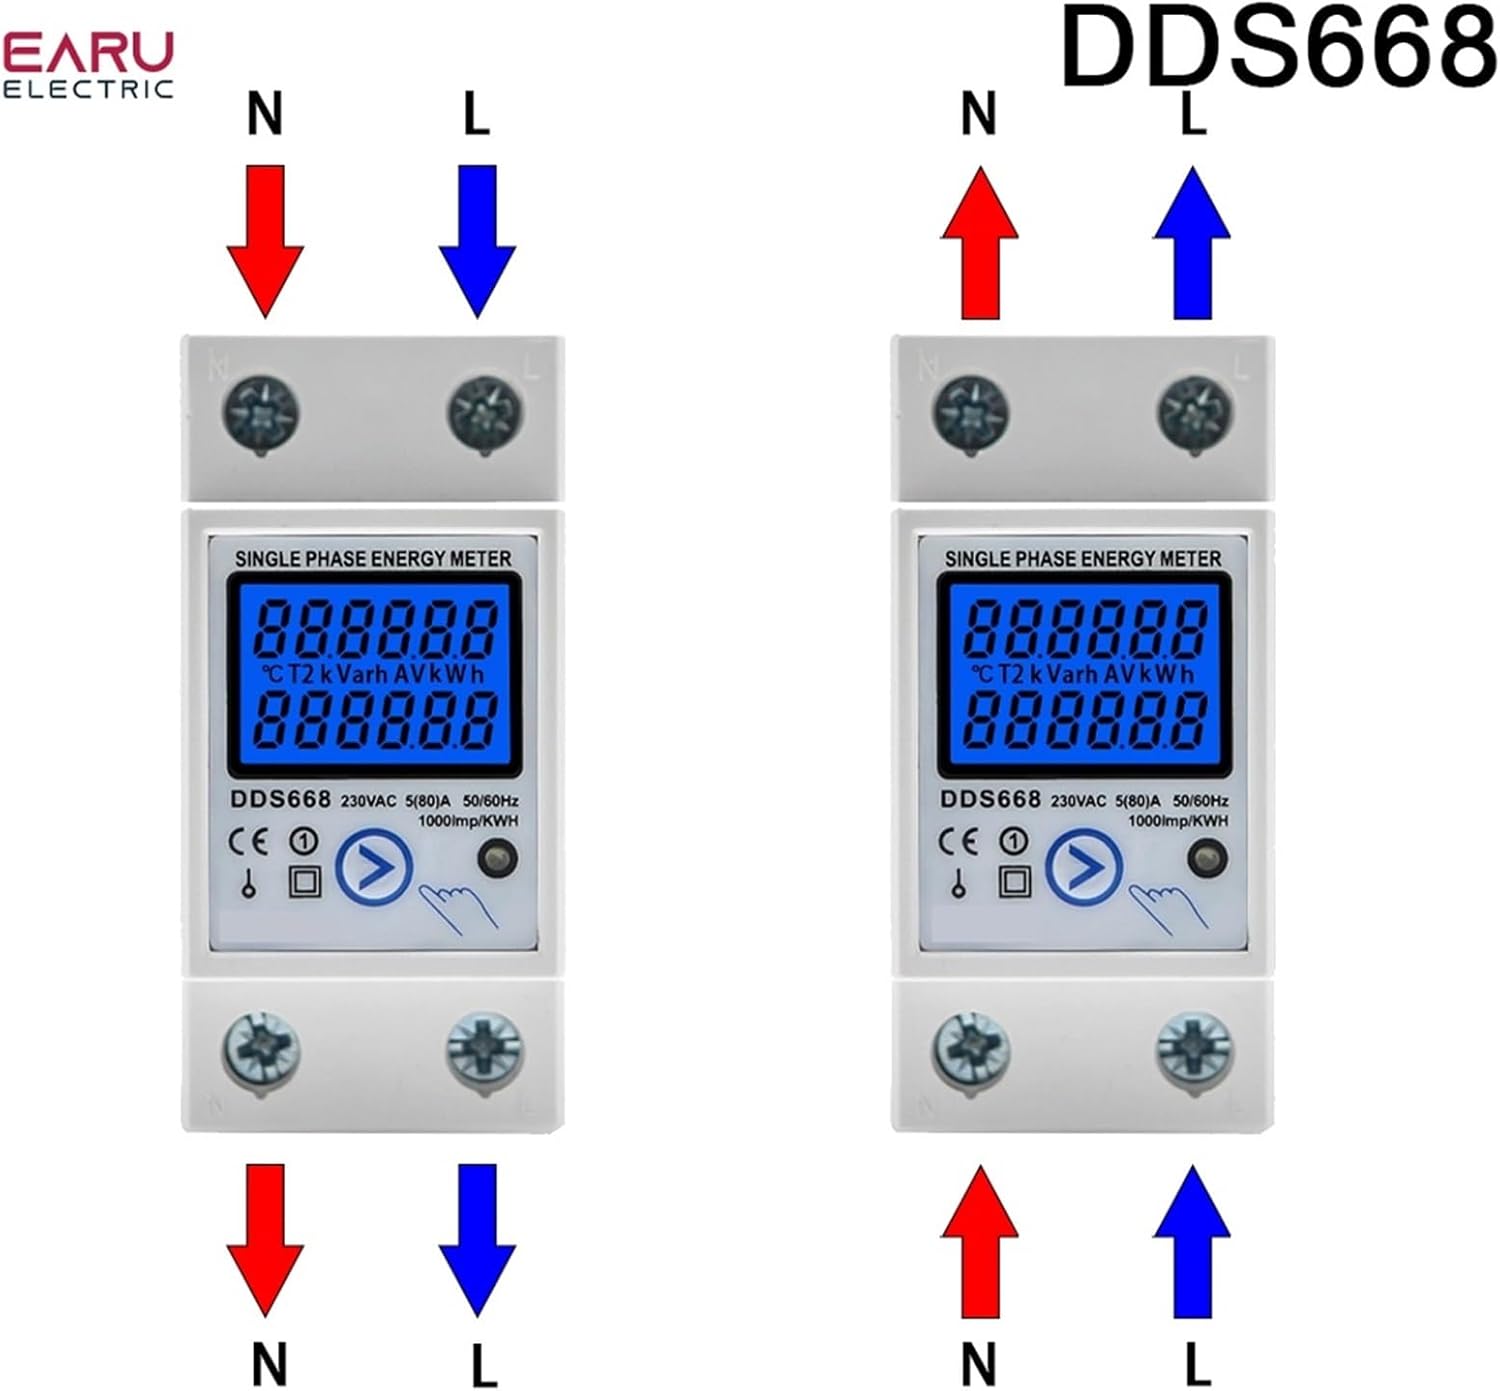
Figure 6: Wiring diagrams for DDS668 model, illustrating upper input/lower output and lower input/upper output modes.
6. Käyttö
6.1 Virta päälle
Once correctly wired and mounted, restore power to the circuit. The LCD display will illuminate, showing the current readings.
6.2 Reading Displayed Values
The meter cycles through various parameters on its LCD display. You can manually press the button (if available on your model, e.g., DDS667, DDS668) to cycle through:
- Kokonaisenergia (kWh)
- Temporary Energy (kWh)
- Real Voltage (V)
- Real Current (A)
- Todellinen teho (W)
The pulse LED will flash to indicate active energy measurement.
6.3 Tilapäisen kWh-arvon nollaaminen
To reset the temporary kWh reading to zero, press and hold the button on the front of the meter for approximately 6 seconds. Note that the total kWh reading cannot be reset.
7. Huolto
The EVURU Digital Single Phase Energy Meter requires minimal maintenance.
- Pidä mittari puhtaana ja pölyttömänä. Käytä puhdistamiseen pehmeää, kuivaa liinaa.
- Älä käytä hankaavia puhdistusaineita tai liuottimia.
- Tarkista säännöllisesti johtojen liitosten kireys ja kulumisen tai vaurioiden merkit.
- Varmista, että käyttöympäristö pysyy määritellyissä olosuhteissa (lämpötila, kosteus).
8. Vianmääritys
- Ei näyttöä / Mittari ei käynnisty:
- Tarkista virtapiirin virransyöttö.
- Varmista, että kaikki johdotusliitännät ovat tukevasti kiinni ja oikein kaavioiden mukaisesti.
- Väärät lukemat:
- Ensure the meter is correctly wired for the load. Incorrect wiring can lead to inaccurate measurements.
- Vahvista voltage and current are within the meter's specified range (e.g., 220V AC, max 80A).
- Temporary kWh Not Resetting:
- Ensure you are holding the reset button for the full 6 seconds.
- Note that the total kWh cannot be reset.
- Pulse LED Not Flashing:
- Verify there is an active load connected and drawing power through the meter.
- Check wiring for proper current flow.
9. Takuu ja tuki
Jos tarvitset takuutietoja tai teknistä tukea, katso tuotepakkausta tai ota yhteyttä jälleenmyyjään. Säilytä ostokuitti ostotodistuksena.