1. Johdanto
This manual provides essential information for the safe and efficient use of your AOC U34V5C/BK 34-inch WQHD LED Monitor. Please read this manual thoroughly before operating the device and retain it for future reference. The AOC U34V5C/BK is designed to deliver a high-quality visual experience with its 3440 x 1440 WQHD resolution and 21:9 aspect ratio, suitable for various applications from professional work to entertainment.
2. Turvallisuustiedot
Noudata seuraavia turvaohjeita näytön vahingoittumisen estämiseksi ja henkilökohtaisen turvallisuuden varmistamiseksi:
- Älä altista näyttöä sateelle tai kosteudelle tulipalo- tai sähköiskuvaaran välttämiseksi.
- Älä avaa näyttöä casing. Laitteen sisällä ei ole käyttäjän huollettavia osia. Anna kaikki huoltotoimenpiteet pätevän huoltohenkilöstön tehtäväksi.
- Aseta näyttö vakaalle ja tasaiselle alustalle, jotta se ei putoa.
- Varmista näytön ympärillä oleva asianmukainen ilmanvaihto. Älä tuki tuuletusaukkoja.
- Käytä ainoastaan näytön mukana toimitettua virtajohtoa ja sovitinta.
- Irrota näyttö pistorasiasta ukkosmyrskyjen aikana tai jos sitä ei käytetä pitkään aikaan.
3. Pakkauksen sisältö
Varmista, että pakkauksessa on kaikki tarvittavat osat:
- AOC U34V5C/BK Monitor
- Näytön jalusta (jalusta ja kaula)
- Virtakaapeli
- HDMI kaapeli
- DisplayPort-kaapeli
- USB-kaapeli
- Käyttöopas (tämä asiakirja)
4. Tuote ohiview
The AOC U34V5C/BK monitor features a 34-inch VA panel with WQHD resolution, USB-C connectivity with 65W Power Delivery, and a 100Hz refresh rate with AMD FreeSync support.
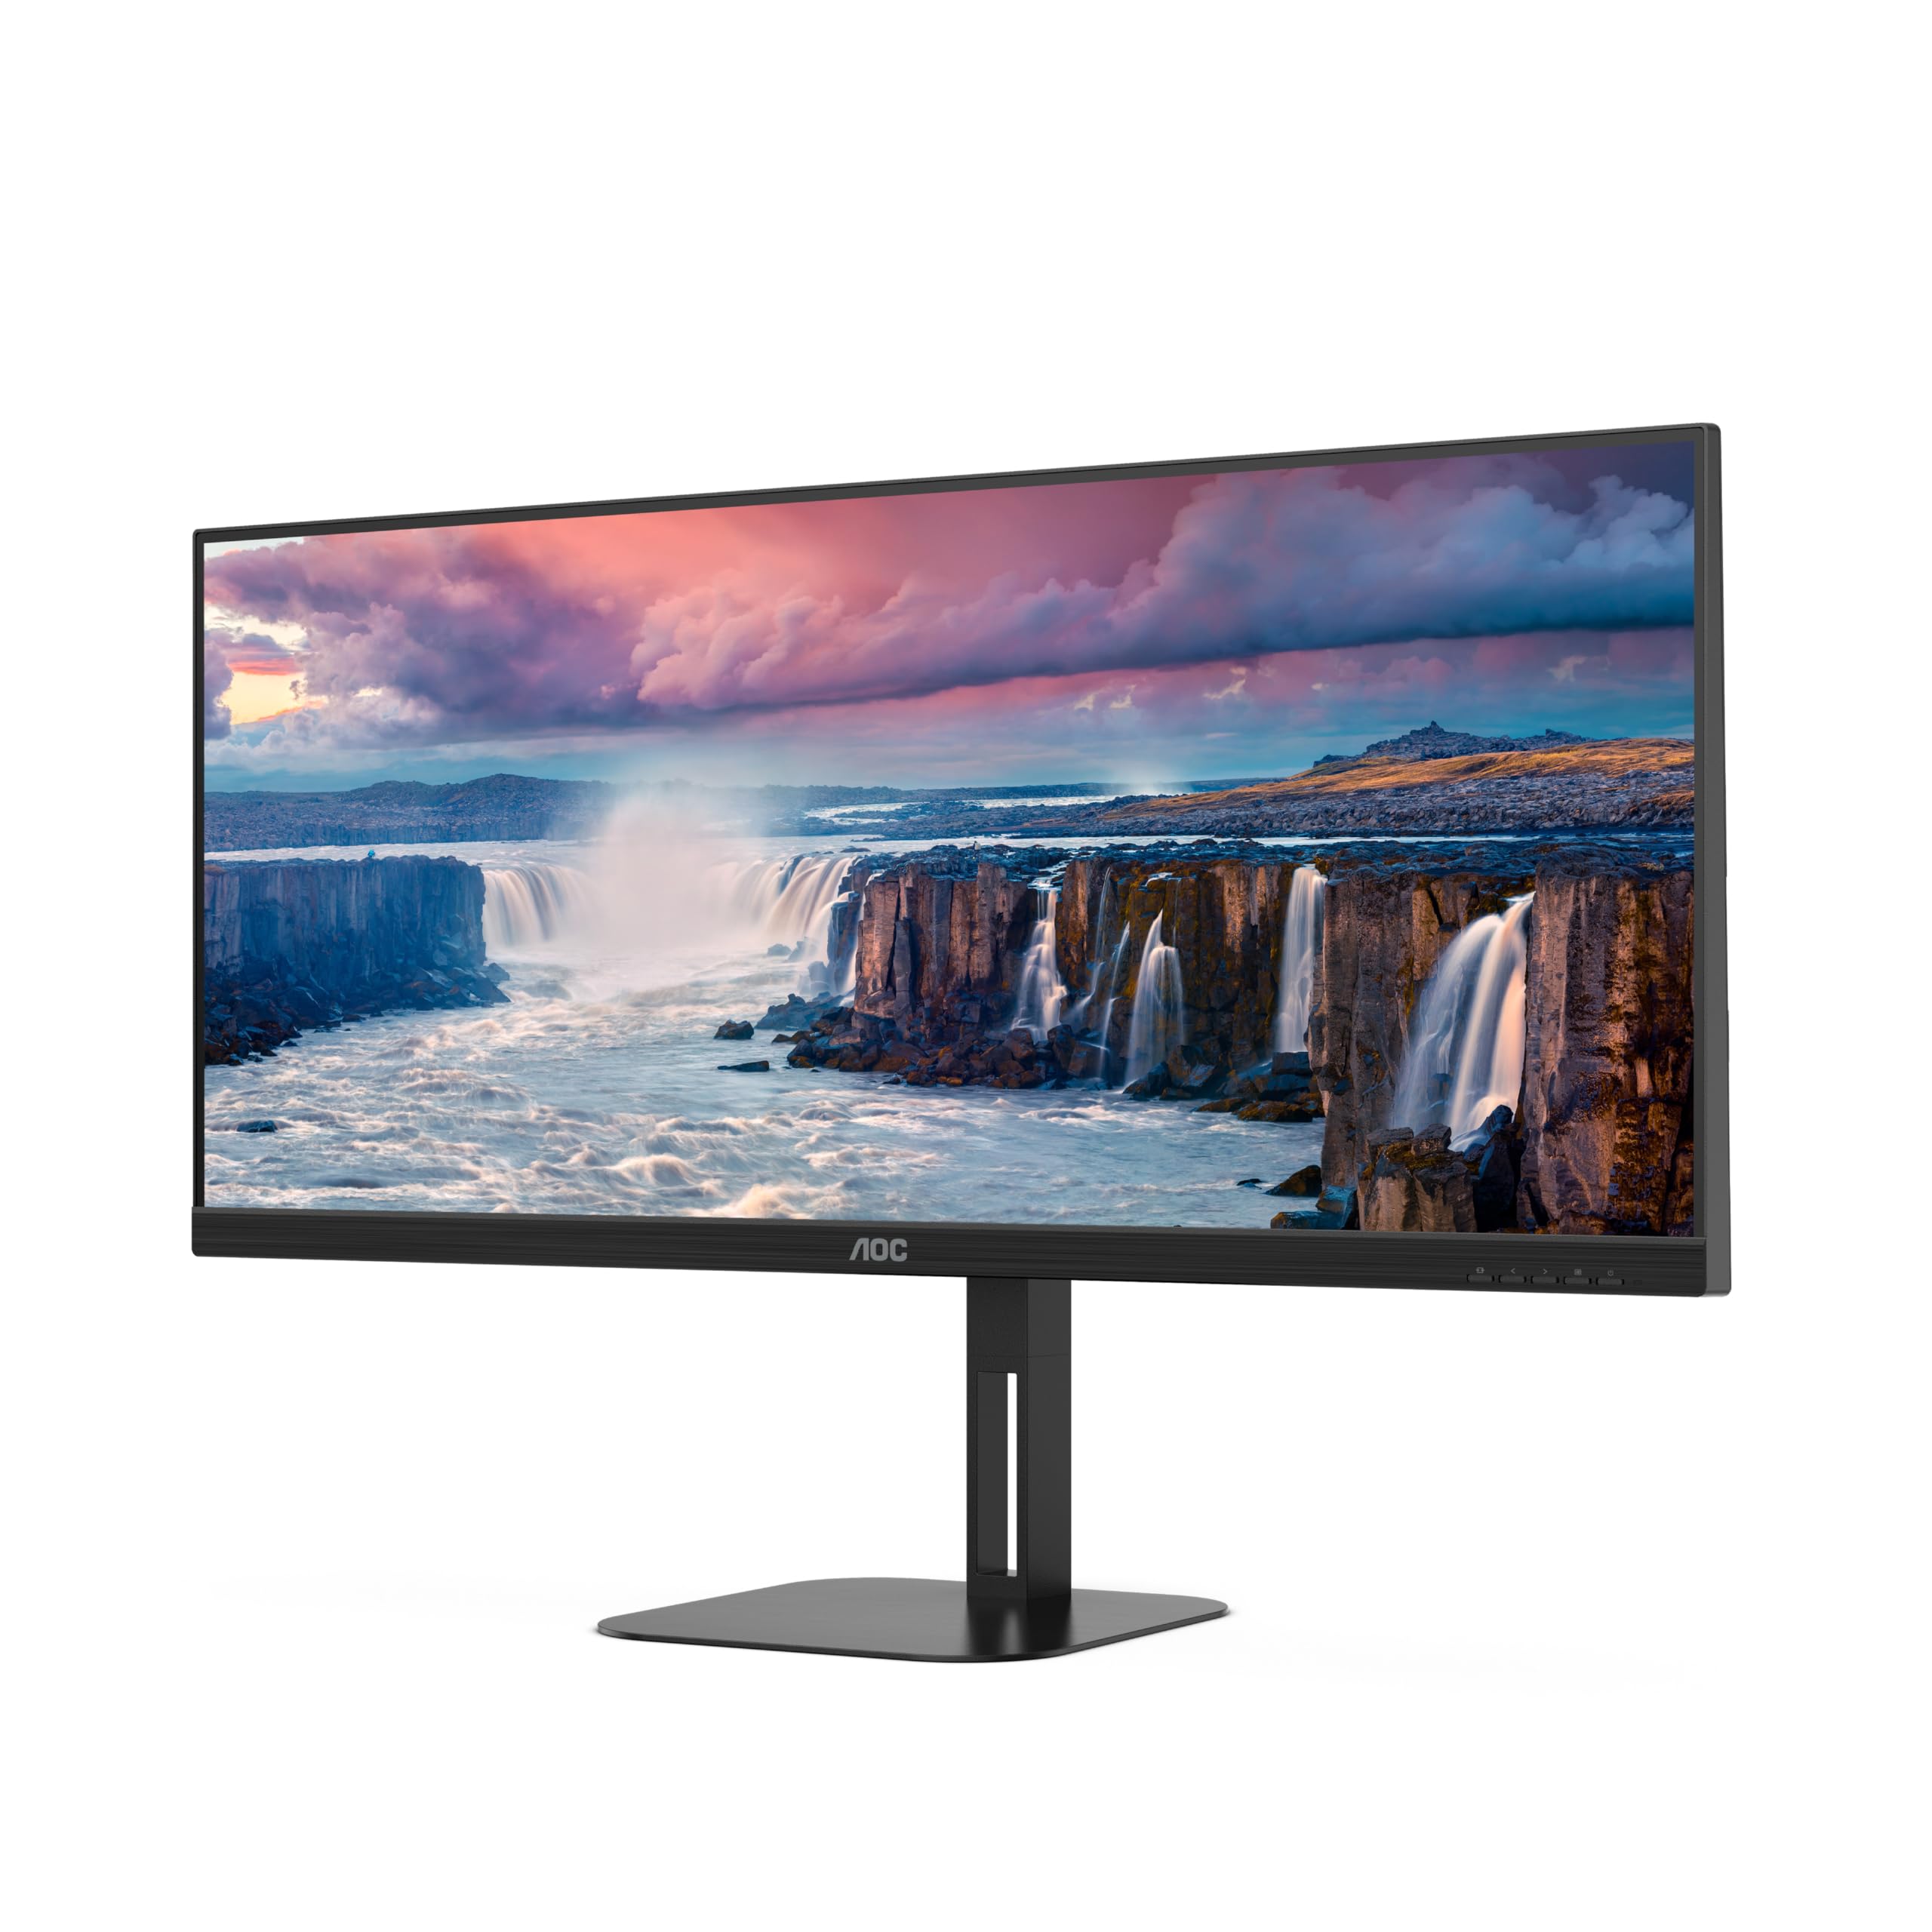
Kuva 4.1: Etuosa view of the AOC U34V5C/BK monitor highlighting its 34-inch VA panel, USB-C port with 65W Power Delivery, 100Hz refresh rate, and AMD FreeSync technology.
4.1 Näytön osat
Familiarize yourself with the various parts of your monitor:
- Etupaneeli: Display screen, OSD control buttons (usually located on the bottom right bezel).
- Takapaneeli: Power input, video input ports (HDMI, DisplayPort, USB-C), USB hub ports, security lock slot.
- Jalusta: Provides stable support and allows for height, tilt, and swivel adjustments.

Kuva 4.2: Takaosa view of the AOC U34V5C/BK monitor, showing the VESA mount compatibility and the stand attachment point.

Kuva 4.3: Pohja view of the AOC U34V5C/BK monitor, detailing the power input, DisplayPort, HDMI, USB-C, and USB-A hub ports.
5. Asennus
5.1 Jalustan kokoaminen
- Aseta näyttö varovasti kuvaruutu alaspäin pehmeälle, puhtaalle liinalle naarmujen välttämiseksi.
- Kiinnitä jalustan kaulaosa näytön takaosaan, kunnes se napsahtaa paikalleen tai on kiinnitetty ruuveilla (jos sellainen on).
- Kiinnitä jalustan pohja jalustan kaulaan ja kiristä jalustan pohjassa oleva kiinnitysruuvi.
- Carefully lift the monitor and place it on a stable desk.
5.2 Näytön liittäminen
Varmista, että tietokone ja näyttö on sammutettu ennen kuin teet mitään liitäntöjä.
- Virtaliitäntä: Kytke virtajohto näytön virransyöttöön ja sitten maadoitettuun pistorasiaan.
- Videoliitäntä: Valitse yksi seuraavista vaihtoehdoista:
- HDMI: Liitä HDMI-kaapelin toinen pää tietokoneen HDMI-lähtöön ja toinen pää näytön HDMI-tuloon.
- DisplayPort: Liitä DisplayPort-kaapelin toinen pää tietokoneen DisplayPort-lähtöön ja toinen pää näytön DisplayPort-tuloon.
- USB-C: Connect one end of the USB-C cable to your computer's USB-C port (which supports video output) and the other end to the USB-C input on the monitor. This connection can also provide power delivery and USB data transfer.
- USB Hub Connection (Optional): If using the monitor's USB hub, connect a USB upstream cable (USB-C to USB-A or USB-C to USB-C, depending on your computer) from your computer to the monitor's USB upstream port. This enables the monitor's USB-A ports for peripherals.
6. Näytön käyttö
6.1 Virta päälle/pois
Press the power button, usually located on the bottom right bezel, to turn the monitor on or off. The power indicator light will illuminate when the monitor is on.
6.2 On-Screen Display (OSD) -valikko
The OSD menu allows you to adjust various monitor settings. Use the control buttons (joystick or individual buttons) on the monitor's bezel to navigate the menu.
- Press the Menu button (or push the joystick) to open the OSD menu.
- Use the navigation buttons (or joystick) to move through the menu options.
- Press the Select button (or push the joystick) to enter a sub-menu or confirm a selection.
- Use the Exit button (or move the joystick left) to go back to the previous menu or exit the OSD.
6.3 Yleiset näyttövalikon asetukset
- Luminanssi: Adjust brightness, contrast, and gamma.
- Kuvan asetukset: Fine-tune image quality, sharpness, and pixel clock.
- Väriasetus: Valitse värilämpötila, sRGB-tila tai käyttäjän määrittämät väriasetukset.
- Kuvan tehostus: Paranna näytön tiettyjä alueita.
- OSD-asetukset: Säädä näyttövalikon kieltä, sijaintia ja läpinäkyvyyttä.
- Peliasetukset: Enable/disable FreeSync, adjust overdrive, and game modes.
- Lisätiedot: Select input source, reset settings, view tiedot.
7. Huolto
7.1 Näytön puhdistaminen
- Irrota näyttö aina ennen puhdistamista.
- Käytä pehmeää, nukkaamatonta liinaa kevyesti dampvedellä tai miedolla, hankaamattomalla näytönpuhdistusaineella.
- Do not use alcohol, ammonia, or abrasive cleaners, as they may damage the screen or casing.
- Wipe the screen gently. Do not apply excessive pressure.
7.2 Yleishoito
- Vältä painavien esineiden asettamista näytön tai sen kaapeleiden päälle.
- Pidä näyttö poissa suorasta auringonvalosta, lämmönlähteistä ja äärimmäisistä lämpötiloista.
- Do not expose the monitor to strong vibrations or impacts.
8. Vianmääritys
Jos kohtaat ongelmia näytön kanssa, katso seuraavat yleiset ongelmat ja ratkaisut:
| Ongelma | Mahdollinen syy | Ratkaisu |
|---|---|---|
| Ei kuvaa näytöllä | Monitor not powered on; Incorrect input source; Loose video cable | Press power button; Select correct input via OSD; Reconnect video cable securely |
| Kuva liian tumma/kirkas | Kirkkaus-/kontrastiasetukset ovat virheelliset | Adjust Brightness and Contrast in OSD menu |
| välkkyvä kuva | Väärä virkistystaajuus; Viallinen kaapeli | Set refresh rate to 100Hz in display settings; Try a different video cable |
| USB-portit eivät toimi | USB-upstream-kaapelia ei ole kytketty | Connect the USB-C upstream cable from the monitor to your computer |
If the problem persists after trying these solutions, contact AOC customer support.
9. Tekniset tiedot
Below are the technical specifications for the AOC U34V5C/BK monitor:

Figure 9.1: Product Information Sheet for AOC U34V5C/BK, detailing energy efficiency and technical parameters.
| Parametri | Arvo |
|---|---|
| Merkki | AOC |
| Malli | U34V5C/BK |
| Näytön koko | 34 tuumaa (86.4 cm) |
| Resoluutio | 3440 x 1440 WQHD |
| Kuvasuhde | 21:9 |
| Vastausaika | 4 millisekuntia |
| Päivitystaajuus | 100 Hz (default 60 Hz) |
| Paneelitekniikka | VA Panel, LED LCD |
| Viewkulma | 178 astetta (vaaka/pysty) |
| Laitteistorajapinta | DisplayPort, HDMI, USB-C |
| USB-portteja yhteensä | 4 (USB Hub) |
| Virransyöttö (USB-C) | 65W |
| Voitage | 5 Volts (Internal Power Supply) |
| Tuotteen mitat | 50 x 25 x 40 cm; 7 kg |
| Energiatehokkuusluokka (SDR) | G |
| Virrankulutus (SDR) | 34.0 W |
| Energiatehokkuusluokka (HDR) | G |
| Virrankulutus (HDR) | 35.0 W |
| Valmiustila virta | 0.5 W |
| Minimum guaranteed software/firmware updates | 8 vuotta |
| Minimum guaranteed spare parts availability | 7 vuotta |
| Taattu vähimmäistuotetuki | 8 vuotta |
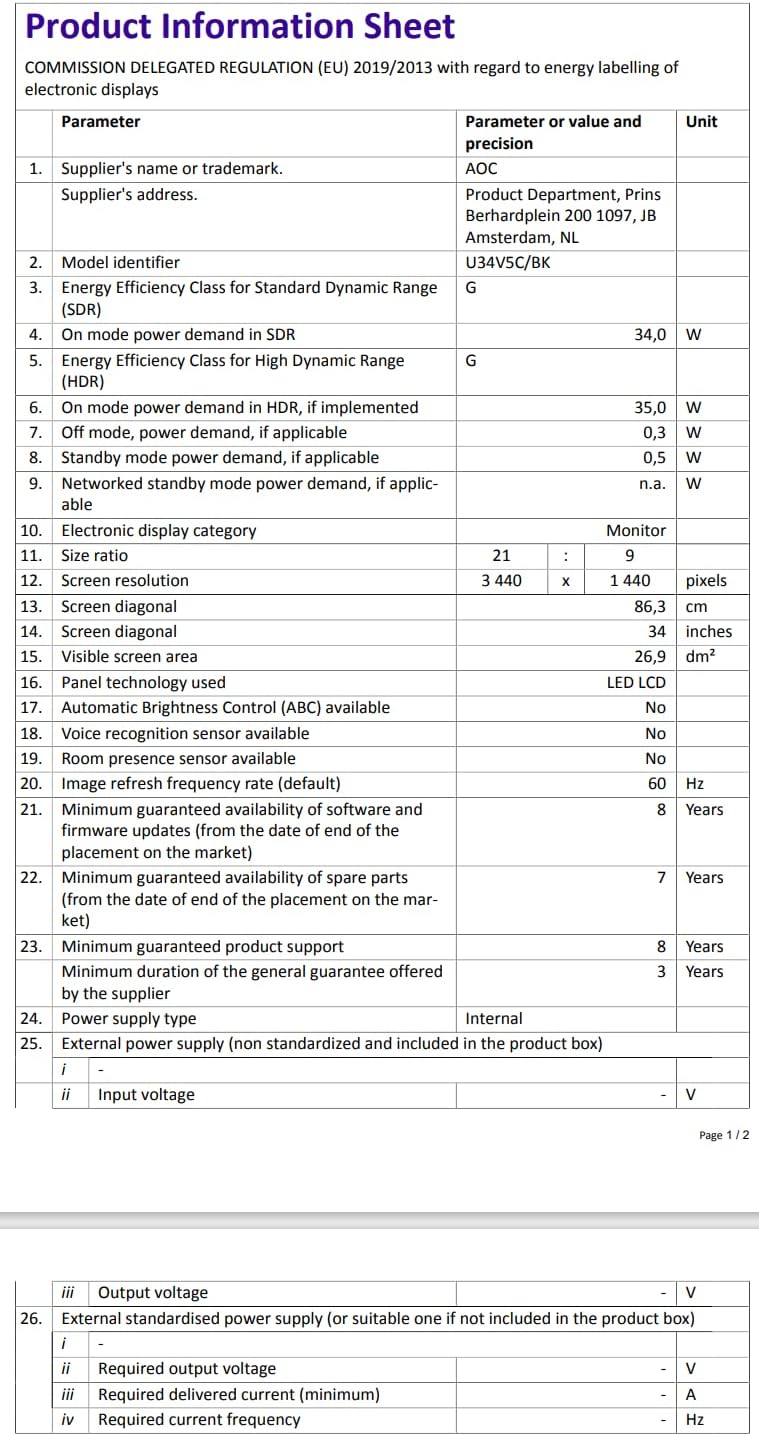
Figure 9.2: Energy Label for AOC U34V5C/BK. For more details, visit the EPREL -tietokanta.
10. Takuu ja tuki
The AOC U34V5C/BK monitor comes with a minimum guaranteed general warranty of 3 vuotta toimittajan tarjoama.
For technical support, warranty claims, or service inquiries, please visit the official AOC website or contact your local AOC customer service center. Ensure you have your monitor's model number (U34V5C/BK) and serial number ready when contacting support.