
ECG DM-817
EKG DM-817 digitaalisen yleismittarin käyttöohje
Malli: DM-817
Johdanto
The ECG DM-817 is an auto-ranging digital multimeter designed for precise electrical measurements. It features a 6000-count display and 3-5/6 digit resolution, making it suitable for a wide range of applications. This manual provides detailed instructions for the safe and effective operation, maintenance, and troubleshooting of your DM-817 multimeter.
Turvallisuustiedot
Always observe the following safety precautions when using the DM-817 multimeter:
- Älä ylitä minkään toiminnon enimmäissyöttörajoja.
- Ole erittäin varovainen, kun työskentelet voltages yli 60 V DC tai 30 V AC RMS.
- Ensure the test leads are properly connected and the function switch is in the correct position before making measurements.
- Älä käytä yleismittaria, jos se näyttää vaurioituneelta tai jos mittausjohdot ovat rispaantuneet.
- Replace the battery and fuses only with the specified type and rating.
- Irrota aina mittausjohdot piiristä ennen toimintojen vaihtamista.
- Noudata kaikkia paikallisia ja kansallisia turvallisuusmääräyksiä.
VAROITUS: Tämä tuote sisältää kemikaaleja, joiden Kalifornian osavaltio tietää aiheuttavan syöpää ja synnynnäisiä epämuodostumia tai muita lisääntymisvaurioita. Lisätietoja on osoitteessa www.P65Warnings.ca.gov.
Pakkauksen sisältö
Varmista, että pakkauksessa on kaikki tarvittavat osat:
- ECG DM-817 Digital Multimeter
- Mittausjohdot (yksi punainen, yksi musta)
- Kantolaukku
- 2 x AAA-paristoa (esiasennettu tai toimitetaan erikseen)
- Käyttöopas (tämä asiakirja)

Image: The ECG DM-817 Digital Multimeter displayed alongside its included test leads, carrying case, and batteries.
Tuote loppuview
Familiarize yourself with the components of your DM-817 multimeter:

Kuva: Edessä view of the ECG DM-817 Digital Multimeter, showing the display, function dial, and input jacks.
- LCD-näyttö: Shows measurement readings, units, and function indicators. Features a backlight for low-light conditions.
- Toimintovalinta: Pyörivä kytkin mittaustoimintojen valitsemiseksi (tilavuustage, Current, Resistance, Capacitance, Temperature, Frequency, Diode, Continuity).
- SELECT -painike: Toggles between AC/DC, Diode/Continuity, or other sub-functions within a dial setting.
- HOLD-painike: Jäädyttää nykyisen lukeman näytössä.
- Taustavalopainike: Ottaa näytön taustavalon käyttöön tai poistaa sen käytöstä.
- Tuloliittimet:
- VΩHzCAP°C: Äänenvoimakkuuden syöttötage, Resistanssin, taajuuden, kapasitanssin ja lämpötilan mittaukset.
- mAµA: Millimetrin syöttöampere ja mikroampvirtamittaukset (sulakkeella).
- 10A: Tulo suurten virtamittausten suorittamiseen jopa 10 A:iin asti (sulake).
- COM: Yhteinen (maadoitus) tulo kaikille mittauksille.
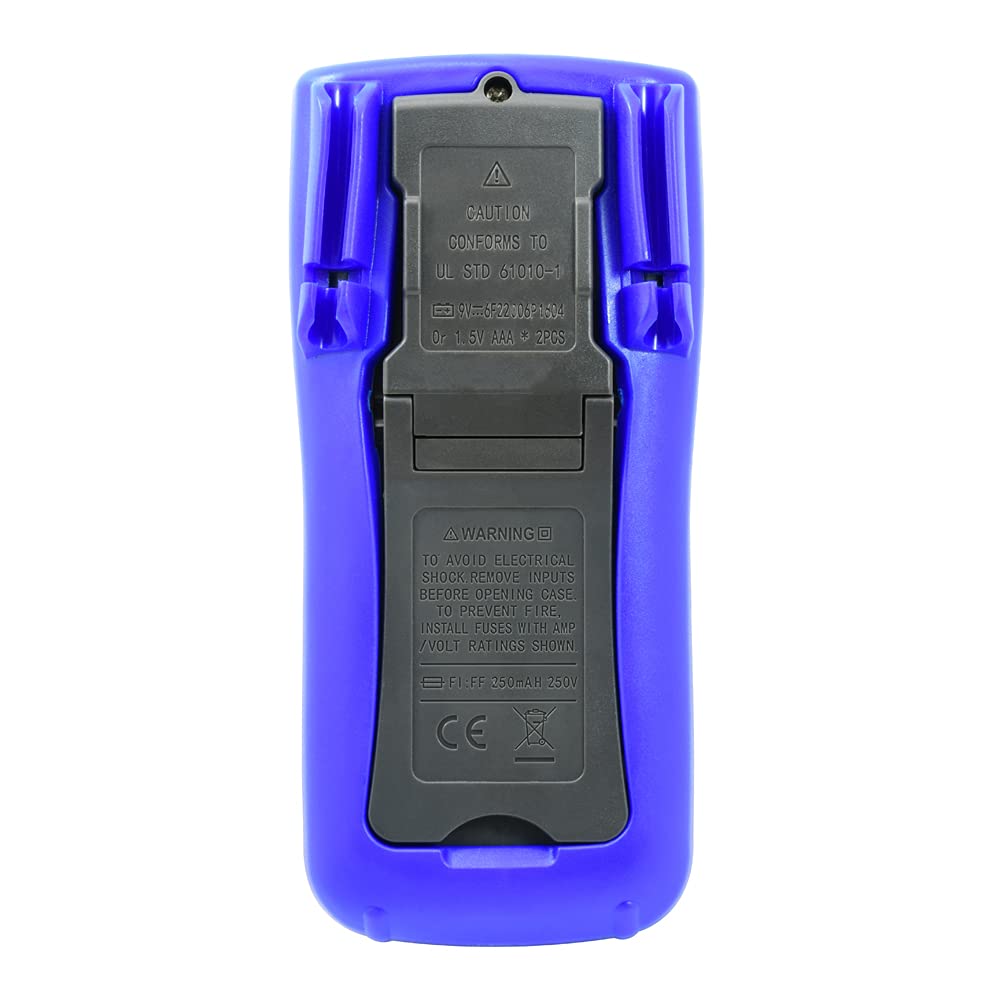
Kuva: Selkä view of the ECG DM-817 Digital Multimeter, showing the battery compartment and kickstand.
The back of the multimeter features a battery compartment cover and a foldable kickstand for convenient hands-free operation.
Asennus
Akun asennus
The DM-817 requires two AAA batteries for operation. These are typically included. If not, or if the low battery indicator appears on the display, follow these steps:
- Varmista, että yleismittari on sammutettu ja irrota kaikki mittausjohdot.
- Paikanna paristolokeron kansi laitteen takaa.
- Löysää paristokotelon kantta kiinnittävä ruuvi ruuvimeisselillä.
- Irrota kansi.
- Aseta kaksi AAA-paristoa lokeroon ja varmista, että napaisuus (+ ja -) on oikein päin lokeron sisällä olevien merkkien mukaisesti.
- Aseta akun kansi takaisin paikalleen ja kiinnitä se ruuvilla.
Käyttöohjeet
Before any measurement, ensure the test leads are securely plugged into the correct input jacks and the function dial is set to the desired measurement type.
Mittaus DC Voltage (VDC)
- Plug the red test lead into the VΩHzCAP°C jack and the black test lead into the COM jack.
- Käännä toimintosäädin asentoon V (DC Voltage) position. The multimeter is auto-ranging.
- Kytke mittausjohdot mitattavaan komponenttiin tai piiriin ja huomioi napaisuus.
- Lue voltage -arvo nestekidenäytössä.
Mittaus AC Voltage (VAC)
- Plug the red test lead into the VΩHzCAP°C jack and the black test lead into the COM jack.
- Käännä toimintosäädin asentoon V~ (AC-tilavuustage) position. The multimeter is auto-ranging.
- Kytke mittausjohdot mitattavaan komponenttiin tai piiriin.
- Lue voltage -arvo nestekidenäytössä.
Measuring DC Current (DCA)
- Katkaise virta piiristä.
- For currents up to 600mA, plug the red test lead into the mAµA jack. For currents up to 10A, plug the red test lead into the 10A jack. Plug the black test lead into the COM jack.
- Käännä toimintosäädin asentoon A (tasavirta) -asento.
- Katkaise virtapiiri ja kytke yleismittari sarjaan virtapiirin kanssa.
- Kytke virta virtapiiriin ja lue virran arvo LCD-näytöltä.
- Turn off power and disconnect the multimeter before restoring the circuit.
Measuring AC Current (ACA)
- Katkaise virta piiristä.
- For currents up to 600mA, plug the red test lead into the mAµA jack. For currents up to 10A, plug the red test lead into the 10A jack. Plug the black test lead into the COM jack.
- Käännä toimintosäädin asentoon A~ (Vaihtovirta) -asento.
- Katkaise virtapiiri ja kytke yleismittari sarjaan virtapiirin kanssa.
- Kytke virta virtapiiriin ja lue virran arvo LCD-näytöltä.
- Turn off power and disconnect the multimeter before restoring the circuit.
Measuring Resistance (Ω)
- Plug the red test lead into the VΩHzCAP°C jack and the black test lead into the COM jack.
- Käännä toimintosäädin asentoon Ω (Vastustus)asento.
- Varmista, että virtapiiri on jännitteetön ennen resistanssin mittaamista.
- Kytke mittausjohdot mitattavan komponentin päälle.
- Lue vastusarvo LCD-näytöltä.
Measuring Capacitance (F)
- Plug the red test lead into the VΩHzCAP°C jack and the black test lead into the COM jack.
- Käännä toimintosäädin asentoon KORKKI (Kapasitanssi) -asento.
- Varmista, että kondensaattori on täysin purkautunut ennen mittausta.
- Kytke mittausjohdot kondensaattorin yli.
- Lue kapasitanssiarvo LCD-näytöltä.
Measuring Temperature (°C/°F)
- Plug the temperature probe (if included, otherwise use appropriate adapter) into the VΩHzCAP°C and COM jacks, observing polarity.
- Käännä toimintosäädin asentoon ° C / ° F (Lämpötila) -asento.
- The display will show the ambient temperature. Place the probe on or near the object whose temperature is to be measured.
- Read the temperature value on the LCD display. Use the SELECT button to toggle between Celsius and Fahrenheit.
Measuring Frequency (Hz)
- Plug the red test lead into the VΩHzCAP°C jack and the black test lead into the COM jack.
- Käännä toimintosäädin asentoon Hz (Frequency) position.
- Kytke mittausjohdot signaalilähteen yli.
- Lue taajuusarvo LCD-näytöltä.
Dioditesti ja jatkuvuustarkistus
- Plug the red test lead into the VΩHzCAP°C jack and the black test lead into the COM jack.
- Käännä toimintosäädin asentoon Diodi/jatkuvuus asema.
- Dioditesti: Kytke punainen johdin diodin anodiin ja musta johdin katodiin. Eteenpäin suuntautuva jännitetage drop will be displayed. Reverse the leads; an open circuit (OL) should be displayed.
- Jatkuvuuden tarkistus: Connect the test leads across the circuit or component. If continuity exists (resistance below approximately 50Ω), the buzzer will sound.
Huolto
Puhdistus
Pyyhi kotelo mainoksellaamp liinalla ja miedolla pesuaineella. Älä käytä hankaavia aineita tai liuottimia. Pidä tuloliittimet vapaina liasta ja kosteudesta.
Sulakkeen vaihto
If the current measurement functions stop working, the fuses may need replacement. Always use fuses with the specified ratings:
- mAµA input: F1 250mA/250V fast-blow fuse.
- 10A input: F2 10A/250V fast-blow fuse.
To replace fuses:
- Varmista, että yleismittari on sammutettu ja irrota kaikki mittausjohdot.
- Avaa paristolokeron kansi kohdassa "Pariston asennus" kuvatulla tavalla.
- The fuses are located inside the battery compartment. Carefully remove the old fuse.
- Insert a new fuse of the correct type and rating.
- Aseta paristokansi takaisin paikalleen ja kiinnitä se.
Varastointi
If the multimeter is not used for an extended period, remove the batteries to prevent leakage and damage to the unit. Store the multimeter in its carrying case in a cool, dry place away from direct sunlight and extreme temperatures.
Vianetsintä
| Ongelma | Mahdollinen syy | Ratkaisu |
|---|---|---|
| Ei näyttöä tai himmeä näyttö | Tyhjät tai vähissä akut | Vaihda paristot. |
| Näytössä näkyy "OL" (ylikuormitus) | Input value exceeds range; incorrect function selected | Select a higher range (if manual ranging) or correct function. Ensure leads are connected properly. |
| Ei virran mittausta | Blown fuse; incorrect lead connection | Check and replace fuse if necessary. Ensure leads are in the correct current input jacks (mAµA or 10A). |
| Epätarkkoja lukemia | Low battery; poor lead contact; external interference | Replace batteries. Ensure leads are clean and make good contact. Move away from strong electromagnetic fields. |
Tekniset tiedot
The following table outlines the key specifications of the ECG DM-817 Digital Multimeter:

Image: Detailed specifications printed on the back of the ECG DM-817 product packaging.
| Mittaustyyppi | Alue | Tarkkuus |
|---|---|---|
| DC Voitage | 600mV - 1000V | ±(0.5% + 5 digits) to ±(0.8% + 5 digits) |
| AC Voitage (tosi RMS) | 600mV - 750V | ±(0.8% + 5 digits) to ±(1.2% + 10 digits) |
| DC virta | 600 µA - 10 A | ±(1.0% + 5 digits) to ±(2.0% + 30 digits) |
| Vaihtovirta | 600 µA - 10 A | ±(1.2% + 5 digits) to ±(2.5% + 30 digits) |
| Resistanssi | 600Ω - 60MΩ | ±(0.8% + 5 digits) to ±(2.0% + 20 digits) |
| Kapasitanssi | 10nF to 6000µF | ±(3.5% + 20 digits) to ±(5.0% + 10 digits) |
| Taajuus | 10 Hz - 10 MHz | ±(0.1 % + 3 numeroa) |
| Lämpötila | -20°C - 1000°C / -4°F - 1832°F | ±(1.0% + 5 digits) to ±(2.0% + 5 digits) |
Yleiset tiedot:
- Näyttö: 6000 Counts, 3-5/6 Digit LCD with Backlight
- Automaattinen virrankatkaisu: Kyllä
- Tietojen pito: Kyllä
- Virtalähde: 2 x AAA paristot (mukana)
- Mitat: 7.25 x 3.5 x 1.78 tuumaa
- Paino: 1 puntaa
- Turvallisuusluokitus: CAT IV 600V, CAT III 1000V
Takuu ja tuki
For warranty information and technical support, please contact ECG customer service. Refer to the product packaging or the official ECG websivustolta ajantasaisimmat yhteystiedot.
Valmistaja: ECG, NTE
Ask a question about this manual
Ask about setup, troubleshooting, compatibility, parts, safety, or missing instructions. Manuals+ will review the question and use this page’s manual context to help answer it.