
Tärkeitä turvallisuustietoja
Read and understand all instructions before assembly and use. Failure to follow these instructions may result in injury or damage to the product.
- Always ensure the gazebo is securely anchored to the ground using the provided stakes and ropes.
- Do not use the gazebo in strong winds, heavy rain, or snow. Disassemble and store the gazebo during adverse weather conditions.
- Pidä kaikki liekit ja lämmönlähteet poissa huvimajan kankaasta.
- Exercise caution during assembly and disassembly to prevent pinching fingers or hands.
- Ensure adequate clearance around the gazebo to prevent obstruction or damage.
- This gazebo is intended for temporary outdoor use only. It is not designed as a permanent structure.
Pakkauksen sisältö
Varmista, että kaikki osat ovat mukana ennen kokoamisen aloittamista. Jos osia puuttuu tai on vaurioitunut, ota yhteyttä asiakastukeen.

Image: Sunjoy Lambert Pop Up Hexagon Gazebo with all components including frame, canopy, mesh walls, carry bag, stakes, and ropes.
- Pop-Up Steel Frame (1)
- Canopy Top (1)
- Mesh Sidewalls (6 panels, pre-attached or separate)
- Kantolaukku (1)
- Maavaarnat (6)
- Tukiköydet (6)
Asennusohjeet
Assembly typically requires two people. Choose a level surface for setup.
Step 1: Unpacking and Initial Placement
- Remove the gazebo frame and canopy from the carry bag.
- Place the folded frame in the desired setup location.
Step 2: Expanding the Frame
- With one person at each end, gently pull the frame outwards to partially expand it.
- Lift the frame slightly and continue pulling outwards until the frame is about three-quarters open.
- Ensure all cross-bars are extending evenly.

Kuva: Sisätilat view of the gazebo frame structure, showing the central hub and connecting bars.
Vaihe 3: Katoksen kiinnitys
- Drape the canopy top over the partially expanded frame. Align the corners of the canopy with the corners of the frame.
- Secure the canopy to the frame using the hook-and-loop fasteners or ties located on the underside of the canopy.

Image: Close-up of the canopy attachment mechanism to the gazebo frame, showing ties.
Step 4: Fully Extend the Frame and Adjust Height
- From underneath the canopy, push up on the central hub of the frame until it locks into place.
- Extend each leg of the gazebo by pressing the push-button release and sliding the lower leg section down until it locks into the desired height setting.

Image: Detail of the height-adjustable press button design on the gazebo leg.
Step 5: Securing the Gazebo
- Insert ground stakes through the footpads at the base of each leg and firmly into the ground.
- Attach guy ropes to the canopy corners and stake them into the ground at an angle, ensuring tension for stability.

Image: Anchoring kit components, including stakes and ropes.
Step 6: Attaching Mesh Sidewalls (if separate)
- If your mesh sidewalls are not pre-attached, hang them from the frame using the integrated hooks or ties.
- Zip the sidewalls together to create an enclosed space.
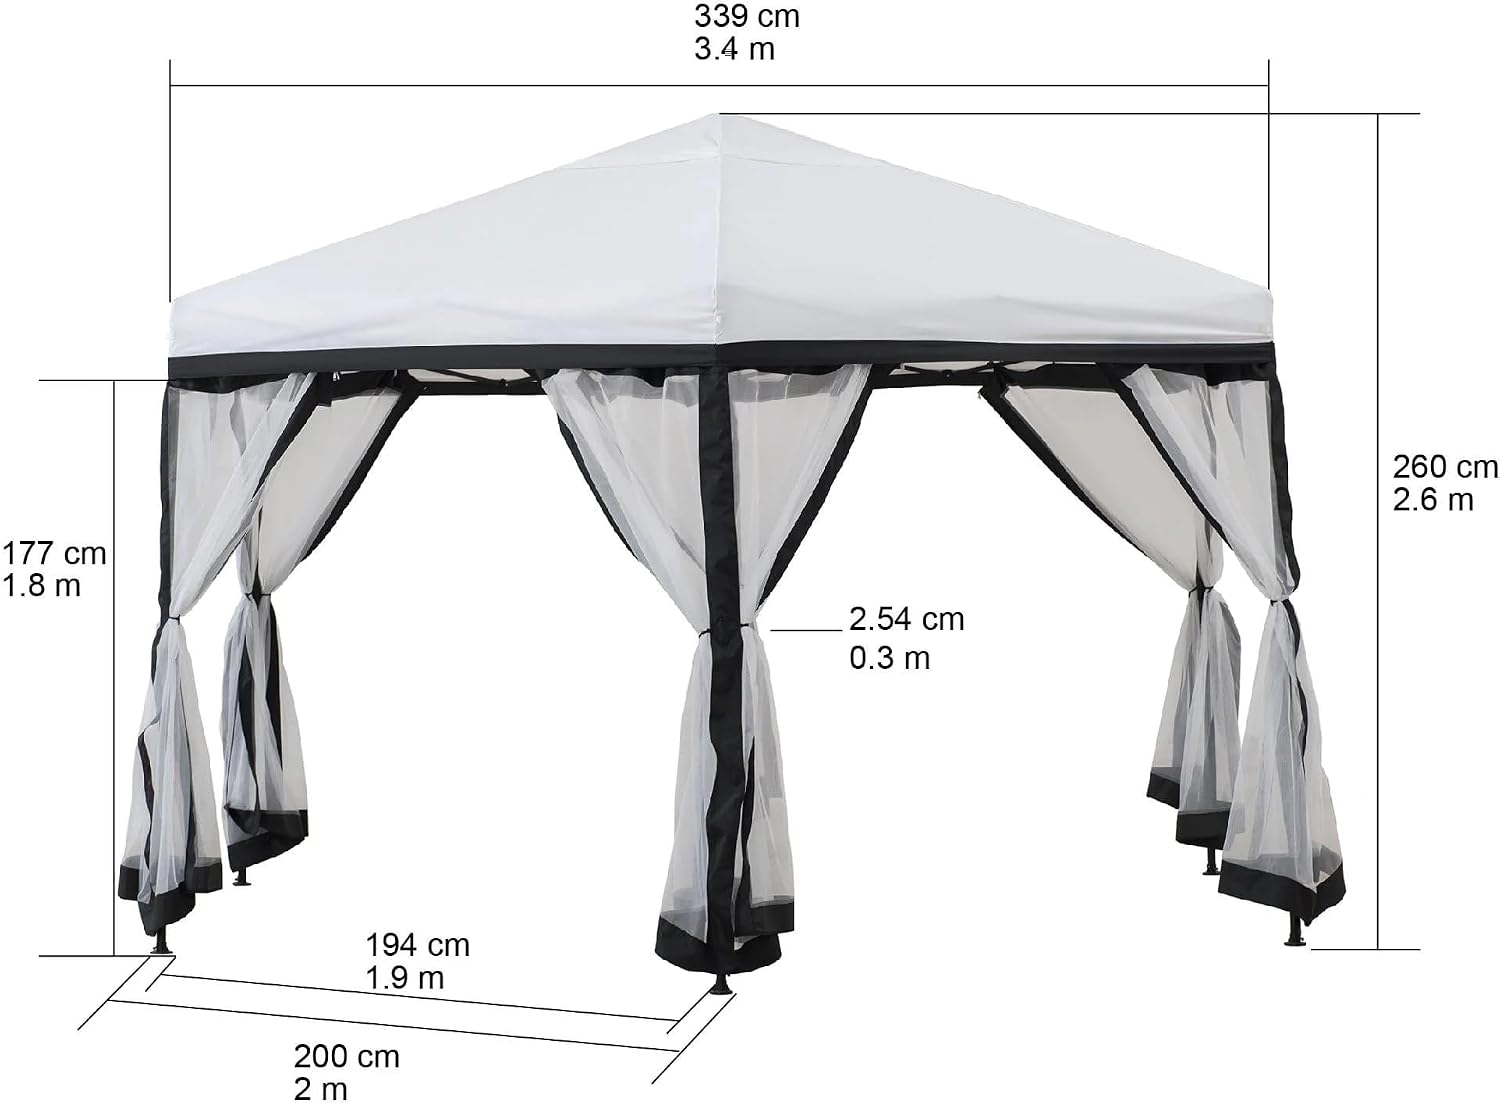
Image: Gazebo with all mesh sidewalls zipped closed, providing insect protection.
Käyttöohjeet
- Korkeuden säätäminen: To adjust the height, press the push-button on each leg and slide the leg to the desired position. Ensure all legs are locked at the same height for stability.
- Verkkosivuseinien käyttö: The mesh sidewalls can be zipped closed to provide protection from insects or tied back to open up the space.
- purkaminen: To disassemble, reverse the assembly steps. Unlock the legs, collapse the frame, remove the canopy and sidewalls, and store all components in the carry bag.
Huolto
- Puhdistus: Clean the canopy and mesh sidewalls with mild soap and water. Do not use harsh chemicals or abrasive cleaners. Allow fabric to air dry completely before storage.
- Kehyksen hoito: Tarkasta teräsrunko säännöllisesti ruosteen tai vaurioiden varalta. Puhdista runko liasta ja roskista.
- Varastointi: When not in use, disassemble the gazebo and store all components in the provided carry bag in a cool, dry place away from direct sunlight. Ensure the fabric is completely dry to prevent mold and mildew.
- Tarkastus: Regularly check all connections, stakes, and ropes for wear or damage. Replace any worn parts immediately.
Vianetsintä
| Ongelma | Mahdollinen syy | Ratkaisu |
|---|---|---|
| Huvimaja on epävakaa tai huojuu. | Not properly anchored; uneven ground; legs not fully extended/locked. | Ensure all stakes and ropes are securely fastened. Move to a level surface. Verify all legs are fully extended and locked. |
| Katos ei sovi oikein. | Canopy not aligned; frame not fully expanded. | Ensure canopy corners match frame corners. Fully expand the frame before attaching the canopy. |
| Difficulty collapsing the frame. | Legs are still locked; central hub not disengaged. | Press the release buttons on each leg to unlock them. Gently push down on the central hub to disengage the locking mechanism. |
Tekniset tiedot

Image: Diagram showing the dimensions of the Sunjoy Lambert Pop Up Hexagon Gazebo.
| Ominaisuus | Yksityiskohta |
|---|---|
| Tuotteen mitat (P x L x K) | 3.39L x 3.39W x 2.6H Meters (133.5 x 133.5 x 102.4 inches) |
| Tuotteen paino | 32.85 puntaa (14.9 kg) |
| Rungon materiaali | Alloy Steel, Powder-Coated |
| Katoksen materiaali | Weather-resistant Fabric |
| Muoto | Kuusikulmainen |
| Väri | Valkoinen & Musta |
| Vedenkestävyystaso | Vedenpitävä |
| Ultraviolettivalon suojaus | Kyllä |
| Asennus vaaditaan | Kyllä |
| Käyttöaste | 4 US (Approximate) |
Takuu ja tuki
This Sunjoy product comes with a 1 vuoden valmistajan takuu ostopäivästä lukien ja kattaa materiaali- ja valmistusvirheet normaalin käytön aikana.
For warranty claims, missing parts, or technical support, please contact Sunjoy customer service. Keep your proof of purchase for warranty validation.
- Valmistaja: Auringon iloa
- Liikepaikka: REDLANDS, CA, 92374 US
For the most up-to-date support information, please visit the official Sunjoy websivustolta tai katso tuotepakkauksessa olevat yhteystiedot.