1. Johdanto ja turvallisuustiedot
Thank you for choosing the ANENG V8 Digital Multimeter. This device is designed for safe and accurate measurement of AC/DC voltage, AC/DC current, resistance, capacitance, frequency, temperature, diode, continuity, and battery testing. Please read this manual thoroughly before use to ensure proper operation and to prevent potential hazards.
1.1 Turvaohjeet
- Varmista aina, että yleismittari on hyvässä toimintakunnossa ennen käyttöä. Tarkista mittausjohdot vaurioiden varalta.
- Älä käytä voltage tai virta, joka ylittää yleismittarin suurimmat nimellisarvot.
- Ole erittäin varovainen, kun työskentelet voltagyli 36 V DC:n tai 25 V AC:n RMS-jännitteille, koska ne voivat aiheuttaa sähköiskun vaaran.
- Katkaise aina virta piiristä ja pura kaikki korkeajännitteiset varauksettagIrrota kondensaattorit ennen resistanssin, jatkuvuuden, diodien tai kapasitanssin mittaamista.
- Ensure the rotary switch is in the correct position for the desired measurement before connecting the test leads to the circuit.
- Älä käytä yleismittaria räjähdysherkissä kaasu-, höyry- tai pölyisissä ympäristöissä.
- Vaihda paristot välittömästi, kun heikon pariston varoitusvalo tulee näkyviin, jotta mittaustulokset ovat tarkkoja.
2. Tuote ohiview
2.1 Pakkauksen sisältö
The ANENG V8 Digital Multimeter package typically includes the following items:
- ANENG V8 Digital Multimeter
- Mittausjohdot (punainen ja musta)
- Lämpötila-anturi
- Kantolaukku
- Käyttöopas

Image: ANENG V8 Digital Multimeter with its standard accessories, including test leads, a temperature probe, and a protective carrying case.
2.2 Ohjauslaitteet ja näyttö
The multimeter features an 8000-count LCD backlight display for clear readings in various lighting conditions. Key controls include a rotary switch for function selection and buttons for range, data hold, and other features.

Kuva: Yksityiskohtainen view of the multimeter's front panel, highlighting the LCD screen, the central rotary selector, and various control buttons.
3. Asennus
3.1 Akun asennus
The ANENG V8 Digital Multimeter is powered by batteries. To install or replace batteries:
- Varmista, että yleismittari on sammutettu ja irrota kaikki mittausjohdot.
- Paikanna laitteen takaosassa oleva paristolokeron kansi.
- Löysää paristokotelon kantta kiinnittävä(t) ruuvi(t) ruuvimeisselillä.
- Irrota kansi.
- Insert new batteries, observing the correct polarity (+ and -) as indicated inside the compartment. The device typically uses AA batteries.
- Aseta paristokotelon kansi takaisin paikalleen ja kiinnitä se ruuveilla/ruuveilla.
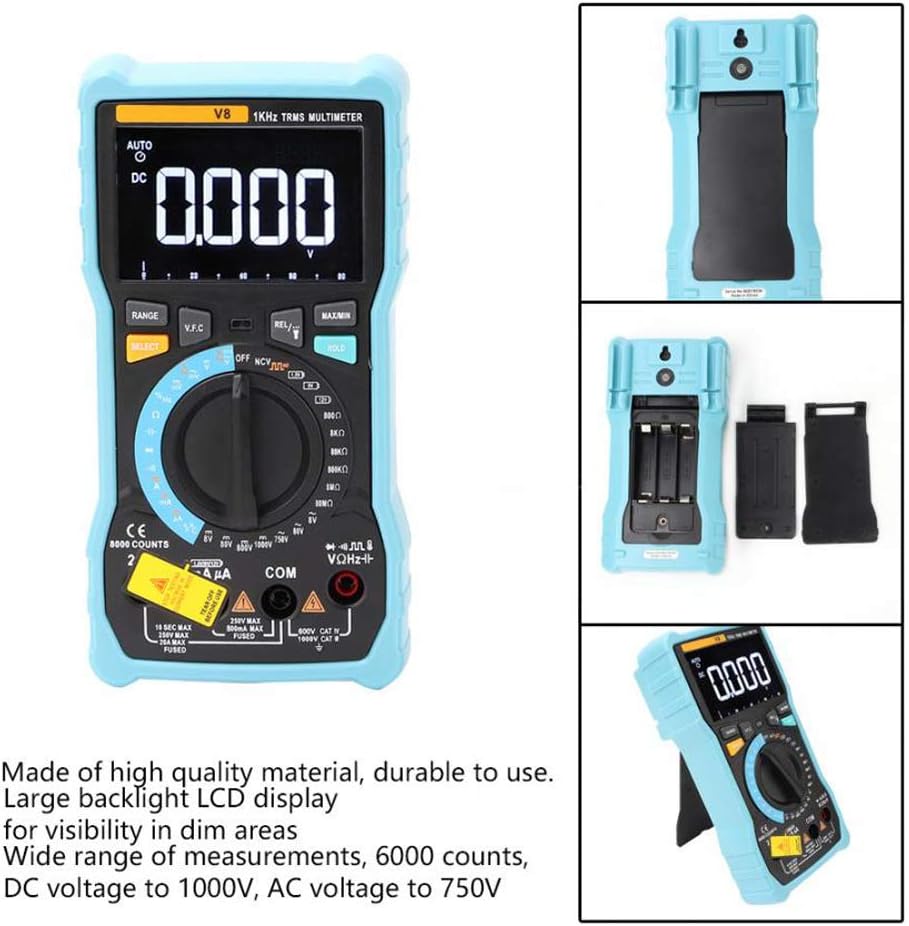
Kuva: Takaosa view of the multimeter with the battery compartment open, illustrating the correct placement for three AA batteries.
4. Käyttöohjeet
Before any measurement, ensure the test leads are correctly inserted into the input jacks and the rotary switch is set to the appropriate function.
4.1 DC/AC-jännitteen mittaaminentage
- Set the rotary switch to the 'V–' (DC Voltage) or 'V~' (AC Voltage) sijainti.
- Kytke punainen mittausjohto 'VΩmA'-liittimeen ja musta mittausjohto 'COM'-liittimeen.
- Kytke mittausjohdot rinnan mitattavan piirin tai komponentin kanssa.
- Lue voltage -arvo näytössä.
4.2 Tasa-/vaihtovirran mittaaminen
- Set the rotary switch to the 'A–' (DC Current) or 'A~' (AC Current) position. For milliampere (mA) tai mikroampere (µA) measurements, select the corresponding range.
- For current up to 800mA, connect the red test lead to the 'VΩmA' jack. For current up to 20A, connect the red test lead to the '20A' jack. Connect the black test lead to the 'COM' jack.
- Disconnect power to the circuit. Open the circuit where you want to measure current. Connect the multimeter in series with the circuit.
- Kytke virta virtapiiriin ja lue näytöltä virta-arvo.
4.3 Resistanssin mittaus
- Set the rotary switch to the 'Ω' (Resistance) position.
- Kytke punainen mittausjohto 'VΩmA'-liittimeen ja musta mittausjohto 'COM'-liittimeen.
- Ensure the circuit is de-energized and all capacitors are discharged. Connect the test leads across the component to be measured.
- Lue vastuksen arvo näytöltä.
4.4 NCV (kosketukseton tilavuus)tage) Havaitseminen
- Set the rotary switch to the 'NCV' position.
- Move the top end of the multimeter near the conductor or outlet.
- The multimeter will emit an audible beep and the NCV indicator light will flash if AC voltage is detected, indicating the presence of live voltage ilman fyysistä kontaktia.
4.5 Lämpötilan mittaus
- Set the rotary switch to the '°C/°F' (Temperature) position.
- Connect the temperature probe to the 'VΩmA' and 'COM' jacks, observing polarity if applicable.
- Aseta lämpötila-anturin kärki mitattavan kohteen päälle tai lähelle.
- Lue lämpötila-arvo näytöltä.
4.6 Muut toiminnot
- Kapasitanssi: Set the rotary switch to the 'F' position. Connect leads across the discharged capacitor.
- Taajuus/käyttösuhde: Set the rotary switch to the 'Hz/%' position. Connect leads to the signal source.
- Dioditesti: Set the rotary switch to the 'Diode' position. Connect leads across the diode.
- Jatkuvuustesti: Set the rotary switch to the 'Continuity' position. Connect leads across the circuit. An audible beep indicates continuity.
- Akkutesti: Set the rotary switch to the 'Battery' position. Connect leads to the battery terminals (1.5V, 9V, or 12V).
- Tietojen pito: Paina 'HOLD'-painiketta jäädyttääksesi nykyisen lukeman näytölle. Paina uudelleen vapauttaaksesi painikkeen.
- Taustavalo/Taskulamppu: Press the backlight button to turn on/off the display backlight or flashlight.
- Automaattinen virrankatkaisu: Yleismittari sammuu automaattisesti tietyn käyttämättömyysajan jälkeen pariston säästämiseksi.
5. Huolto
5.1 Puhdistus
Pyyhi kotelo mainoksellaamp liinalla ja miedolla pesuaineella. Älä käytä hankaavia aineita tai liuottimia. Pidä tuloliittimet vapaina liasta ja kosteudesta.
5.2 Sulakkeen vaihto
Jos virranmittaustoiminto ei toimi, sulake saattaa olla tarpeen vaihtaa. Katso oikean sulaketyypin ja -arvon tiedot teknisistä tiedoista. Sulakkeen vaihdon saa suorittaa vain pätevä henkilöstö.
5.3 Varastointi
When not in use for extended periods, remove the batteries to prevent leakage and store the multimeter in a dry, cool place.
6. Vianmääritys
- Ei näyttöä: Tarkista akun asennus ja lataus. Vaihda akut tarvittaessa.
- Väärät lukemat: Ensure the rotary switch is set to the correct function and range. Check test lead connections. Verify battery charge.
- Virran mittaus ei toimi: Check the fuse. Replace if blown (refer to fuse replacement section).
- NCV ei havaitse: Ensure the NCV function is selected and the multimeter is close enough to the AC voltage lähde.
7. Tekniset tiedot
| Parametri | Arvo |
|---|---|
| Näyttö | 8000 Counts LCD with Backlight |
| DC Voitage (V) | 8.000V / 80.00V / 800.0V / 1000V |
| DC Voitage (mV) | 800mV |
| AC Voitage (V) | 8.000 V / 80.00 V / 750 V |
| AC Voitage (mV) | 800mV |
| Tasavirta (A) | 8.000A / 20.00A |
| DC-virta (mA) | 8.000mA / 80.00mA / 800.0mA |
| Tasavirta (µA) | 800µA / 8000µA |
| Vaihtovirta (A) | 8.000A / 20.00A |
| Vaihtovirta (mA) | 8.000mA / 80.00mA / 800.0mA |
| Vaihtovirta (µA) | 800µA / 8000µA |
| Resistanssi | 800.0Ω / 8.000kΩ / 80.00kΩ / 800.0kΩ / 8.000MΩ / 80.00MΩ |
| Kapasitanssi | 9.999nF / 99.99nF / 999.9nF / 9.999µF / 99.99µF / 999.9µF / 9.999mF / 99.99mF |
| Taajuus | 9.999Hz / 99.99Hz / 999.9Hz / 9.999kHz / 99.99kHz / 999.9kHz / 9.999MHz |
| Käyttömäärä | 1 % ~ 99 % |
| Lämpötila-alue | -20°C ~ 1000°C (-4°F ~ 1832°F) |
| Akun testi | 1.5 V / 9 V / 12 V |
| Rangeissa | Automaattinen / manuaalinen |
| Päivitysnopeus | 3 kertaa sekunnissa |
| Todellinen RMS | Kyllä |
| Tietojen säilytys | Kyllä |
| Taustavalo/taskulamppu | Kyllä |
| Alhaisen akun varoitus | Kyllä |
| Automaattinen virrankatkaisu | Kyllä |
| Materiaali | ABS / PVC |
| Virtalähde | Paristokäyttöinen |
8. Takuu ja tuki
This product is covered by a standard manufacturer's warranty against defects in materials and workmanship. Please refer to the warranty card included with your purchase for specific terms and conditions. For technical support or service inquiries, please contact your retailer or the manufacturer's customer service department.
9. Viralliset tuotevideot
Myyjältä ei ole tällä hetkellä saatavilla virallisia tuotevideoita upotettavaksi.