
Johdanto
This manual provides detailed instructions for the safe installation, operation, and maintenance of your VOLT 150W Clamp Yhdistä Low Voltage Transformer with Digital Timer. Please read this manual thoroughly before installation and retain it for future reference.

Kuva: Edessä view of the VOLT 150W Clamp Yhdistä Low Voltage Transformer in its closed, stainless steel housing.
Tärkeitä turvallisuustietoja
- Katkaise virta ennen tämän laitteen asennusta tai huoltoa.
- Do not exceed the maximum primary current of 5 Amps.
- This unit is equipped with a thermal protector. If a circuit overloads or short circuits, the thermal protector will automatically shut off power. Reset by pushing the circuit breaker.
- Sopii sisä- tai ulkokäyttöön.
- Noudata aina paikallisia sähkömääräyksiä ja -määräyksiä.
- Varmista oikea maadoitus.
Tuotteen ominaisuudet
- Clamp-Type Terminal Blocks: Tool-free wire insertion and clamping for secure connections. Supports up to 10-gauge wire.
- High Performance Toroidal Core: Ensures reliable, efficient, cooler, and quieter operation.
- Designed for LED Systems: Features 12V for short runs and 15V for longer runs or multiple fixtures.
- Ammattitason rakentaminen: ETL listed, stainless steel enclosure with lockable hinged lid, and spacious wire compartment.
- Astronomic Digital Timer: Automatically determines dusk/dawn times based on geographical location, eliminating manual adjustments. Features a large, easy-to-read LCD display.

Image: The transformer with its front cover open, revealing the internal wiring, terminal blocks, timer receptacle, and photocell plug.
Asennus ja asennus
- Asennus: Securely mount the transformer to a wall or suitable vertical surface using appropriate hardware. Ensure it is in a location that allows for proper ventilation and access.
- Virtaliitäntä: Plug the transformer into a standard 120V AC outlet.
- Wiring Landscape Lights:
- Poista noin 1/2 tuuman eristysmateriaalia maisemavalaistuksen johtojen päistä.
- Avaa clamp-type terminal blocks by pressing down on the lever.
- Insert the stripped wire fully into the desired common (COM1 or COM2) and voltage tap (12V or 15V) terminals.
- Release the lever to secure the wire. Ensure all connections are tight.
- Timer/Photocell Setup:
- The unit includes a timer receptacle and a photocell plug. The digital timer (included) can be plugged into the timer receptacle.
- If using an external photocell (sold separately), remove the jumper from the photocell plug and insert the photocell.

Kuva: Yksityiskohtainen view kloamp-type terminal blocks, showing wires inserted into the COM, 12V, and 15V terminals.
Video: Tämä video tarjoaa yleiskuvanview of the VOLT Clamp-Connect Low Voltage Transformers, demonstrating key features and the easy connection process using clamp-type terminals.
Operating Instructions: Digital Timer
The included Astronomic Digital Timer simplifies the control of your landscape lighting.
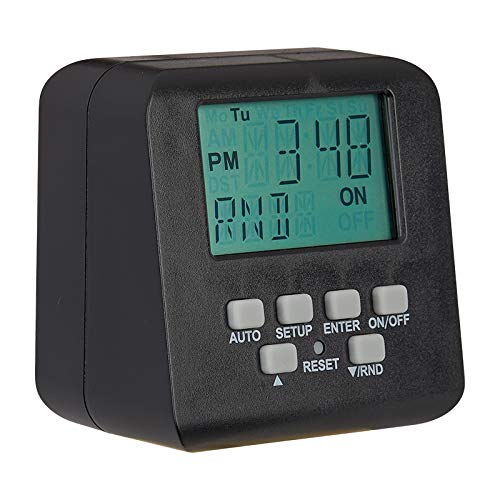
Image: The Astronomic Digital Timer, showing its LCD display and various control buttons for setup and operation.
Ajastimen asettaminen
- Alkuasennus: Follow the timer's specific instructions to set the current time, date, and your geographical location. This allows the timer to accurately calculate local dusk and dawn times.
- Programming On/Off Cycles: Program the desired ON and OFF times for your lighting. The astronomic feature will adjust these times daily based on the changing dusk/dawn schedule.
- Manuaalinen ohitus: Most digital timers include a manual override function to temporarily turn lights on or off outside of programmed schedules.
Refer to the separate instruction sheet provided with the digital timer for detailed programming steps.
Huolto
- Säännöllinen tarkastus: Periodically inspect the transformer and wiring for any signs of damage, corrosion, or loose connections.
- Puhdistus: Keep the transformer enclosure clean and free of debris. Use a soft, dry cloth for cleaning. Do not use abrasive cleaners or solvents.
- Ilmanvaihto: Ensure that the transformer's ventilation openings are not obstructed to prevent overheating.
- Katkaisija: If the circuit breaker trips, disconnect some lights or check for short circuits before resetting.
Vianetsintä
| Ongelma | Mahdollinen syy | Ratkaisu |
|---|---|---|
| Valot eivät syty | Ei virtaa muuntajalle | Tarkista pistorasia ja sulake. |
| Valot eivät syty | Viallinen johdotusyhteys | Inspect all wire connections at the terminal blocks. Ensure wires are fully inserted and clamptoim. |
| Valot eivät syty | Digital timer not programmed correctly | Review timer instructions and reprogram. |
| Valot vilkkuvat tai himmenevät | Voitage drop due to long wire runs or too many fixtures | Use the 15V tap for longer runs or reduce the number of fixtures. Ensure appropriate wire gauge is used. |
| Katkaisijan laukaisut | Ylikuormitus tai oikosulku | Disconnect some lights. Inspect wiring for shorts. Reset the circuit breaker. |
Tekniset tiedot
- Malli: 150W
- Tulo Voltage: 120V AC
- Lähtö Voltage: 12V AC, 15V AC
- Max Wattage: 150W
- Mitat (K x L x S): 13.19 cm x 6.00 cm x 5.41 cm
- Paino: 15.01 lbs
- Kotelon materiaali: Ruostumaton teräs
- Sertifikaatit: ETL listattu
- Virtalähde: Johdollinen sähkö
- Asennustyyppi: Seinäteline
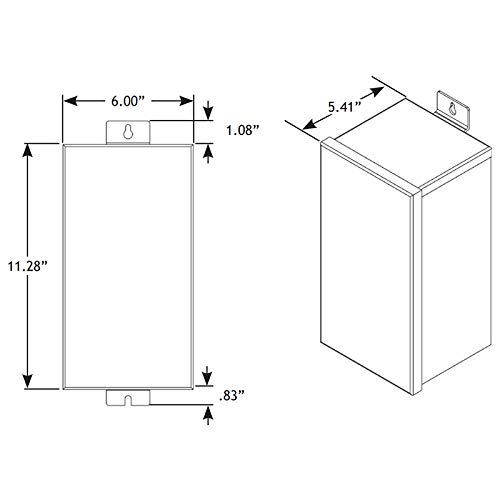
Image: Technical drawing illustrating the height, width, and depth dimensions of the transformer.
Takuu ja tuki
This VOLT transformer is backed by a lifetime warranty. For technical assistance, troubleshooting, or warranty claims, please contact VOLT Lighting customer support.
Visit the official VOLT Lighting websivustolta yhteystietoja ja lisäresursseja.