1. Johdanto
This manual provides detailed instructions for the installation, operation, and maintenance of your KICKER car audio system. This system includes a KICKER 48DCWR122-RS Dual 12" CompR Series Subwoofer Enclosure, a KICKER 46CXA8001 Mono Amplifier, and a Harmony Audio HA-AK8 Amplifier Installation Kit. Please read this manual thoroughly before attempting installation or operation to ensure proper function and safety.
Turvallisuusohjeet:
- Irrota aina ajoneuvon akun negatiivinen napa ennen sähkötöiden aloittamista.
- Varmista, että kaikki johdot on vedetty ja kiinnitetty oikein vaurioiden tai oikosulkujen välttämiseksi.
- Käytä asennuksen aikana asianmukaisia henkilönsuojaimia.
- Jos olet epävarma jostakin asennusprosessin osasta, ota yhteyttä ammattimaiseen auton äänentoistolaitteiden asentajaan.
2. Pakkauksen sisältö
Varmista, että pakkauksessasi on kaikki tarvittavat osat:
- 1 x KICKER 48DCWR122-RS Dual 12" CompR Series Subwoofer Enclosure
- 1 x KICKER 46CXA8001 Car Audio Class D Mono Ampelävämpi
- 1 x Harmony Audio HA-AK8 Car Stereo Complete 8 Gauge Ampnostimen asennussarja

Kuva 2.1: Etuosa view of the KICKER Dual 12 inch CompR Subwoofer Enclosure. This image shows the two 12-inch subwoofers mounted in a black carpeted enclosure with the KICKER logo.

Kuva 2.2: Yläosa view of the KICKER 46CXA8001 Mono Ampelävämpi. The amplifier is a compact black unit with the KICKER logo and model number CXA800.1 visible.

Figure 2.3: Harmony Audio HA-AK8 8 Gauge Amplifier Installation Kit components. This image displays various cables, a fuse holder, terminals, and zip ties included in the installation kit.
3. Asennus ja käyttöönotto
Proper installation is crucial for optimal performance and safety. It is recommended to have this system installed by a qualified professional.
3.1 Subwoofer Enclosure Placement
The KICKER 48DCWR122-RS enclosure is designed for freestanding placement. Choose a secure location in your vehicle, typically the trunk or cargo area, where it will not shift during driving. Ensure adequate ventilation around the enclosure.

Kuva 3.1: Takaosa view of the KICKER Dual 12 inch CompR Subwoofer Enclosure. This view shows the rear panel, typically where the speaker terminals are located for connection to an ampelävämpi.
3.2 Amplifier Installation (KICKER 46CXA8001)
Asenna amplifier in a location that provides good air circulation and is protected from moisture and excessive heat. Common locations include under a seat, in the trunk, or attached to the subwoofer enclosure.
3.2.1 Power Wiring (HA-AK8 Kit)
- Power Cable (+12V): Connect the 8-gauge power cable from the HA-AK8 kit to the vehicle's positive battery terminal. Install the fuse holder (included in HA-AK8 kit) as close to the battery as possible (within 18 inches) to protect the vehicle's electrical system. Route the power cable to the amplifier'in +12V-napa.
- Ground Cable (GND): Connect the 8-gauge ground cable from the HA-AK8 kit to a clean, unpainted metal surface on the vehicle's chassis. Ensure a solid, low-resistance connection. Connect the other end to the amplifier's GND terminal. The ground cable should be as short as possible, ideally less than 3 feet.
- Remote Turn-On Cable (REM): Connect a thin gauge wire (typically blue) from your head unit's remote output to the ampelektorin REM-liittimeen. Tämä johto kytkee elektorin ampkytke virta päälle ja pois päältä päälaitteella.
3.2.2 Signaalitulo
The 46CXA8001 amplifier supports both high-level (speaker level) and low-level (RCA) inputs. Use the appropriate input type based on your head unit's outputs.
- Matalan tason tulo: If your head unit has RCA outputs, connect them to the amplifier'n RCA-sisääntuloliittimet.
- Korkean tason syöttö: If your head unit does not have RCA outputs, use the speaker-level inputs. Refer to the amplifier's specific wiring diagram for connecting speaker wires directly to the ampelävämpi.
3.2.3 Kaiutinlähtö
Connect the subwoofer enclosure's speaker terminals to the amplifier's SPEAKER output terminals. Ensure correct polarity (+ to + and - to -) for optimal sound. The 48DCWR122-RS enclosure is wired for a 2 Ohm load.
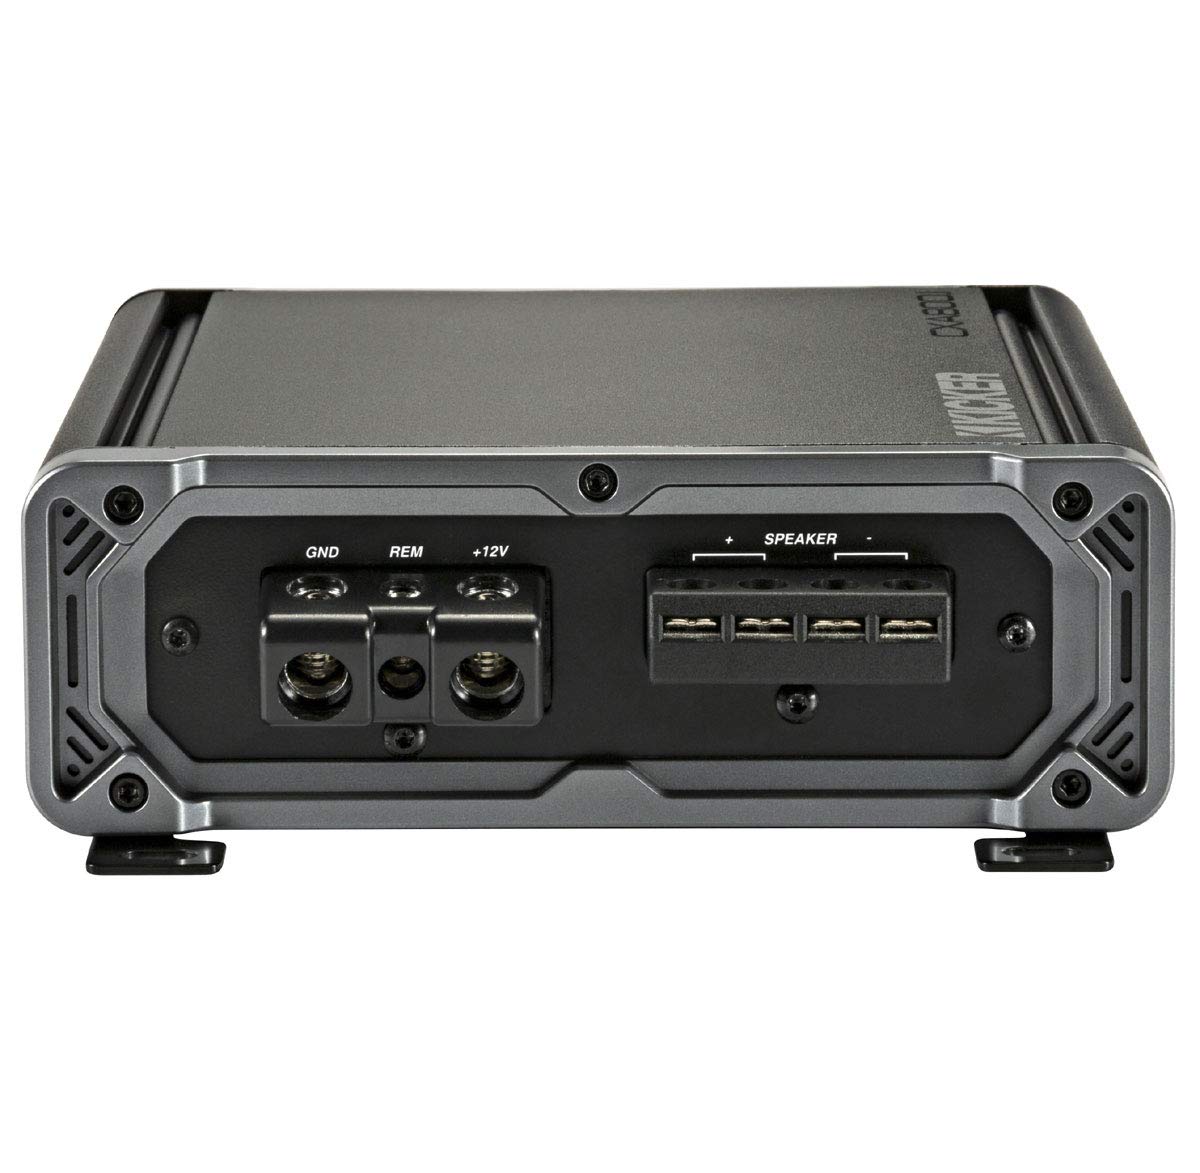
Figure 3.2: Connection side of the KICKER 46CXA8001 Mono Amplifier. This image shows the power (GND, REM, +12V) and speaker output terminals on one side of the ampelävämpi.
4. Käyttöohjeet
Once the system is installed, follow these steps for initial setup and operation:
4.1 Ensimmäinen käynnistys
- Tarkista kaikki johtojen liitännät.
- Reconnect the vehicle's battery negative terminal.
- Käynnistä pääyksikkö. amplifier should power on (indicated by an LED).
4.2 Amplifier Settings (KICKER 46CXA8001)
The 46CXA8001 amplifier features several adjustable controls:
- Gain Control: Säädä vahvistusta vastaamaan lähtöäänenvoimakkuuttatage of your head unit. Start with the gain at minimum and slowly increase it until you hear distortion, then back off slightly. This is not a volume control.
- Alipäästösuodattimen jakosuodatin (LPF): Variable from 50-200Hz. Set this to filter out frequencies above your desired subwoofer range. A common starting point is 80-100Hz.
- Subsonic -suodatin: Fixed at 25Hz. This filters out extremely low frequencies that the subwoofer cannot reproduce efficiently, protecting it from damage.
- KICKER EQ Boost: Variable to +12dB, centered at 40Hz. Use this to fine-tune the bass response to your preference. Use sparingly to avoid distortion.
5. Huolto
Regular maintenance ensures the longevity and performance of your KICKER system.
- Puhdistus: Pidä amplifier and subwoofer enclosure clean and free of dust and debris. Use a soft, dry cloth. Do not use liquid cleaners directly on components.
- Liitännät: Tarkista säännöllisesti kaikki virta-, maadoitus-, kaukosäädin- ja kaiutinliitännät varmistaaksesi, että ne ovat tukevasti kiinni ja että niissä ei ole korroosiota.
- Ilmanvaihto: Varmista, että amplifier's heatsink fins are not obstructed to allow for proper cooling.
6. Vianmääritys
If you experience issues with your system, refer to the following common problems and solutions:
6.1 Ei virtaa / Amplifier ei käynnisty
- Tarkista sulake: Verify the fuse in the HA-AK8 kit's fuse holder is intact. Replace if blown.
- Virtaliitäntä: Ensure the +12V power cable is securely connected to the battery and ampelävämpi.
- Maaliitäntä: Confirm the ground cable has a solid connection to the chassis and ampelävämpi.
- Kaukokäynnistys: Check that the remote wire is connected to both the head unit and amplifier, and that the head unit is powered on.
6.2 Ei ääntä subwooferista
- Kaiutinliitännät: Verify speaker wires are correctly connected to both the amplifier and subwoofer enclosure, with correct polarity.
- Signaalitulo: Ensure RCA or high-level input cables are securely connected to both the head unit and ampelävämpi.
- Ampnostovoitto: Lisää amplifier's gain control slightly.
- Pääyksikön asetukset: Check head unit's subwoofer output settings and volume.
6.3 Vääristynyt ääni
- Vahvistusasetus: Vähennä amplifier's gain control. It may be set too high.
- Syöttötaso: Ensure the head unit's volume is not excessively high, causing the input signal to clip.
- Crossover Setting: Adjust the LPF setting on the ampelävämpi.
6.4 Amplifier Ylikuumeneminen
- Ilmanvaihto: Varmista, että amplifier has adequate airflow and is not covered.
- Impedanssi: Varmista, että subwooferin impedanssi vastaa amplifier's capabilities (the 48DCWR122-RS is 2 Ohm, which the 46CXA8001 supports).
- Vahvistusasetus: Vähennä amplifier's gain.
7. Tekniset tiedot
7.1 KICKER 48DCWR122-RS Dual 12" CompR Series Subwoofer Enclosure
- Tehon käsittely: 1000 wattia RMS / 2000 wattia huippu
- Recommended Power Range: 500 - 1000 Watts RMS
- Nimellisimpedanssi: 2 ohmia
- Taajuusvaste: 25 - 500 Hz
- Herkkyys: 98dB
- Kartiomateriaali: Polypropeeni
- Surround-materiaali: Ribbed Santoprene
- Kotelon rakenne: MDF (Medium Density Fiberboard) with extensive internal bracing
- Kotelon tyyppi: Ported, Front-facing port
- Mitat (likimääräiset):
- Box Top Depth: 14"
- Box Bottom Depth: 17 1/4"
- Box Height: 16"
- Box Width: 32 3/8"
7.2 KICKER 46CXA8001 Car Audio Class D Mono Ampelävämpi
- RMS tehon ulostulo:
- 600 wattia x 1 @ 2 ohmia
- 800 wattia x 1 @ 1 ohmia
- Huipputeho:
- 1200 wattia x 1 @ 2 ohmia
- 1600 wattia x 1 @ 1 ohmia
- Taajuusvaste: 25Hz - 200Hz
- Signaali-kohinasuhde: 95dB
- Tuloherkkyys:
- High level: 250mV-10V
- Low level: 125mV-5V
- Aktiivinen crossover: 12dB/octave, variable 50-200Hz, low pass only
- Subsonic -suodatin: 24dB/octave high-pass fixed @ 25Hz
- KICKER EQ Boost: Variable to +12dB, centered @ 40Hz
- Mitat (likimääräiset): 8-1/8" Length x 2-3/8" Height x 7-3/16" Width
8. Takuu ja tuki
KICKER products are engineered for performance and reliability. For specific warranty information regarding your KICKER 48DCWR122-RS subwoofer enclosure and 46CXA8001 amplifier, please refer to the warranty card included with your product or visit the official KICKER website. For support with the Harmony Audio HA-AK8 installation kit, please refer to Harmony Audio's documentation.
If you require technical assistance or have questions not covered in this manual, please contact KICKER customer support or your authorized KICKER dealer.