
1. Johdanto
This manual provides detailed instructions for the installation, operation, and maintenance of your ASRock B365 PRO4 ATX Motherboard. Please read this manual thoroughly before proceeding with installation to ensure correct setup and to prevent damage to the components.
The ASRock B365 PRO4 motherboard supports 9th and 8th Generation Intel Core Processors, offering a robust platform for personal computing. It features a Digi Power Design with an 8 Power Phase Design, ensuring stable power delivery to the CPU.
2. Turvallisuustiedot
- Irrota aina virtalähde ennen minkään komponentin asentamista tai irrottamista.
- Käytä antistaattista ranneketta estääksesi herkkien komponenttien staattisen sähkön purkausten (ESD) aiheuttamat vauriot.
- Käsittele emolevyä reunoista välttääksesi herkkien komponenttien koskettamista.
- Varmista tietokoneen kotelon asianmukainen tuuletus ylikuumenemisen estämiseksi.
- Pidä emolevy poissa kosteudesta ja äärimmäisistä lämpötiloista.
3. Asennus ja asennus
3.1 Pakkauksen sisältö
Varmista, että pakkauksessa on kaikki tarvittavat osat:
- ASRock B365 PRO4 Motherboard
- Pika-asennusopas
- Tuki-CD
- I / O-suojus
- 2 x SATA-datakaapelit
- 3 x ruuvia M.2-kantoihin
- 1 x Tukikappale M.2-kannalle

Image: ASRock B365 PRO4 Motherboard and its included accessories, including the quick installation guide, support CD, I/O shield, SATA cables, and M.2 screws/standoff.
3.2 Emolevyn asettelu
Tutustu emolevyn tärkeimpiin komponentteihin ja liittimiin.

Kuva: Ylhäältä alas view of the ASRock B365 PRO4 Motherboard, highlighting the CPU socket, RAM slots, PCIe slots, and M.2 slots.

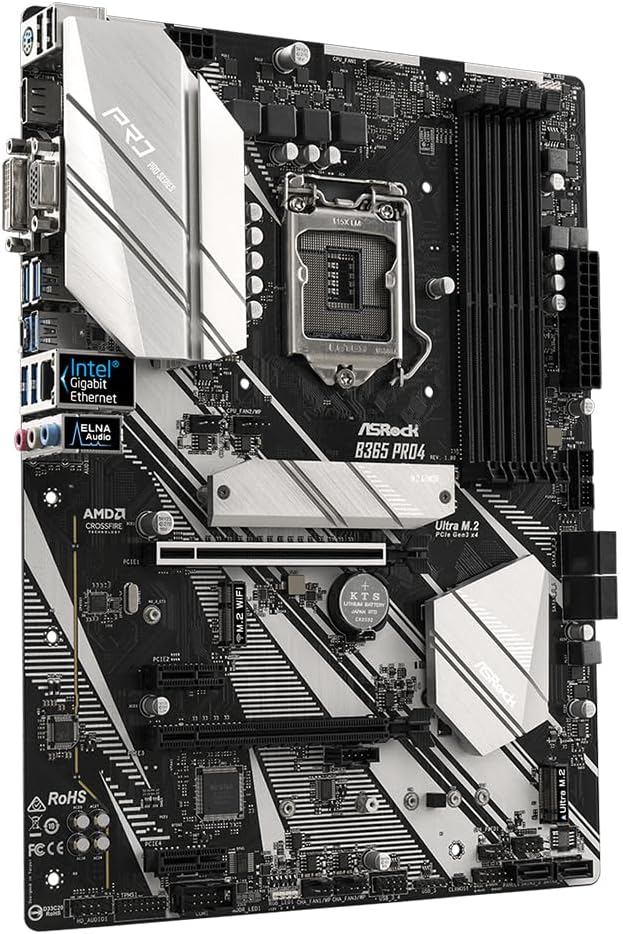
Kuva: Kulmikas view of the ASRock B365 PRO4 Motherboard, showing the heatsinks and various connectors.
3.3 Suorittimen asennus (LGA1151)
- Avaa suorittimen kannan vipu ja nosta kuormituslevy.
- Kohdista suoritin huolellisesti kantaan ja varmista, että suorittimen kultainen kolmio vastaa kannan kolmiota.
- Aseta suoritin varovasti kantaan pakottamatta sitä.
- Sulje kuormalevy ja kiinnitä se vivulla.
3.4 Muistin (RAM) asennus
The motherboard features 4 DDR4 DIMM slots, supporting dual-channel memory up to 64GB.
- Avaa DIMM-paikan molemmissa päissä olevat pidikkeet.
- Kohdista RAM-moduulin lovi DIMM-paikan kiilan kanssa.
- Insert the RAM module firmly until the clips snap into place.
3.5 Tallennuslaitteen asennus
The motherboard supports 6 SATA3 ports and 2 Ultra M.2 ports.
- SATA-asemat: Connect SATA data cables to the SATA ports on the motherboard and to your storage devices (HDDs/SSDs). Connect power cables from your power supply to the devices.
- M.2 SSD-levyt: Locate the M.2 slots. Insert the M.2 SSD into the slot at an angle, then gently push it down and secure it with the provided screw and standoff.
3.6 Laajennuskortin asennus (PCIe)
The motherboard has 2 PCI-Express 3.0 x16 slots and 2 PCI-Express 3.0 x1 slots.
- Select an appropriate PCIe slot for your expansion card (e.g., graphics card).
- Remove the corresponding metal bracket from your PC case.
- Align the card with the slot and press firmly until it is seated correctly.
- Kiinnitä kortti ruuvilla tietokoneen koteloon.
3.7 Connecting Peripherals to the I/O Panel
Takapaneelissa on useita portteja ulkoisten laitteiden kytkemiseen.
Kuva: Lähikuva view of the ASRock B365 PRO4 Motherboard's rear I/O panel, showing ports for PS/2, USB 2.0, USB 3.1 Gen 1, VGA, DVI-D, HDMI, LAN, and audio jacks.
- USB-portit: Connect USB devices (keyboard, mouse, external drives) to the available USB 2.0 (5 ports) and USB 3.1 Gen 1 (8 ports, including 1 Type-C rear) ports.
- Videolähdöt: Connect your monitor to the VGA, DVI-D, or HDMI port.
- LAN-portti: Kytke Ethernet-kaapeli verkkoon pääsyä varten.
- Ääniliitännät: Connect speakers, headphones, or microphones to the audio jacks.
- PS/2-portti: Connect a PS/2 keyboard or mouse.
4. Käyttöohjeet
4.1 Ensimmäinen käynnistys ja BIOS-asetukset
- After assembling all components, connect the power supply and monitor.
- Power on your system. Press Del or F2 käynnistyksen aikana siirtyäksesi BIOS/UEFI-asetusohjelmaan.
- Configure boot order, system time, and other necessary settings. Save changes and exit.
- Asenna käyttöjärjestelmä käynnistettävältä USB-asemalta tai optiselta tallennusvälineeltä.
4.2 Ohjaimen asennus
After installing the operating system, install the necessary drivers from the provided Support CD or download the latest versions from the ASRock websivusto. Keskeisiä ajureita ovat:
- Piirisarjan ajurit
- Ääniohjaimet (Realtek ALC892)
- LAN Drivers (Intel I219V Gigabit Ethernet)
- Näytönohjaimet (integroidulle näytönohjaimelle tai erilliselle näytönohjaimelle)
5. Huolto
- Pölynpoisto: Regularly clean dust from the motherboard and case fans using compressed air. Ensure the system is powered off and unplugged before cleaning.
- BIOS-päivitykset: Tarkista ASRock website periodically for BIOS updates. Updates can improve system stability and compatibility. Follow the instructions carefully when updating the BIOS.
- Kaapelin hallinta: Varmista, että kaapelit on reititetty siististi ilmavirran parantamiseksi ja häiriöiden estämiseksi.
6. Vianmääritys
- Ei virtaa:
- Check all power connections, including the 24-pin ATX and 8-pin 12V CPU power connectors.
- Varmista, että virtakytkin on ON-asennossa.
- Ei näyttöä:
- Verify that the monitor is connected to the correct video output (either integrated graphics or discrete GPU).
- Aseta näytönohjain ja RAM-moduulit uudelleen paikoilleen.
- Järjestelmän epävakaus/kaatumiset:
- Tarkista RAM-moduulien oikea asento.
- Varmista, että suorittimen jäähdytin on asennettu oikein ja että se on hyvin yhteydessä toisiinsa.
- Päivitä ajurit ja BIOS uusimpiin versioihin.
- M.2 SSD-levyä ei havaittu:
- Ensure the M.2 SSD is correctly seated and secured.
- Check BIOS settings to ensure M.2 slots are enabled and configured correctly (SATA vs. PCIe mode).
7. Tekniset tiedot
| Ominaisuus | Yksityiskohta |
|---|---|
| CPU-liitäntä | LGA 1151 |
| Yhteensopivat prosessorit | 9th/8th Generation Intel Core Processors (up to 95W) |
| Piirisarja | Intel B365 |
| Muisti | 4 x DDR4 DIMM slots, Dual Channel, Non-ECC, Buffered, Max 64GB (2666/2400/2133 MHz) |
| Laajennuspaikat | 2 x PCIe 3.0 x16, 2 x PCIe 3.0 x1 |
| Monigrafiikkatuki | AMD Quad CrossFireX and CrossFire Technology |
| Varastointi | 6 x SATA3 ports (RAID 0, 1, 5, 10), 2 x Ultra M.2 ports (PCIe Gen3 x4 & SATA3) |
| Audio | Realtek ALC892 7.1-kanava HD-ääni |
| LAN | Intel I219V Gigabit Ethernet |
| USB-portit | 8 x USB 3.1 Gen1 (1 Type-C rear, 5 rear, 2 via header), 5 x USB 2.0 (2 rear, 3 via header) |
| Videolähdöt | 1 x VGA, 1 x DVI-D, 1 x HDMI |
| Muototekijä | ATX (12.0 x 9.0 inch / 30.5 x 22.9 cm) |
8. Takuu ja tuki
8.1 Takuutiedot
The ASRock B365 PRO4 Motherboard comes with a 1 vuoden rajoitettu takuu. This warranty covers defects in materials and workmanship under normal use. For specific terms and conditions, please refer to the warranty card included with your product or visit the official ASRock websivusto.
Note: Damage caused by improper installation, misuse, unauthorized modifications, or natural disasters is not covered under warranty.
8.2 Tekninen tuki
For technical assistance, driver downloads, BIOS updates, or further troubleshooting, please visit the official ASRock support websivusto:
Voit myös ottaa yhteyttä ASRockin asiakaspalveluun suoraan heidän kauttaan. websivusto henkilökohtaista tukea varten.


