1. Johdanto
This manual provides detailed instructions for the setup, operation, and maintenance of your OWLENZ SD60 Wi-Fi Mini Projector. Please read this manual thoroughly before using the product to ensure proper functionality and safety. The SD60 features advanced LED light technology with 1500 lumens brightness, Wi-Fi screen sharing capabilities (Miracast/Airplay), and multiple media playback options for a versatile home theater experience. Its portable and compact design allows for easy installation and use.
2. Tärkeitä turvallisuustietoja
- Älä katso suoraan projektorin linssiin, kunamp on päällä.
- Varmista, että projektorin ympärillä on asianmukainen tuuletus ylikuumenemisen estämiseksi.
- Pidä projektori poissa vedestä tai muista nesteistä.
- Käytä ainoastaan projektorin mukana toimitettua virtalähdettä.
- Vältä projektorin sijoittamista epävakaille pinnoille.
- The LED light technology is designed to be gentle on the eyes and has no radiation.
3. Pakkauksen sisältö
Varmista, että pakkauksessasi on kaikki alla luetellut tuotteet. Jos jokin tuote puuttuu tai on vaurioitunut, ota yhteyttä asiakastukeen.

Image: OWLENZ SD60 Projector, remote control, power cable, and AV cables.
- OWLENZ SD60 Mini Projector
- Kaukosäädin
- Virtakaapeli
- AV-kaapeli
- Käyttöopas (tämä asiakirja)
4. Tuote ohiview
Familiarize yourself with the various parts and controls of your OWLENZ SD60 projector.
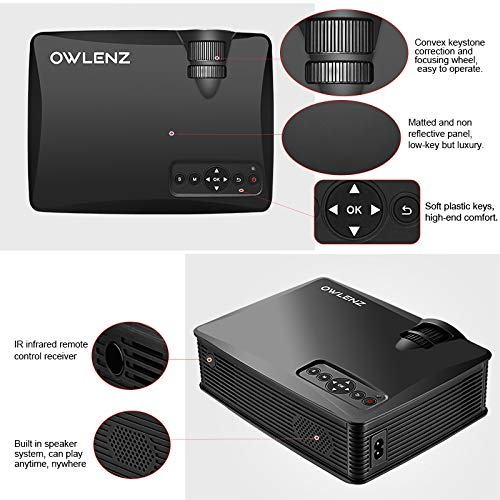
Image: Key features of the OWLENZ SD60 projector, including the focusing wheel, keystone correction, control panel, IR receiver, and built-in speaker.
- Convex Keystone Correction and Focusing Wheel: Located on the top, these allow for easy image adjustment.
- Matted and Non-Reflective Panel: Provides a sleek, low-key appearance.
- Soft Plastic Keys: For comfortable and responsive control.
- IR Infrared Remote Control Receiver: For remote operation.
- Sisäänrakennettu kaiutinjärjestelmä: A 3W speaker for integrated audio playback.
- Tuloportit: HDMI, USB, AV, SD Card slot (located on the side/rear).
5. Asennus
5.1 Virtaliitäntä
- Liitä virtajohto projektorin virransyöttöporttiin.
- Kytke virtajohdon toinen pää sopivaan pistorasiaan.
- Käynnistä projektori painamalla virtapainiketta tai kaukosäädintä.
5.2 Tulolähteiden kytkeminen
The projector supports various input options:
- HDMI: Connect an HDMI cable from your device (laptop, gaming console, etc.) to the projector's HDMI port.
- USB: Liitä USB-asema USB-porttiin toistaaksesi mediaa suoraan.
- AV: Käytä mukana toimitettua AV-kaapelia liittääksesi laitteet AV-ulostulolla.
- SD-kortti: Insert an SD card into the SD card slot for media playback.
After connecting, select the appropriate input source from the projector's menu using the remote or control panel.
5.3 Wi-Fi Screen Sharing (Miracast / Airplay)
The SD60 supports wireless screen sharing from compatible smartphones and tablets.
- Varmista, että mobiililaitteesi ja projektori on yhdistetty samaan Wi-Fi-verkkoon.
- On the projector, navigate to the "Screen Share" or "Miracast/Airplay" option in the main menu.
- Ota mobiililaitteellasi käyttöön näytön peilaustoiminto (esim. "Älykäs View"Androidilla, "Näytön peilaus" iOS:llä).
- Valitse projektorin nimi käytettävissä olevien laitteiden luettelosta yhteyden muodostamiseksi.
5.4 Tarkennuksen ja trapetsivääristymän säätö
- Painopiste: Rotate the focusing wheel near the lens until the projected image is clear and sharp.
- Keystone-korjaus: Use the keystone correction wheel to adjust the image shape if it appears trapezoidal (wider at the top or bottom).
6. Käyttö
6.1 Perusohjaimet
Use the control panel on the projector or the remote control to navigate menus and adjust settings.
- Virtapainike: Kytkee projektorin päälle/pois.
- Navigation Buttons (Arrows/OK): Valikon navigointia ja valintaa varten.
- Lähde-painike: Switches between input sources (HDMI, USB, AV, SD Card, Wi-Fi).
- Valikkopainike: Avaa projektorin asetusvalikon.
6.2 Median toisto
Once an input source is selected, the projector will display content. For USB/SD card playback, navigate through the file browser to select your desired media.
6.3 Äänilähtö
- Sisäänrakennettu kaiutin: The projector has a built-in 3W speaker suitable for small viewalueilla.
- Ulkoinen kaiutin: For a better listening experience, connect external speakers or headphones to the 3.5mm audio port.
6.4 Projektiokoko
The projector supports projection sizes ranging from 40 to 150 inches, offering a large screen experience.
7. Huolto
7.1 Puhdistus
- Puhdista projektorin ulkopinta pehmeällä, kuivalla liinalla.
- For the lens, use a lens cleaning cloth and specialized lens cleaning solution. Do not use abrasive materials.
- Regularly clean the ventilation openings to ensure proper airflow and prevent dust buildup.
7.2 LED Bulb Lifespan
The OWLENZ SD60 features an LED bulb with a lifespan of up to 30,000+ hours, significantly longer than traditional projector lamps. No regular bulb replacement is typically required under normal usage conditions.
8. Käyttötapaukset
The OWLENZ SD60 Mini Projector is versatile and suitable for various applications:
- Kotiteatteri: Nauti elokuvista, TV-ohjelmista ja urheilusta suurelta näytöltä.
- Pelaaminen: Connect gaming consoles for an immersive gaming experience.
- Koulutustarkoitukset: Project educational content, videos, and presentations.
- Children's Entertainment: Ideal for playing videos and cartoons for children.
- Pieni Viewing Areas: Its compact design and built-in speaker make it perfect for use in smaller rooms or spaces.
9. Vianmääritys
| Ongelma | Mahdollinen syy | Ratkaisu |
|---|---|---|
| Kuvaa ei näy | Incorrect input source selected; loose cable connection; source device not powered on. | Valitse oikea tulolähde. Tarkista kaikki kaapeliliitännät. Varmista, että lähdelaite on päällä. |
| Kuva on epäselvä | Tarkennusta ei ole säädetty oikein. | Adjust the focusing wheel until the image is clear. |
| Kuva on puolisuunnikkaan muotoinen | Keystone not adjusted correctly. | Adjust the keystone correction wheel. |
| Ei ääntä | Volume too low; external speakers not connected properly; audio format not supported. | Increase volume. Check external speaker connection or use built-in speaker. Ensure audio format is compatible. |
| Wi-Fi screen sharing not working | Devices not on the same Wi-Fi network; screen mirroring function not activated on mobile device. | Ensure both devices are on the same Wi-Fi. Activate screen mirroring on your mobile device and select the projector. |
10. Tekniset tiedot
| Ominaisuus | Yksityiskohta |
|---|---|
| Merkki | OWLENZ |
| Malli | SD60 |
| Tuotteen mitat (PxLxK) | 20.8 x 16.5 x 8 cm |
| Tuotteen paino | 949 g |
| Laitteistorajapinta | HDMI, USB |
| Yhteystekniikka | HDMI, USB, Wi-Fi |
| Yhteensopivat laitteet | Älypuhelimet, tabletit, kannettavat tietokoneet |
| Erikoisominaisuudet | Sisäänrakennettu kaiutin, kannettava |
| Näyttötekniikka | LCD |
| Kirkkaus | 1500 lumenia |
| LED Bulb Lifespan | Jopa 30,000+ tuntia |
| Projektion koko | 40-150 tuumaa |
| Sisäänrakennettu kaiutinvirta | 3W |
| Muototekijä | Kannettava |
| Asennustyyppi | Pöytäteline |
| Wattage | 24 wattia |
| Paristot vaaditaan | Yes (for remote control, not included) |
11. Tuotevideon loppuview
Katso tämä lyhyt video saadaksesi nopean yleiskuvanview of the OWLENZ SD60 Mini Projector's features and capabilities.
Video: Lyhyt katsausview highlighting the OWLENZ SD60 projector's display, sound, smart features, other features, portability, and use cases.
12. Takuu ja tuki
The OWLENZ SD60 Mini Projector comes with a standard brand warranty. For detailed warranty information, technical support, or service inquiries, please refer to the product detail page on Amazon.in or contact OWLENZ customer service directly.
For further information, visit the product detail page: Amazonin tuotesivu