
TRONIC SMV9809
TRONIC 3-in-1 Detector SMV9809 User Manual
Model: SMV9809
1. Johdanto
Thank you for choosing the TRONIC 3-in-1 Detector, Model SMV9809. This device is designed to detect wood, metal, and live electrical voltage behind walls, ceilings, and floors. Please read this manual thoroughly before using the device to ensure safe and effective operation. Keep this manual for future reference.
2. Turvallisuusohjeet
VAROITUS: Näiden turvallisuusohjeiden noudattamatta jättäminen voi aiheuttaa sähköiskun, tulipalon tai vakavan vamman.
- Oleta aina, että seinien takana on jännitteisiä sähköjohtoja. Ole äärimmäisen varovainen.
- Do not rely solely on the detector to locate live wires. Always turn off power to the area before drilling or cutting.
- The device is designed for indoor use only. Avoid exposure to moisture or extreme temperatures.
- Älä avaa tai muuta laitetta. Korjauksia saa suorittaa vain pätevä henkilöstö.
- Pidä laite poissa lasten ulottuvilta.
- Clean the device with a dry, soft cloth. Do not use abrasive cleaners or solvents.
3. Tuote ohiview
The TRONIC SMV9809 detector features an LCD display and intuitive controls for easy operation.
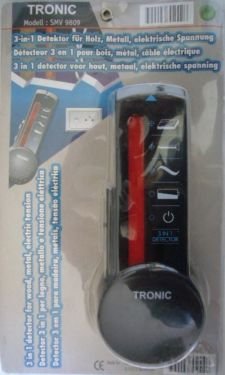
Kuva 1: Etuosa view of the TRONIC 3-in-1 Detector SMV9809, showing the LCD screen and control buttons.
3.1 Komponentit
- LCD-näyttö: Näyttää tunnistustilan, signaalin voimakkuuden ja akun tilan.
- Tilapainike: Switches between Wood, Metal, and AC Voltage-tunnistustilat.
- Skannauspainike: Käynnistää skannausprosessin.
- Anturin alue: Located on the back of the device, this area must be placed flat against the surface for accurate detection.
- Akkulokero: Sijaitsee takana akun asennusta varten.
4. Asennus
4.1 Akun asennus
The TRONIC SMV9809 requires a 9V battery (not included).
- Avaa laitteen takana oleva paristolokeron kansi.
- Aseta uusi 9 V:n paristo paikalleen varmistaen oikean napaisuuden (+/-).
- Sulje paristolokeron kansi kunnolla.
Note: Replace the battery when the low battery indicator appears on the LCD display.
5. Käyttöohjeet
5.1 Yleisiä käyttövinkkejä
- Ensure the surface is dry and free of dust.
- Hold the device flat against the surface. Do not tilt or lift it during scanning.
- Move the device slowly and steadily across the surface.
- Mark the detected areas with a pencil.
5.2 Wood Detection Mode
This mode is used to locate wood studs behind drywall or other common wall materials.
- Paina Tilapainike until the "WOOD" indicator appears on the LCD.
- Place the device flat against the wall where you want to start scanning.
- Paina ja pidä painettuna Skannauspainike. Wait for calibration (a beep may sound).
- Slowly slide the device horizontally across the surface.
- The signal strength indicator on the LCD will increase as you approach a wood stud. A distinct sound and full bar indication will signal the center of the stud.
5.3 Metallinilmaisintila
This mode detects ferrous and non-ferrous metals, such as pipes, rebar, or conduit.
- Paina Tilapainike until the "METAL" indicator appears on the LCD.
- Place the device flat against the wall.
- Paina ja pidä painettuna Skannauspainike.
- Slowly slide the device horizontally.
- The signal strength will increase as you approach metal. A continuous tone and full bar indication will signal the presence of metal.
5.4 AC Voitage Tunnistustila
CAUTION: This mode detects live, unshielded AC wires. Always confirm power is off before working.
- Paina Tilapainike until the "AC" indicator appears on the LCD.
- Place the device flat against the wall.
- Paina ja pidä painettuna Skannauspainike.
- Slowly slide the device horizontally.
- The signal strength will increase, and an audible alarm will sound when live AC voltage is detected. The "AC" symbol will flash on the display.
6. Huolto
- Puhdistus: Wipe the device with a dry, soft cloth. Do not use liquids or chemical cleaners.
- Varastointi: Store the device in a dry, dust-free environment at room temperature. Remove the battery if the device will not be used for an extended period.
- Akun vaihto: Replace the 9V battery when the low battery indicator is displayed.
7. Vianmääritys
| Ongelma | Mahdollinen syy | Ratkaisu |
|---|---|---|
| Laite ei käynnisty. | Tyhjä tai väärin asennettu akku. | Check battery polarity; replace battery. |
| Epätarkkoja lukemia. | Device not calibrated correctly; surface too wet/uneven; interference. | Ensure proper calibration (press and hold scan button on clear area); ensure dry, flat surface; avoid scanning near strong electromagnetic fields. |
| Ei tunnistusta AC-tilassa. | Wires are shielded or too deep; power is off. | Ensure power is on for the circuit; AC detection depth is limited. |
8. Tekniset tiedot
- Malli: SMV9809
- Tunnistustilat: Wood, Metal, AC Voltage
- Virtalähde: 9 V:n paristo (ei sisälly toimitukseen)
- Näyttö: LCD
- Materiaali: Muovi
- Kansainvälinen suojaluokitus: IP66 (Dust tight and protected against powerful jets of water)
- Säädettävä pituus: Kyllä
9. Takuu ja tuki
TRONIC products are manufactured to high-quality standards. For warranty information or technical support, please refer to the documentation provided with your purchase or contact your retailer. Keep your proof of purchase for any warranty claims.
ei asiaankuuluvia asiakirjoja
Ask a question about this manual
Ask about setup, troubleshooting, compatibility, parts, safety, or missing instructions. Manuals+ will review the question and use this page’s manual context to help answer it.