
ROBOTIME DG103
Ada's Studio DIY Miniature House
Käyttöohje
Malli: DG103 | Merkki: ROBOTIME
Johdanto
Welcome to the world of miniature crafting with your new ROBOTIME Ada's Studio DIY Miniature House kit. This kit allows you to construct a detailed miniature painter's studio, complete with an easel, paintings, brushes, paints, and art books. This manual provides comprehensive instructions to guide you through the assembly process, operation of features, maintenance, and troubleshooting.

Figure 1: Fully assembled Ada's Studio DIY Miniature House.
Turvallisuustiedot
Please read all safety warnings before beginning assembly. This product contains small parts and is not suitable for children under 36 months due to choking hazards. Adult supervision is recommended for younger users (recommended age 14 years and older).
- Keep all small components out of reach of young children.
- Use glues and paints in a well-ventilated area.
- Handle sharp tools (e.g., scissors, craft knives) with care.
Asennus ja kokoonpano
The Ada's Studio kit requires assembly of various miniature components. Follow the steps carefully for best results.
1. Pakkauksen purkaminen ja osien tunnistus
Carefully unpack all contents from the box. Verify that all sheets of pre-cut parts, fabric pieces, wires, LED components, and accessory bags are present. Refer to the included parts list (if any) to ensure no components are missing.
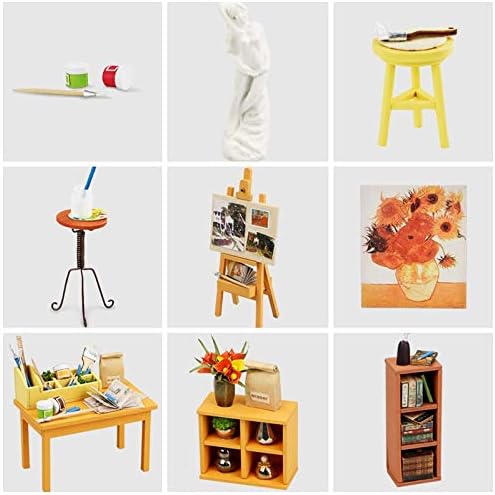
Kuva 2: Esimample of various miniature components included in the kit.
2. Kokoamisvaiheet
Follow the numbered instructions provided in the kit's dedicated assembly guide. General steps include:
- Valmistelu: Carefully detach pre-cut pieces from their sheets. Use fine-grit sandpaper to smooth any rough edges if necessary.
- Liimaus: Apply glue sparingly to the designated tabs or surfaces. Hold pieces together firmly until the glue sets.
- Folding and Cutting: For paper or fabric components, follow the score lines for accurate folds and use sharp scissors or a craft knife for precise cuts.
- Wiring (LEDs): Connect the LED components according to the wiring diagram. Ensure correct polarity if applicable. Secure wires neatly to avoid obstruction.
- Yksityiskohdat: Attach small accessories and decorative elements last, ensuring they are securely fastened.

Figure 3: Illustrative assembly steps, including cutting, gluing, and fabric work.
Käyttöohjeet
The Ada's Studio miniature house features integrated LED lighting to illuminate your completed scene.
LED-valon toiminta
Once assembly is complete and the wiring is connected, the LED lights can be activated. The kit typically includes a battery box (batteries not included) with an on/off switch. Insert the required batteries (e.g., AAA batteries) into the battery box, connect it to the main power line of the LED circuit, and use the switch to turn the lights on or off.

Figure 4: Ada's Studio with LED lights off (left) and on (right).
Huolto
To ensure the longevity and appearance of your miniature house, follow these simple maintenance guidelines:
- Pölyäminen: Regularly dust the miniature house with a soft brush or a can of compressed air to remove accumulated dust. Avoid using wet cloths, which may damage paper or fabric components.
- Sijoitus: Display the model in a dry environment, away from direct sunlight, extreme temperatures, and high humidity, which can cause warping or fading.
- Käsittely: Handle the assembled model with care, preferably by its base, to avoid dislodging delicate components.
- Akun vaihto: If the LED lights dim or stop working, replace the batteries in the battery box. Ensure proper battery orientation.
Vianetsintä
If you encounter issues during assembly or operation, refer to the following common problems and solutions:
| Ongelma | Mahdollinen syy | Ratkaisu |
|---|---|---|
| Osat eivät sovi yhteen. | Excess glue, rough edges, incorrect orientation. | Ensure glue is applied thinly. Gently sand edges if needed. Double-check the assembly diagram for correct part orientation. |
| LED-valot eivät syty. | Incorrect battery installation, dead batteries, loose wire connection, faulty LED. | Check battery polarity and ensure batteries are fresh. Verify all wire connections are secure. Inspect LED for visible damage. |
| Puuttuvat komponentit. | Parts overlooked during unpacking, manufacturing error. | Carefully re-check all packaging materials. Contact ROBOTIME customer support with your model number and a description of the missing part. |
Tekniset tiedot
| Ominaisuus | Yksityiskohta |
|---|---|
| Tuotteen mitat | 19 x 19 x 14 cm (7.5 x 7.5 x 5.5 tuumaa) |
| Paino | 270 g (0.6 lbs) |
| Mallinumero | DG103 |
| Suositeltu ikä | 14 vuotta ja vanhemmat |
| Materiaalit | Cardboard, Plastic, Metal, Paper |
| Asennus vaaditaan | Yes (DIY Kit) |
| Paristot vaaditaan | Yes (for LED lighting, not included) |
Takuu ja tuki
For any questions, missing parts, or support regarding your ROBOTIME Ada's Studio DIY Miniature House, please contact the manufacturer or your point of purchase. Keep your proof of purchase and model number (DG103) ready when contacting support.
ROBOTIME products are designed for quality and enjoyment. If you experience any issues, please reach out to their customer service for assistance.
Ask a question about this manual
Ask about setup, troubleshooting, compatibility, parts, safety, or missing instructions. Manuals+ will review the question and use this page’s manual context to help answer it.