
1. Johdanto
This manual provides essential information for the safe and efficient operation of your Rigol DS1104Z-S Plus 100 MHz Digital Oscilloscope. Please read this manual thoroughly before using the instrument to ensure proper functionality and to prevent damage. The Rigol DS1104Z-S Plus is a 4-channel digital storage oscilloscope designed for precise signal analysis with a 100 MHz bandwidth and a 1 GSa/s real-time sample korko.
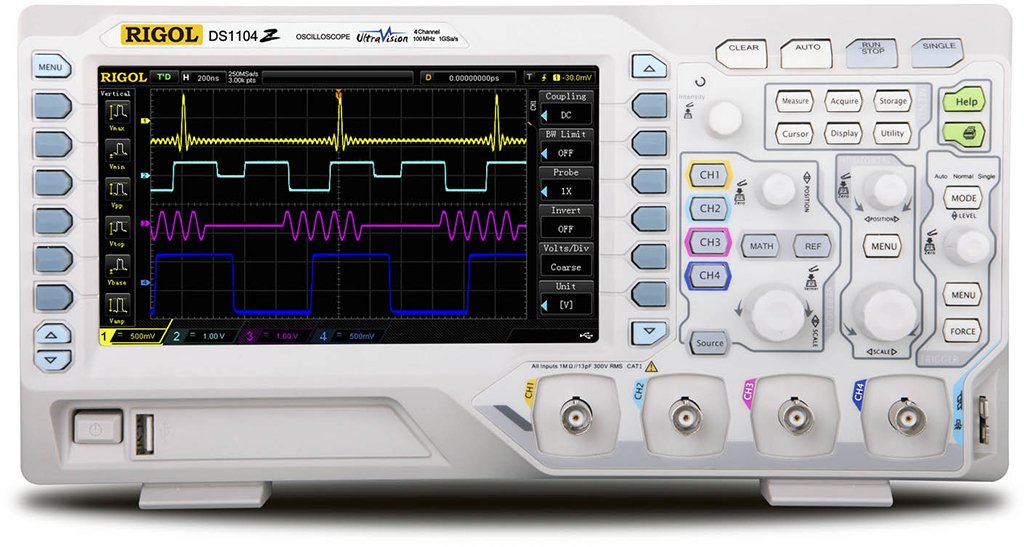
Figure 1: Rigol DS1104Z-S Plus Digital Oscilloscope. This image shows the front panel of the oscilloscope with its display, control knobs, and input channels.
2. Turvallisuustiedot
Noudata aina seuraavia turvaohjeita loukkaantumisten ja laitteen vaurioitumisen välttämiseksi:
- Virtalähde: Connect the instrument only to a power source with the specified voltage ja taajuus.
- Maadoitus: Varmista, että laite on maadoitettu asianmukaisesti sähköiskun välttämiseksi.
- Ilmanvaihto: Älä tuki tuuletusaukkoja. Varmista riittävä ilmankierto laitteen ympärillä.
- Ympäristö: Operate the oscilloscope in a dry, well-ventilated area, away from direct sunlight, high temperatures, and excessive dust.
- Koettimet: Use only probes designed for the specified voltage ja taajuusluokitukset.
- Huolto: Jätä kaikki huoltotyöt pätevän huoltohenkilöstön tehtäväksi. Älä yritä korjata laitetta itse.
- Puhdistus: Katkaise virta ennen puhdistusta. Käytä pehmeää, damp kangas. Älä käytä hankaavia puhdistusaineita tai liuottimia.
3. Pakkauksen sisältö
Varmista, että paketti sisältää seuraavat kohteet:
- Rigol DS1104Z-S Plus Digital Oscilloscope
- Virtajohto
- Passive Probes (4 units)
- USB-kaapeli
- Pikaopas
- Resource CD (User Manual, Programming Manual, Software)
4. Tuote ohiview
The Rigol DS1104Z-S Plus features a user-friendly interface and robust design for various measurement applications.
4.1 Etupaneeli
The front panel includes the display, control knobs, function buttons, and input connectors for channels 1-4.
- Näyttö: Shows waveforms, measurement results, and menu options.
- Pystysuuntaiset säätimet: Säädä tilavuustage per division and position for each channel.
- Vaakasuuntaiset säätimet: Adjust time per division and horizontal position.
- Liipaisinsäätimet: Set trigger level, mode, and type.
- Toimintopainikkeet: Access various menus such as Acquire, Measure, Storage, Utility, etc.
- Channel Inputs (CH1-CH4): BNC connectors for probe connection.
4.2 Takapaneeli
The rear panel provides power input, USB host/device ports, and LAN port for connectivity.
- Verkkovirta: Virtajohdon kytkemistä varten.
- USB-isäntäportti: USB-tallennuslaitteiden liittämiseen.
- USB-laiteportti: Tietokoneeseen liittämistä varten.
- LAN-portti: For network connectivity and remote control.
5. Asennus
5.1 Virtaliitäntä
- Varmista, että takapaneelin virtakytkin on OFF-asennossa.
- Kytke laitteen mukana toimitettu virtajohto oskilloskoopin takapaneelissa olevaan verkkovirtaliitäntään.
- Kytke virtajohdon toinen pää maadoitettuun pistorasiaan.
5.2 Anturin liitäntä
- Connect the BNC connector of a passive probe to one of the input channels (CH1, CH2, CH3, or CH4) on the front panel.
- Connect the probe's ground clip to the circuit's ground reference.
- Set the attenuation ratio on the probe to match the setting on the oscilloscope (e.g., 1X or 10X).
5.3 Ensimmäinen käynnistys
- Press the power switch on the rear panel to the ON position.
- The oscilloscope will perform a self-test and display the Rigol logo.
- After startup, the default waveform display will appear.
6. Käyttöohjeet
This section covers basic operations for acquiring and analyzing waveforms.
6.1 Aaltomuodon perusnäyttö
- Vertical Scale (VOLTS/DIV): Use the vertical scale knob for the active channel to adjust the voltage herkkyys.
- Pystysuuntainen sijainti: Use the vertical position knob to move the waveform up or down on the screen.
- Horizontal Scale (SEC/DIV): Use the horizontal scale knob to adjust the time base.
- Horizontal Position: Use the horizontal position knob to shift the waveform left or right.
6.2 Laukaisu
Liipaisu vakauttaa toistuvia aaltomuotoja ja tallentaa yksittäisiä tapahtumia.
- Liipaisutaso: Säädä liipaisutason nuppia äänenvoimakkuuden asettamiseksitage point at which the trigger occurs.
- Liipaisinvalikko: Paina Liipaisinvalikko button to configure trigger type (Edge, Pulse, Video, etc.), source, and slope.
- Laukaisutila: Select between Auto, Normal, and Single modes.
6.3 Mittausfunktiot
The oscilloscope offers various automatic measurement functions.
- Paina Mitata button to display the measurement menu.
- Select desired measurements such as Vpp, Vmax, Vmin, Freq, Period, Rise Time, etc.
- The results will be displayed on the screen.
6.4 Tietojen tallentaminen
Waveforms and settings can be saved to internal memory or a USB storage device.
- Paina Varastointi -painiketta.
- Select the storage type (Waveform, Setup, Image) and destination (Internal, USB).
- Follow the on-screen prompts to save the data.
7. Huolto
7.1 Puhdistus
To maintain the instrument's appearance and performance:
- Irrota virtajohto ennen puhdistamista.
- Käytä pehmeää liinaa dampened with mild detergent and water to clean the exterior.
- Älä käytä hankaavia puhdistusaineita, liuottimia tai voimakkaita kemikaaleja.
- Varmista, ettei laitteen sisään pääse nestettä.
7.2 Kalibrointi
The oscilloscope is factory calibrated. For optimal performance, periodic calibration by qualified service personnel is recommended, typically every 1-2 years, depending on usage.
7.3 Varastointi
When not in use for extended periods, store the oscilloscope in a dry, dust-free environment within the specified operating temperature range.
8. Vianmääritys
This section lists common problems and their solutions. If the problem persists, contact Rigol customer support.
| Ongelma | Mahdollinen syy | Ratkaisu |
|---|---|---|
| Ei näyttöä virran kytkemisen jälkeen | Power cord not connected; Power switch off; Faulty power outlet | Check power cord connection; Ensure power switch is ON; Test power outlet with another device |
| Ei aaltomuotoa näytettynä | Probe not connected; Incorrect channel settings; Trigger level incorrect; Input signal too small/large | Connect probe to active channel; Adjust vertical scale and position; Adjust trigger level; Check input signal source |
| Epävakaa aaltomuoto | Incorrect trigger settings; Noisy signal | Adjust trigger level and mode; Check signal source for noise; Use averaging acquisition mode |
| Cannot save data to USB | USB drive not formatted correctly; USB drive full; USB drive faulty | Format USB drive to FAT32; Delete unnecessary files; Try a different USB drive |
9. Tekniset tiedot
Key technical specifications for the Rigol DS1104Z-S Plus Digital Oscilloscope:
- Kaistanleveys: 100 MHz
- Kanavat: 4 analogista kanavaa
- Reaaliaikainen Sample Hinta: Jopa 1 GSa/s
- Muistin syvyys: 12 Mpts (Standard), 24 Mpts (Optional)
- Aaltomuodon sieppausnopeus: Jopa 500 000 wfms/s
- Näyttö: 7-inch TFT LCD (800x480 resolution)
- Pystysuuntainen herkkyys: 1 mV/div - 10 V/div
- Aikaperusteinen alue: 2 ns/div to 50 s/div
- Liipaisintyypit: Edge, Pulse, Video, Slope, Alternate, Runt, Window, Delay, Setup/Hold, Nth Edge
- Käyttöliittymä: USB Host, USB Device, LAN, Pass/Fail, Trigger Out
- Virtalähde: Johdollinen sähkö
- Tuotteen paino: 1 kiloa
- Vaatimustenmukaisuus: CE
10. Takuu ja tuki
Rigol Technologies provides a standard warranty for its products. For detailed warranty terms and conditions, please refer to the warranty card included with your product or visit the official Rigol website. For technical support, service, or inquiries, please contact your local Rigol distributor or Rigol customer service. Contact information can typically be found on the Rigol website or in the documentation provided with your oscilloscope.
Virallinen Websivusto: www.rigol.com