1. Johdanto
Kiitos ostoksestasiasing the BYINTEK BT140 WiFi Projector. This manual provides essential information for setting up, operating, and maintaining your projector. Please read it thoroughly before use to ensure proper functionality and to extend the lifespan of your device.
2. Turvallisuustiedot
Tulipalo-, sähköisku- tai loukkaantumisvaaran välttämiseksi noudata seuraavia turvallisuusohjeita:
- Älä katso suoraan projektorin linssiin, kunamp on päällä. Voimakas valo voi aiheuttaa silmävaurioita.
- Varmista asianmukainen ilmanvaihto. Älä tuki tuuletusaukkoja. Ylikuumeneminen voi vahingoittaa projektoria.
- Aseta projektori vakaalle ja tasaiselle alustalle, jotta se ei putoa.
- Pidä projektori poissa vedestä, kosteudesta ja syttyvistä materiaaleista.
- Käytä ainoastaan projektorin mukana toimitettua virtalähdettä.
- Älä yritä korjata projektoria itse. Jätä kaikki huoltotyöt pätevän henkilöstön tehtäväksi.
- Irrota projektori pistorasiasta ukkosmyrskyjen aikana tai jos sitä ei käytetä pitkään aikaan.
3. Pakkauksen sisältö
Tarkista, että kaikki osat ovat mukana:
- BYINTEK BT140 Projector
- Virtakaapeli
- Kaukosäädin
- AV-kaapeli
- Käyttöopas (tämä asiakirja)
Note: Specific accessories may vary slightly depending on the region or retailer.
4. Tuote ohiview
Tutustu projektorin osiin ja liitäntöihin.
Kuva: Edessä view of the BYINTEK BT140 Projector, showing the lens and ventilation grilles.
Liitännät:
- HDMI: Connect to devices like laptops, Blu-ray players, gaming consoles.
- USB: Liitä USB-asemat mediatoistoa varten.
- SD-korttipaikka: Aseta SD-kortit median toistoa varten.
- AV: Yhdistä vanhempiin laitteisiin mukana toimitetulla AV-kaapelilla.
- VGA: Connect to computers with a VGA output.
- Ääni ulos: Liitä ulkoiset kaiuttimet tai kuulokkeet.
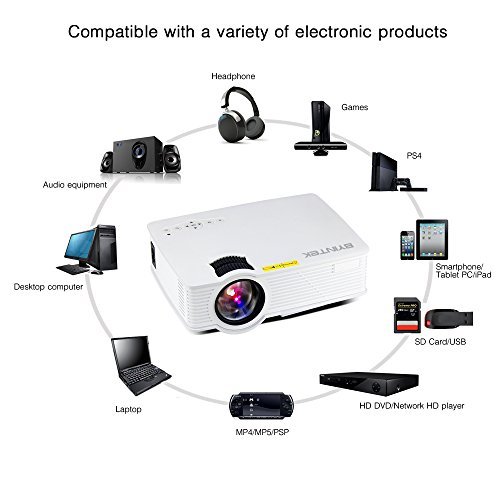
Image: Diagram illustrating various devices compatible with the BYINTEK BT140 Projector, including laptops, smartphones, tablets, gaming consoles (PS4, PSP), desktop computers, headphones, audio equipment, and HD media players, connected via HDMI, USB, SD, AV, and VGA ports.
5. Asennus
5.1 Sijoitus
Place the projector on a stable surface. The recommended projection distance is 1.5 to 2.5 meters for an optimal screen size of 50 to 80 inches. The projector supports image sizes from 34 to 100 inches.
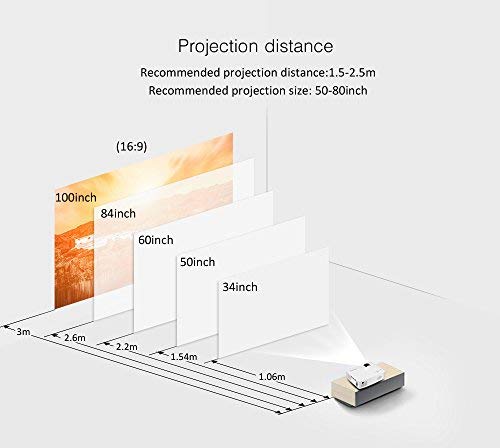
Image: Diagram showing recommended projection distances and corresponding screen sizes for the BYINTEK BT140 Projector, ranging from 34 inches at 1.06m to 100 inches at 3m.
5.2 Virtaliitäntä
- Liitä virtajohto projektorin virransyöttöporttiin.
- Kytke virtajohdon toinen pää pistorasiaan.
5.3 Laitteiden liittäminen
- HDMI: Connect an HDMI cable from your source device (e.g., laptop, game console) to the projector's HDMI port.
- USB/SD: Insert a USB drive or SD card into the respective port for direct media playback.
- AV/VGA: Use the appropriate cable to connect older devices.
5.4 Tarkennuksen säätö
Kierrä projektorin linssin tarkennusrengasta, kunnes heijastettu kuva on selkeä ja terävä.
5.5 Keystone-korjaus
If the projected image appears trapezoidal, adjust the keystone correction dial (usually located near the lens) to square the image. The projector supports vertical keystone correction of ±15 degrees.
5.6 Wireless Connection (Airplay/Miracast)
The BT140plus model includes a built-in wireless push module supporting Airplay and Miracast functionality for wireless connection to smartphones, tablets, and iPads. Refer to the on-screen instructions for pairing your device.
6. Käyttöohjeet
6.1 Virran kytkeminen päälle/pois
- Virta päälle: Paina projektorin tai kaukosäätimen virtapainiketta.
- Virta pois: Paina virtapainiketta uudelleen. Vahvista sammutus, jos sitä pyydetään.
6.2 Tulolähteen valinta
Use the "Source" button on the remote control or the projector's control panel to cycle through available input sources (HDMI, USB, SD, AV, VGA, Wireless).
6.3 Median toisto (USB/SD)
When a USB drive or SD card is inserted, the projector's multimedia interface will typically appear. Navigate through folders and select your desired media file (videos, photos, music) using the remote control.
- Tuetut videomuodot: RMVB/RM (Realvideo2.0/3.0/4.0), AVI (Xvid/H264), FLV (Sorenson H.263), MOV (H264), MP4 (MPEG4, AVC), MPG (MPG1)
- Tuetut äänimuodot: MP3, WMA, AAC, AC3
7. Huolto
7.1 Linssin puhdistaminen
Use a soft, lint-free cloth or lens cleaning paper to gently wipe the projector lens. Avoid using abrasive cleaners or excessive force, which can scratch the lens.
7.2 Projektorin rungon ja tuuletusaukkojen puhdistaminen
Wipe the projector's exterior with a soft, dry cloth. Use a small brush or compressed air to clear dust from the ventilation openings to ensure proper airflow and prevent overheating.
7.3Lamp Elämä
The BYINTEK BT140 uses an LED lamp with an estimated lifespan of 20,000 hours, significantly reducing the need for lamp replacement compared to conventional lamps.
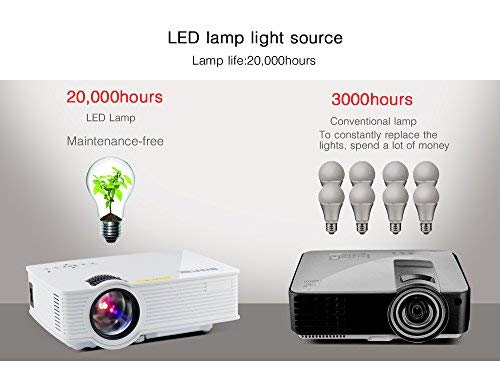
Image: Comparison showing the BYINTEK BT140's LED lamp with 20,000 hours lifespan versus conventional lamps with 3,000 hours lifespan, highlighting the maintenance-free aspect of LED technology.
8. Vianmääritys
Jos projektorin kanssa ilmenee ongelmia, katso seuraavat yleiset ongelmat ja ratkaisut:
| Ongelma | Mahdollinen syy / Ratkaisu |
|---|---|
| Ei kuvaa näytöllä |
|
| Kuva on epäselvä |
|
| Kuva on puolisuunnikkaan muotoinen |
|
| Ei ääntä |
|
| Kaukosäädin ei toimi |
|
9. Tekniset tiedot
Below are the technical specifications for the BYINTEK BT140 Projector:
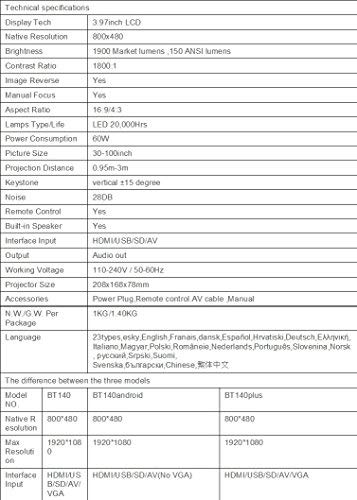
Image: Table detailing the technical specifications of the BYINTEK BT140 Projector, including display tech, resolution, brightness, contrast, aspect ratio, lamp life, power consumption, and interface inputs.
| Ominaisuus | Yksityiskohta |
|---|---|
| Näyttötekniikka | 3.97 tuuman LCD-näyttö |
| Alkuperäinen resoluutio | 800 x 480 |
| Suurin näytön tarkkuus | 1920 x 1080 (Support 1080P) |
| Kirkkaus | 1900 Lumens (150 ANSI lumens) |
| Kontrastisuhde | 1800:1 |
| Kuvan kääntö | Kyllä |
| Manuaalinen tarkennus | Kyllä |
| Kuvasuhde | 16:9 / 4:3 |
| Lamp Type / Life | LED, 20,000 tuntia |
| Virrankulutus | 70W |
| Kuvan koko | 34-100 tuumaa |
| Projektioetäisyys | 0.95–3 metriä |
| Keystone-korjaus | Pysty ±15 astetta |
| Melutaso | 28dB |
| Kaukosäädin | Kyllä |
| Sisäänrakennettu kaiutin | Kyllä |
| Liitäntätulo | HDMI / USB / SD / AV / VGA |
| Äänilähtö | Äänilähtöportti |
| Työvoimatage | 110-240V / 50-60Hz |
| Projektorin koko | 208 x 168 x 78 mm |
| Nettopaino | 950 Grams (1KG N.W./G.W. Per Package) |
| Yhteystekniikka | Wi-Fi (for Airplay/Miracast) |
| Yhteensopivat laitteet | Kannettava tietokone, älypuhelin, tabletti |
10. Takuu ja tuki
BYINTEK products are designed for reliability and performance. For warranty information or technical support, please refer to the warranty card included with your product or contact BYINTEK customer service through their official websivustosta tai jälleenmyyjältäsi.
Lisätietoja saat osoitteesta BYINTEK Store on Amazon.