
1. Johdanto
The COMPUTHERM Q7RF wireless room thermostat is designed for precise control of heating and air conditioning systems. This programmable device allows you to set individual temperature schedules for each day of the week, optimizing comfort and energy efficiency in your home or office. Its wireless design offers flexible placement of the thermostat unit, while the receiver unit connects directly to your boiler or air conditioning system, compatible with both 24V and 230V control circuits.
2. Pakkauksen sisältö
Varmista, että pakkauksessa on kaikki tarvittavat osat:
- 4 x COMPUTHERM Q7RF Room Thermostat (Transmitter Unit)
- 4 x COMPUTHERM Q7RF Receiver Unit
- Käyttöopas (tämä asiakirja)
- Kiinnitysruuvit ja seinätulpat
3. Tuote ohiview
The COMPUTHERM Q7RF system consists of two main components: the thermostat unit (transmitter) and the receiver unit. The thermostat unit measures the room temperature and allows you to set desired temperatures and programs. The receiver unit connects to your heating or cooling system and switches it on or off based on signals from the thermostat unit.

Kuva 1: Päättynytview of the COMPUTHERM Q7RF 4-piece set, showing multiple thermostat and receiver units.
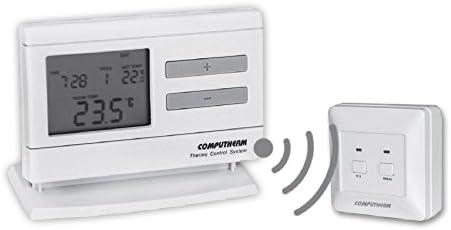
Figure 2: A single COMPUTHERM Q7RF thermostat unit communicating wirelessly with its receiver unit.
3.1 Thermostat Unit (Transmitter)
- LCD-näyttö: Shows current temperature, set temperature, time, day, and program status.
- Ohjauspainikkeet: For setting temperature, time, and programming schedules.
- Akkulokero: Virtalähteeksi.
3.2 vastaanotinyksikkö
- Johdotusliittimet: For connection to the heating/cooling system.
- Tilan ilmaisimet: LEDs to show power and relay status.
- Manual Override Buttons: For temporary manual control.
4. Tekniset tiedot
| Ominaisuus | Erittely |
|---|---|
| Merkki | COMPUTHERM |
| Malli | Q7RF |
| Switching Voltage | 24V AC/DC, ... 250V AC, 50Hz |
| Virrankulutus | 6W |
| Lämpötilan mittausalue | 3 – 45°C (in 0.1°C increments) |
| Säädettävä lämpötila-alue | 5 – 40°C (in 0.5°C increments) |
| Lämpötilan mittauksen tarkkuus | ±0.5°C |
| Ohjaimen tyyppi | Paina painiketta |
| Yhteystekniikka | Langaton (radiotaajuus) |
| Erikoisominaisuudet | Programmable, Compatible with various system voltages |
5. Asennus ja asennus
5.1 Thermostat Unit Placement and Battery Installation
- Valitse sijainti: Place the thermostat unit in a central area of the room where it can accurately measure the ambient temperature, away from direct sunlight, drafts, or heat sources.
- Asenna paristot: Open the battery compartment on the back of the thermostat unit. Insert the required batteries (typically AA or AAA, refer to the unit's markings) ensuring correct polarity. Close the compartment.
- Virta päälle: The display should light up, indicating the unit is powered.
5.2 Receiver Unit Wiring
WARNING: Electrical installation should only be performed by a qualified electrician. Disconnect power to the heating/cooling system before proceeding.
- Vastaanottimen kiinnittäminen: Secure the receiver unit near your boiler or air conditioning system using the provided screws and wall plugs.
- Käyttöjohdotuksen liittimet: Open the cover of the receiver unit to expose the wiring terminals.
- Yhdistä järjestelmään: Connect the receiver unit to the two-wire room thermostat connection point of your boiler or AC system. Ensure connections are secure and follow the wiring diagram provided with your heating/cooling system and the receiver unit. The COMPUTHERM Q7RF is compatible with both 24V and 230V control circuits.
- Palauta virta: Once wiring is complete and verified, close the receiver unit cover and restore power to your heating/cooling system.
5.3 Pairing the Units (If not pre-paired)
Refer to the specific instructions provided with your Q7RF set for pairing procedures. Typically, this involves pressing a pairing button on the receiver unit and then initiating a pairing sequence on the thermostat unit within a short timeframe. A successful pairing will usually be indicated by an LED on the receiver or a message on the thermostat display.
6. Käyttöohjeet
6.1 LCD-näytön ymmärtäminen
The LCD display provides all necessary information about the thermostat's current status and settings.

Kuva 3: Yksityiskohtainen view of the COMPUTHERM Q7RF LCD display, illustrating various indicators such as program number, manual modification symbol, weekdays, time, set temperature, actual room temperature, low battery symbol, boiler ON state, and timed control symbol.
- Arkisin: Osoittaa nykyisen viikonpäivän.
- Exact Time / Time Left: Displays the current time or time remaining for a manual modification.
- Ohjelman numero: Shows the active program segment.
- Aseta lämpötila: The desired temperature set by the user.
- Actual Room Temperature: The current temperature measured by the thermostat.
- Symbol for Manual Modification: Indicates that the thermostat is currently operating under a temporary manual override.
- Temp. Modified until next manual intervention: Shows the duration of a temporary temperature change.
- Symbol for Low Battery Voltage: Näkyy, kun paristot on vaihdettava.
- Symbol for Boiler ON State: Ilmaisee, milloin lämmitys-/jäähdytysjärjestelmä on aktiivinen.
- Symbol for Timed Control: Indicates that a programmed schedule is active.
6.2 Nykyisen kellonajan ja päivämäärän asettaminen
- Paina AIKA -painiketta.
- Käytä + or - -painikkeilla säätääksesi tuntia ja paina sitten AIKA uudelleen vahvistaaksesi.
- Toista minuuttien ja viikonpäivän osalta.
6.3 Manuaalinen lämpötilan säätö
- Normaalissa käyttötilassa paina + or - painikkeita halutun lämpötilan säätämiseksi.
- The new temperature will be maintained until the next programmed time slot or until manually overridden again.
6.4 Programming Daily/Weekly Schedules
The Q7RF allows for independent programming for each day of the week. You can typically set multiple time periods with different temperatures for each day.
- Paina PROG -painiketta siirtyäksesi ohjelmointitilaan.
- Käytä PÄIVÄ button to select the day you wish to program (e.g., MON, TUE, etc.).
- Käytä AIKA ja +/- buttons to set the start time for the first program period.
- Käytä ASETTAA LÄMPÖTILA ja +/- buttons to set the desired temperature for this period.
- Paina PROG again to move to the next program period for the same day, or use PÄIVÄ siirtyä seuraavaan päivään.
- Repeat until all desired periods and days are programmed.
- Paina RUN or EXIT -painiketta tallentaaksesi ja poistuaksesi ohjelmointitilasta.
7. Huolto
7.1 Pariston vaihto
When the low battery symbol appears on the LCD display, replace the batteries immediately to ensure continuous operation. Use new, high-quality alkaline batteries of the specified type.
- Avaa termostaattiyksikön takana olevan paristolokeron kansi.
- Poista vanhat paristot.
- Insert new batteries, observing correct polarity (+/-).
- Sulje paristolokeron kansi.
7.2 Puhdistus
Clean the thermostat and receiver units with a soft, dry cloth. Do not use abrasive cleaners, solvents, or spray directly onto the units, as this may damage the electronics or finish.
8. Vianmääritys
| Ongelma | Mahdollinen syy | Ratkaisu |
|---|---|---|
| Termostaatin näyttö on tyhjä | Tyhjät akut | Vaihda paristot uusiin. |
| Lämmitys-/jäähdytysjärjestelmä ei reagoi | 1. Receiver unit not powered 2. Units not paired 3. Wiring issue 4. Alueen ulkopuolella | 1. Check power supply to receiver. 2. Perform pairing procedure (Section 5.3). 3. Verify wiring connections (Section 5.2). 4. Move thermostat closer to receiver or check for obstructions. |
| Väärä lämpötilalukema | Thermostat placed in unsuitable location (direct sun, draft) | Relocate thermostat to a more central and stable temperature area. |
| Programmed schedule not active | Thermostat in manual override mode | Exit manual override mode (e.g., press RUN/AUTO button) to resume programmed operation. |
9. Takuu ja tuki
COMPUTHERM products are manufactured to high-quality standards. For warranty information, please refer to the warranty card included with your product or contact your retailer. For technical support, please reach out to the COMPUTHERM customer service or your local distributor. Keep your purchase receipt as proof of purchase.