
Johdanto
Thank you for choosing the Atlanta Digital LCD Radio Alarm Clock, Model 1882-0. This compact and easy-to-use alarm clock features a clear LCD display, temperature indication, and a radio-controlled time function for automatic synchronization. This manual provides detailed instructions for setup, operation, and maintenance to ensure optimal performance.
Turvallisuustiedot
- Akun turvallisuus: Use only the specified battery type. Ensure correct polarity (+/-) when inserting batteries. Do not mix old and new batteries, or different types of batteries. Remove batteries if the device will not be used for an extended period. Dispose of used batteries responsibly according to local regulations.
- Sijoitus: Place the clock on a stable, flat surface. Avoid direct sunlight, extreme temperatures, high humidity, or dusty environments.
- Puhdistus: Do not use abrasive cleaners or solvents. Wipe with a soft, dry cloth.
- Veden altistuminen: Tämä laite ei ole vedenpitävä. Vältä altistumista vedelle tai muille nesteille.
Pakkauksen sisältö
- Atlanta Digital LCD Radio Alarm Clock (Model 1882-0)
- Käyttöohje (tämä asiakirja)
- (Paristot eivät yleensä sisälly toimitukseen, ja ne on ostettava erikseen.)
Tuote loppuview
Tutustu herätyskellosi tärkeimpiin osiin ja säätimiin.

Kuva 1: Etuosa View. This image displays the front of the Atlanta Digital LCD Radio Alarm Clock. The large LCD screen shows the current time (10:40), radio control signal indicator, DST indicator, alarm time (6:00), and temperature (24.6°C). Below the screen are three buttons: "TIME", "ALARM", and "+ / -". A red snooze/light button is visible on the top edge.
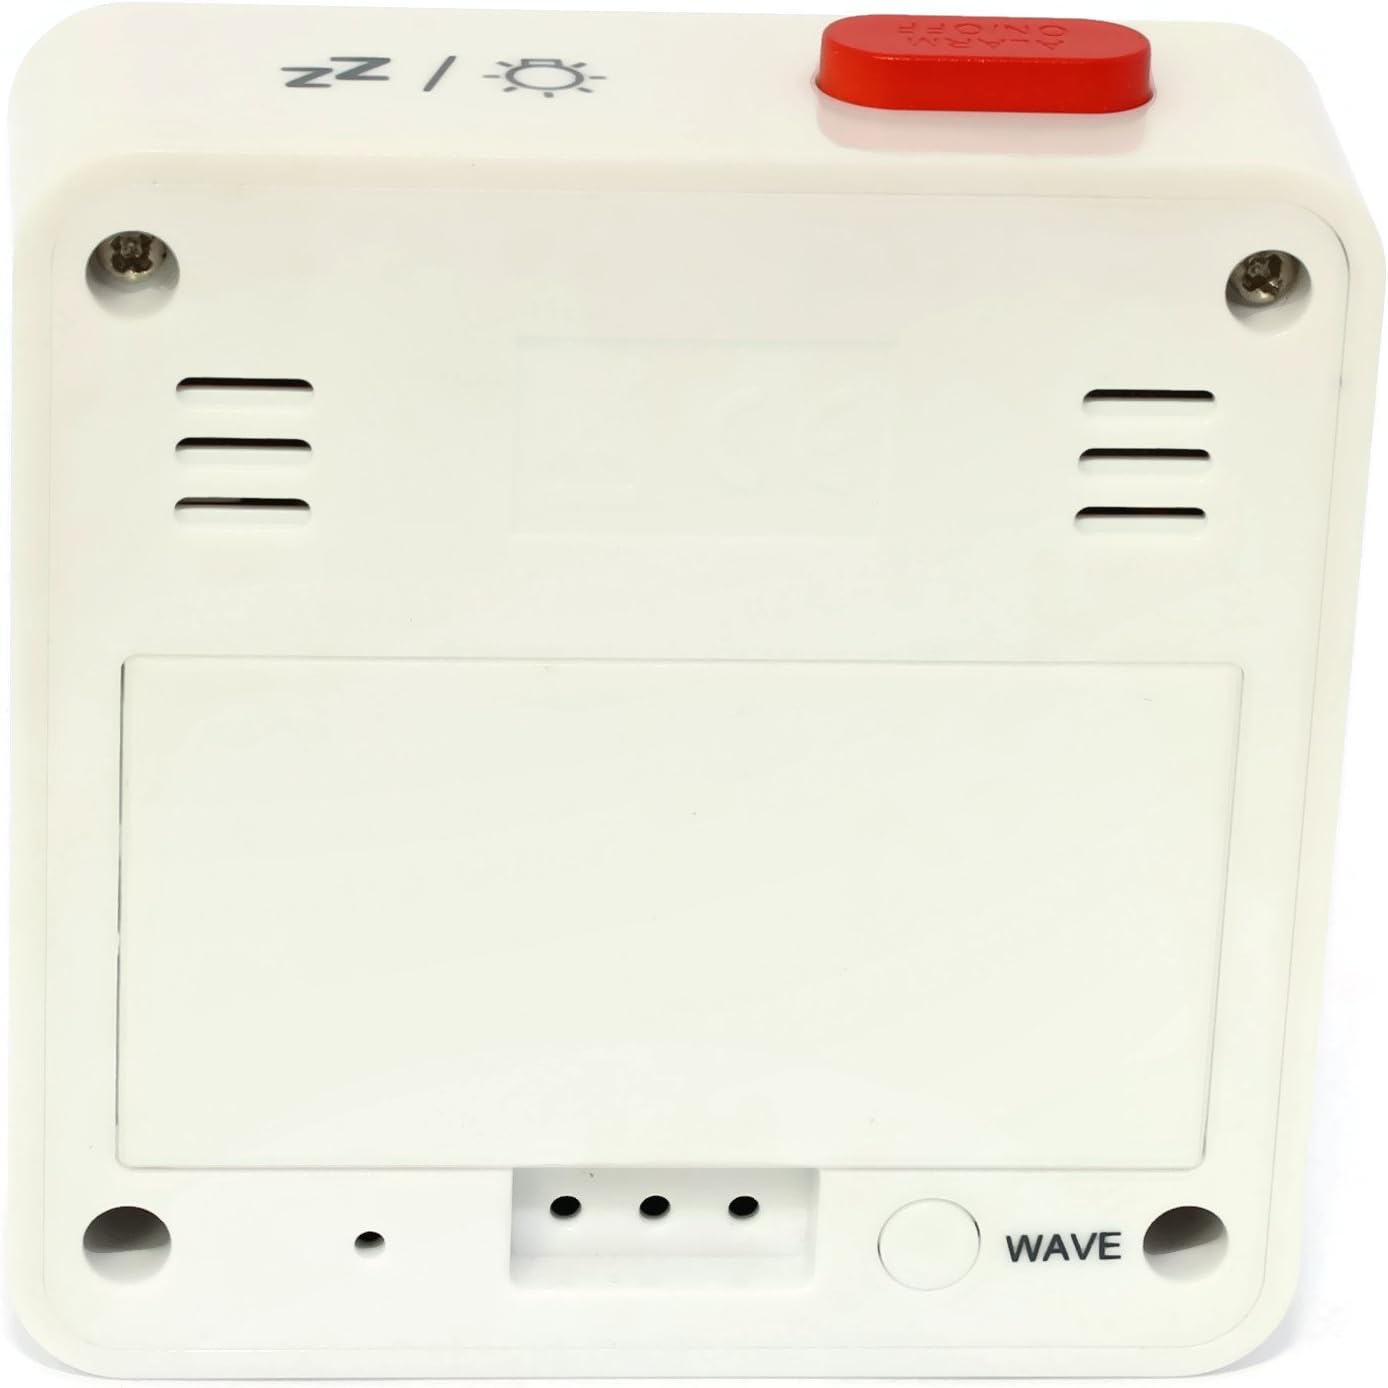
Kuva 2: Takaosa View. This image shows the back of the Atlanta Digital LCD Radio Alarm Clock. The large rectangular cover for the battery compartment is prominent. Below it, a circular "WAVE" button is visible, used for manual radio signal reception. Ventilation slots are present on both sides of the upper back panel.
Ohjaus- ja näyttöelementit:
- LCD-näyttö: Shows time, alarm time, temperature, and radio control status.
- TIME-painike: Used to set the current time manually.
- ALARM-painike: Käytetään hälytyksen asettamiseen ja aktivoimiseen/deaktivointiin.
- + / - Painikkeet: Used to adjust values (time, alarm) and potentially toggle settings.
- SNOOZE / LIGHT Button (Top): Activates snooze function during an alarm; illuminates the display backlight.
- WAVE Button (Back): Initiates manual radio signal reception for time synchronization.
- Battery Compartment (Back): Pitää sisällään tarvittavat paristot.
Asennus
1. Akun asennus
- Open the battery compartment cover located on the back of the clock (refer to Figure 2).
- Insert the required batteries (e.g., 2x AAA, not included) according to the polarity markings (+ and -) inside the compartment.
- Sulje paristolokeron kansi kunnolla.
- The clock will power on and attempt to receive the radio-controlled time signal.
2. Initial Time Synchronization (Radio Control)
Upon battery insertion, the clock will automatically search for the radio time signal. This process may take several minutes. During this time, a signal icon (e.g., ((()))) vilkkuu näytössä.
- For best reception, place the clock near a window and away from electronic devices that may cause interference.
- Once the signal is successfully received, the time will be set automatically, and the signal icon will appear solid.
- If the signal is not received after a few minutes, press the AALTO button on the back of the clock to initiate a manual search.
3. Manual Time Setting (If Radio Control is Unavailable)
- Paina ja pidä painettuna AIKA button for approximately 3 seconds until the hour digits begin to flash.
- Käytä + or - painikkeita säätääksesi tuntia.
- Paina AIKA -painiketta uudelleen vahvistaaksesi tunnit ja siirtyäksesi minuuttien asetukseen.
- Käytä + or - painikkeita minuuttien säätämiseksi.
- Paina AIKA -painiketta uudelleen vahvistaaksesi ja poistuaksesi ajan asetustilasta.
Käyttöohjeet
1. Hälytyksen asettaminen
- Paina ja pidä painettuna HÄLYTYS button for approximately 3 seconds until the alarm hour digits begin to flash.
- Käytä + or - buttons to adjust the desired alarm hour.
- Paina HÄLYTYS button again to confirm the hour and move to the alarm minute setting.
- Käytä + or - -painikkeita haluttujen hälytysminuuttien säätämiseksi.
- Paina HÄLYTYS -painiketta uudelleen vahvistaaksesi ja poistuaksesi hälytysasetustilasta.
2. Hälytyksen aktivointi/deaktivointi
- Paina lyhyesti HÄLYTYS -painiketta hälytyksen kytkemiseksi päälle tai pois päältä.
- When the alarm is active, an alarm icon (e.g., a bell symbol) will appear on the display.
- Kun hälytys soi, paina SNOOZE / VALO button on top to activate the snooze function. The alarm will sound again after a few minutes.
- Voit sammuttaa hälytyksen kokonaan painamalla mitä tahansa muuta painiketta (esim. AIKA, HÄLYTYS, +, -) or let it sound for its full duration.
3. Taustavalotoiminto
Paina SNOOZE / VALO button on the top of the clock to illuminate the display for a few seconds, allowing for easy viewhämärässä.
4. Lämpötilanäyttö
The clock continuously displays the ambient temperature. The unit of temperature (Celsius or Fahrenheit) may be switchable by a dedicated button or a combination of existing buttons (refer to specific model variations if applicable, otherwise it defaults to Celsius as shown in the image).
Huolto
Puhdistus
- Wipe the clock's exterior with a soft, dry, lint-free cloth.
- Do not use liquid cleaners, aerosol sprays, or abrasive materials, as these can damage the finish or internal components.
Akun vaihto
- Kun näyttö himmenee tai kello toimii epäsäännöllisesti, on aika vaihtaa paristot.
- Noudata "Asetukset"-osiossa kuvattuja akun asennusohjeita.
- Ensure proper disposal of old batteries.
Vianetsintä
| Ongelma | Mahdollinen syy | Ratkaisu |
|---|---|---|
| Näyttö on tyhjä tai himmeä. | Paristot ovat lopussa tai ne on asetettu väärin. | Vaihda paristot ja varmista oikea napaisuus. |
| Aika on väärä. | Poor radio signal reception or manual time not set. | Move the clock to a location with better reception (near a window). Press the AALTO button for manual synchronization. If still incorrect, set the time manually. |
| Hälytys ei soi. | Hälytys ei ole aktivoitu tai asetettu väärin. | Ensure the alarm icon is visible on the display. Recheck alarm time settings. |
| Torkkutoiminto ei toimi. | Alarm was turned off instead of snoozed. | Varmista, että painat SNOOZE / VALO button when the alarm sounds, not other buttons. |
Tekniset tiedot
- Malli: 1882-0
- Merkki: Atlanta
- Väri: Valkoinen
- Materiaali: Muovi
- Näyttötyyppi: Digitaalinen nestekidenäyttö
- Mitat (P x L x K): 6.5 x 2.1 x 6.5 cm (noin 2.56 x 0.83 x 2.56 tuumaa)
- Paino: 65 grammaa (noin 2.29 unssia)
- Virtalähde: Battery powered (e.g., 2x AAA, not included)
- Erikoisominaisuudet: Temperature Display, Alarm, Radio-Controlled Time, Backlight, Snooze
- Käyttötarkoitus: Sisätiloissa
Takuu ja tuki
Specific warranty information for your Atlanta product may vary by region and retailer. Please refer to the documentation provided at the time of purchase or visit the official Atlanta websivustolta tarkemmat takuuehdot.
For technical support or inquiries, please contact your retailer or the manufacturer's customer service department. Contact information can typically be found on the product packaging or the official brand websivusto.
Huomautus: Valmistaja ei anna tietoja varaosien saatavuudesta.


