
1. Johdanto
This manual provides detailed instructions for the installation, operation, and maintenance of your ASRock AB350M-HDV MicroATX Motherboard. The ASRock AB350M-HDV is designed to support AMD Socket AM4 A-Series APUs (Bristol Ridge) and Ryzen Series CPUs (Summit Ridge), featuring a Digi Power design and 7 Power Phase design for stable performance. It supports DDR4 memory and offers various connectivity options including SATA3, USB 3.0, and an Ultra M.2 slot.
2. Tuote ohiview
The ASRock AB350M-HDV motherboard is a MicroATX form factor board, ideal for compact PC builds. It features essential components for a modern computing system.

Kuva 2.1: Kulmassa view of the ASRock AB350M-HDV Motherboard, showcasing its compact MicroATX design and various components.
Tärkeimmät ominaisuudet:
- Supports AMD Socket AM4 A-Series APUs (Bristol Ridge) and Ryzen Series CPUs (Summit Ridge).
- DDR4 memory support up to 3200+ (OC) for Ryzen CPUs and 2400 for A-series APUs.
- 1 PCIe 3.0 x16 slot and 1 PCIe 2.0 x1 slot for expansion cards.
- 4 SATA3 ports and 1 Ultra M.2 (PCIe Gen3 x4 & SATA3) slot for storage.
- 6 USB 3.0 ports (2 front, 4 rear) and 2 USB 2.0 ports for peripheral connectivity.
- Integrated Gigabit Ethernet for network connectivity.
- Video outputs: VGA, DVI, HDMI.

Kuva 2.2: Ylhäältä alas view of the ASRock AB350M-HDV Motherboard, highlighting the CPU socket, RAM slots, M.2 slot, and PCIe slots.
3. Asennus ja asennus
Follow these steps carefully to install your ASRock AB350M-HDV motherboard and its components.
3.1 CPU:n asennus
- Paikanna emolevyn AM4-suoritinkanta.
- Nosta pistorasian sivussa olevaa kuormausvipua.
- Kohdista suorittimen kolmiomainen merkki kannan vastaavaan merkkiin. Aseta suoritin varovasti kantaan pakottamatta sitä.
- Laske kuormausvipu kiinnittääksesi suorittimen paikalleen.
- Asenna CPU-jäähdytin valmistajan ohjeiden mukaisesti.
3.2 RAM-muistin (muistin) asennus
- Locate the DDR4 DIMM slots. This motherboard has 4 slots.
- Avaa DIMM-paikan molemmissa päissä olevat pidikkeet.
- Kohdista RAM-moduulin lovi DIMM-paikan kiilan kanssa.
- Työnnä RAM-moduuli tiukasti korttipaikkaan, kunnes klipsit napsahtavat paikoilleen. Varmista, että molemmat klipsit ovat kiinni.
3.3 Storage Device Installation (SATA & M.2)
SATA-asemat:
- Connect one end of a SATA data cable to a SATA3 port on the motherboard.
- Liitä SATA-datakaapelin toinen pää kiintolevyyn tai SSD-levyyn.
- Kytke SATA-virtakaapeli virtalähteestä (PSU) tallennuslaitteeseen.
M.2 SSD:
- Locate the Ultra M.2 slot on the motherboard.
- Remove the M.2 screw and standoff from the slot.
- Aseta M.2 SSD -levy paikkaan 30 asteen kulmassa.
- Push the M.2 SSD down and secure it with the screw and standoff.
3.4 Virtaliitännät
- Connect the 24-pin ATX power connector from your PSU to the 24-pin power socket on the motherboard.
- Connect the 8-pin (or 4-pin) ATX 12V power connector from your PSU to the corresponding socket near the CPU.
3.5 Etupaneelin liitännät
Connect the cables from your PC case (Power Button, Reset Button, HDD LED, Power LED, USB, Audio) to the corresponding headers on the motherboard. Refer to the motherboard layout diagram in your physical manual for exact header locations.
3.6 Näytönohjaimen asennus
- Paikanna PCIe 3.0 x16 -paikka.
- Irrota vastaava laajennuspaikan kansi tietokoneen kotelosta.
- Align the graphics card with the PCIe slot and press it down firmly until it clicks into place.
- Kiinnitä näytönohjain koteloon ruuvilla.
- Connect any required PCIe power cables from your PSU to the graphics card.
4. Käyttöohjeet
4.1 Ensimmäinen käynnistys ja BIOS/UEFI-asetukset
- Kun olet koonnut kaikki osat, kytke näyttö, näppäimistö ja hiiri.
- Käynnistä järjestelmäsi.
- Käynnistyksen aikana paina toistuvasti DEL or F2 -näppäintä siirtyäksesi BIOS/UEFI-asetusohjelmaan.
- In the BIOS, you can configure boot order, system time, and other advanced settings. Save changes and exit to boot into your operating system installation media.
4.2 Ohjaimen asennus
After installing your operating system, install the necessary drivers for the motherboard components. These typically include chipset drivers, audio drivers, LAN drivers, and any specific utility drivers. Drivers can be found on the ASRock official websivusto emolevysi mallille.
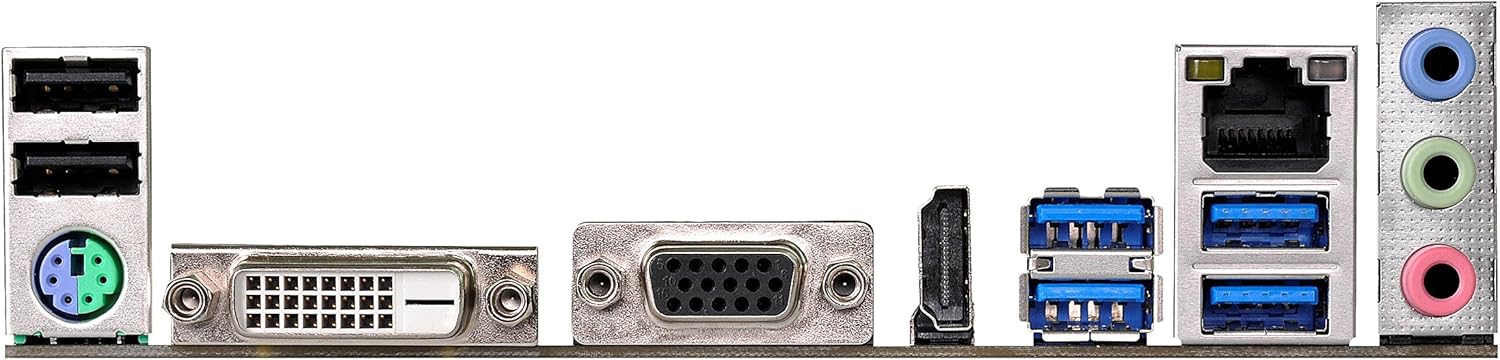
Figure 4.1: Rear I/O panel of the ASRock AB350M-HDV Motherboard, showing USB ports, video outputs (VGA, DVI, HDMI), LAN port, and audio jacks.
5. Huolto
Asianmukainen huolto varmistaa emolevyn pitkän käyttöiän ja optimaalisen suorituskyvyn.
5.1 Puhdistus
- Puhdista säännöllisesti pöly emolevystä ja komponenteista paineilmalla.
- Varmista, että järjestelmä on sammutettu ja irrotettu pistorasiasta ennen puhdistamista.
- Vältä nestemäisten puhdistusaineiden käyttöä suoraan komponenttien pinnalla.
5.2 BIOS/UEFI-päivitykset
Tarkista ASRock säännöllisesti website for BIOS/UEFI updates. Updates can improve compatibility, stability, and performance. Follow the instructions provided by ASRock carefully when performing a BIOS update to avoid system damage.
6. Vianmääritys
Tässä osiossa on ratkaisuja yleisiin ongelmiin, joita saatat kohdata.
6.1 Ei virtaa / Ei POST-testiä (käynnistyksen itsetestaus)
- Tarkista virtaliitännät: Ensure the 24-pin and 8-pin (or 4-pin) CPU power connectors are securely seated.
- Tarkista virtalähde: Test your power supply unit (PSU) to ensure it is functional and providing adequate power.
- Asenna komponentit uudelleen: Remove and re-install the CPU, RAM, and graphics card to ensure they are properly seated.
- Tyhjennä CMOS: Refer to your physical manual for instructions on how to clear the CMOS (Complementary Metal-Oxide-Semiconductor) settings, which can resolve boot issues.
6.2 Ei näyttöä
- Näytön liitäntä: Ensure your monitor is correctly connected to the graphics card or motherboard (if using an APU with integrated graphics).
- Näytönohjain: If using a dedicated graphics card, ensure it is properly installed and has sufficient power. Test with another graphics card if possible.
- APU Compatibility: If using an AMD A-Series APU, ensure your monitor is connected to the motherboard's video outputs (VGA, DVI, HDMI). Ryzen CPUs without integrated graphics require a dedicated graphics card.
6.3 Käyttöjärjestelmä ei käynnisty
- Käynnistysjärjestys: Check the BIOS/UEFI settings to ensure the correct boot device (e.g., SSD/HDD with OS) is prioritized.
- Tallennuslaite: Verify that your storage device is detected in the BIOS.
- Käyttöjärjestelmän asennus: If the OS is newly installed, ensure the installation process completed successfully.
7. Tekniset tiedot
| Merkki | ASRock |
| Mallin nimi | AB350M-HDV |
| CPU-liitäntä | Liitäntä AM4 |
| Piirisarjan tyyppi | AMD Promontory B350 |
| Yhteensopivat prosessorit | AMD A-Series APUs (Bristol Ridge), Ryzen Series CPUs (Summit Ridge) |
| RAM-muistitekniikka | DDR4 |
| Muistin kellonopeus | 2133 MHz (Base), up to 3200+ (OC) for Ryzen CPU |
| Muistipaikat saatavilla | 4 |
| Grafiikkakortin käyttöliittymä | PCI Express (1x PCIe 3.0 x16, 1x PCIe 2.0 x1) |
| SATA-porttien kokonaismäärä | 4 (SATA3) |
| M.2-paikka | 1 (Ultra M.2, PCIe Gen3 x4 & SATA3) |
| USB-portteja yhteensä | 8 (6 x USB 3.0, 2 x USB 2.0) |
| Videolähdöt | VGA, DVI, HDMI |
| Päävirtaliittimen tyyppi | 24-Pin ATX |
| Muototekijä | MicroATX |
| Tuotteen paino | 1.3 puntaa |
8. Takuutiedot
The ASRock AB350M-HDV Motherboard comes with a 1 vuoden takuu. For specific terms and conditions, please refer to the warranty card included with your product or visit the official ASRock websivusto.
9. Tukea
For further assistance, technical support, or driver downloads, please visit the official ASRock websivusto:
You can also find contact information for customer service and support resources on their websivusto.


