
1. Johdanto
This manual provides essential information for the safe and efficient operation of your KitchenAid 5KMT223GER 2-Slot Automatic Toaster. Please read all instructions carefully before first use and retain for future reference.

Kuva 1.1: Edessä view of the KitchenAid 5KMT223GER 2-Slot Automatic Toaster.
2. Tärkeitä turvallisuusohjeita
Sähkölaitteita käytettäessä on aina noudatettava perusturvallisuusohjeita, mukaan lukien seuraavat:
- Lue kaikki ohjeet.
- Älä koske kuumia pintoja. Käytä kahvoja tai nuppeja.
- Sähköiskun välttämiseksi älä upota johtoa, pistokkeita tai leivänpaahdinta veteen tai muuhun nesteeseen.
- Tarkka valvonta on tarpeen, kun mitä tahansa laitetta käyttävät lapset tai lapset ovat niiden lähellä.
- Irrota pistoke pistorasiasta, kun et käytä ja ennen puhdistusta. Anna jäähtyä ennen osien pukemista tai irrottamista.
- Älä käytä laitetta, jonka johto tai pistoke on vaurioitunut, tai jos laitteessa on toimintahäiriö tai se on pudonnut tai vaurioitunut millään tavalla. Palauta laite lähimpään valtuutettuun huoltoliikkeeseen tarkastusta, korjausta tai säätöä varten.
- Muiden kuin laitteen valmistajan suosittelemien lisävarusteiden käyttö voi aiheuttaa vammoja.
- Älä käytä ulkona.
- Älä anna johdon roikkua pöydän tai tason reunan yli tai koskettaa kuumia pintoja.
- Älä aseta kuumalle kaasu- tai sähköpolttimelle tai sen lähelle tai kuumennettuun uuniin.
- Irrota virta kytkemällä jokin säädin pois päältä ja irrottamalla sitten pistoke pistorasiasta.
- Älä käytä laitetta muuhun kuin suunniteltuun käyttöön.
- Ylisuuria ruokia, metallifoliopakkauksia tai ruokailuvälineitä ei saa laittaa leivänpaahtimeen, koska ne voivat aiheuttaa tulipalon tai sähköiskun vaaran.
- Tulipalo voi syttyä, jos leivänpaahdin on peitetty tai se koskettaa syttyvää materiaalia, kuten verhoja, verhoja, seiniä ja vastaavia käytön aikana.
- Älä yritä irrottaa ruokaa, kun leivänpaahdin on kytketty pistorasiaan.
- Älä käytä ilman valvontaa.
- Always remove the crumb tray for cleaning. Do not operate the toaster without the crumb tray in place.
3. Osat ja ominaisuudet
Familiarize yourself with the components of your KitchenAid 2-Slot Automatic Toaster:
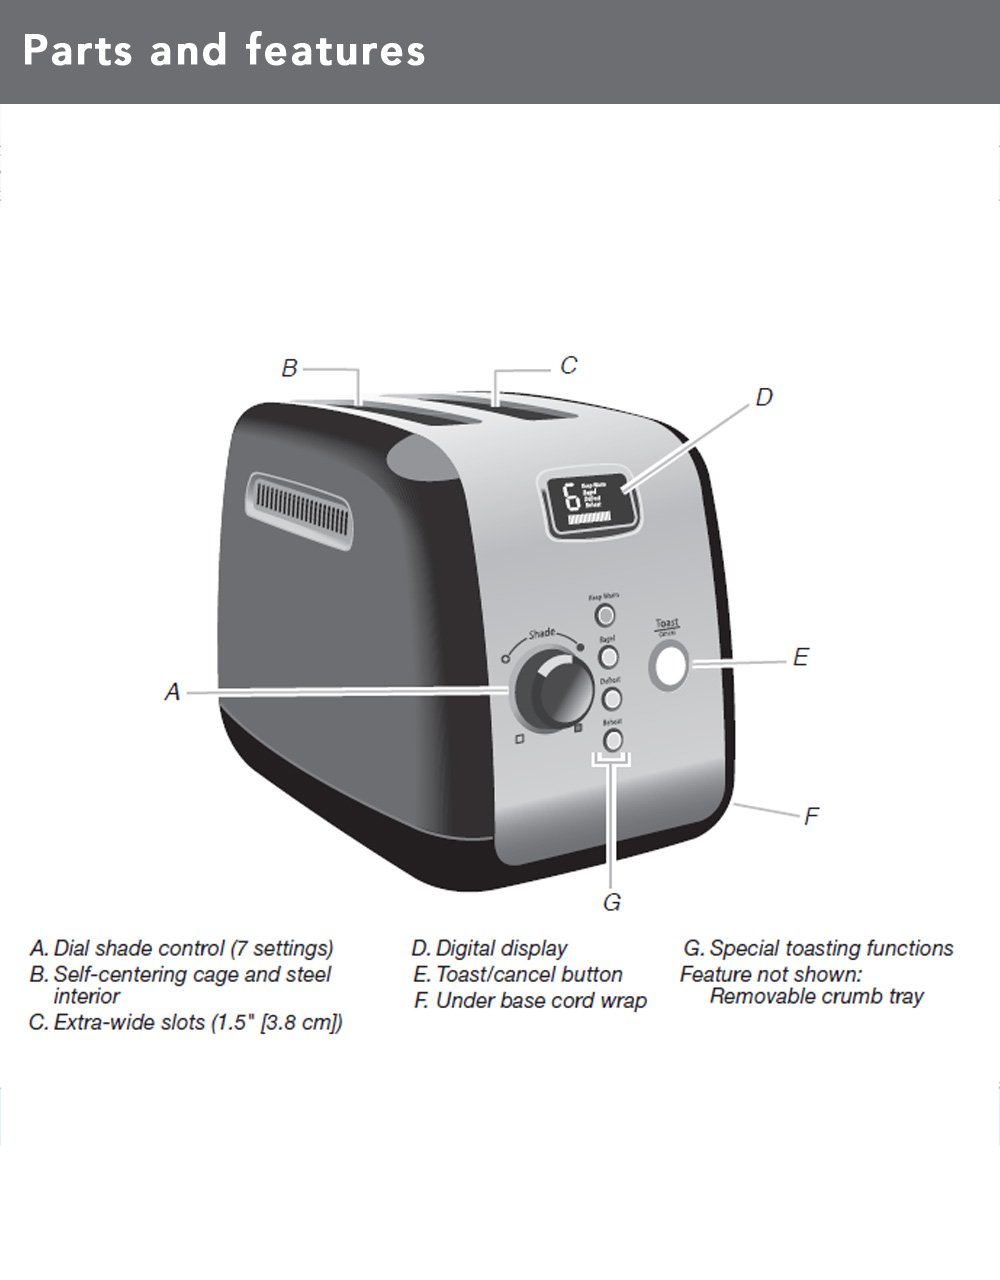
Image 3.1: Diagram illustrating the main parts and features of the toaster.
- Shade Control Dial (A): Adjusts the browning level with 7 settings.
- Self-Centering Bread Racks (B): Automatically centers bread for even toasting.
- Extra-Wide Slots (C): 3.8 cm (1.5 inches) wide slots accommodate various bread types.
- Digital Display (D): Shows selected shade setting and a countdown timer for toasting progress.
- Toast/Cancel Button (E): Initiates or cancels the toasting cycle. Features motorized lift.
- Under Base Cord Wrap (F): For convenient cord storage.
- Special Toasting Functions (G): Includes Keep Warm, Bagel, Defrost, and Reheat buttons.
- Irrotettava murutarjotin: Located at the back for easy cleaning (not shown in diagram).
4. Asennus
Ennen leivänpaahtimen ensimmäistä käyttökertaa:
- Pura leivänpaahdin pakkauksesta ja poista kaikki pakkausmateriaalit.
- Pyyhi leivänpaahtimen ulkopinta mainoksellaamp cloth. Ensure it is completely dry before plugging in.
- Place the toaster on a stable, flat, heat-resistant surface, away from flammable materials.
- Ensure the crumb tray is properly inserted at the back of the toaster.
- For the first use, operate the toaster without bread on the highest shade setting (7) to burn off any manufacturing residues. A slight odor or smoke may be present; this is normal. Allow the toaster to cool completely.
5. Käyttöohjeet
Follow these steps to toast bread and use the special functions:

Image 5.1: Bread slices inserted into the toaster's extra-wide slots.
5.1 Paahtamisen perusohjeet
- Kytke leivänpaahdin maadoitettuun pistorasiaan.
- Place bread slices into the toasting slots. The self-centering racks will automatically adjust.
- Käännä Varjostimen säädin to select your desired browning level (1 for lightest, 7 for darkest). The digital display will show the selected shade.
- Paina Toast/Cancel Button. The motorized lift will lower the bread into the slots, and the toasting cycle will begin. The digital display will show a countdown.
- Once the cycle is complete, the toaster will automatically raise the toasted bread.
- Voit pysäyttää paahtamisen milloin tahansa painamalla Toast/Cancel Button. The bread will be raised.
5.2 Erikoistoiminnot
Your toaster includes dedicated buttons for specialized toasting needs:
- PIDÄ LÄMPÖNÄ: Press this button after a toasting cycle to keep toasted food warm for up to one minute. The toaster will gently lower and raise the bread after the warming period.
- LAUKKU: This function toasts the cut-side of a bagel while gently warming the outer surfaces. Insert bagels with the cut side facing inwards. Select your desired shade, then press the BAGELI -painiketta ja sen jälkeen Toast/Cancel Button.
- SULATUS: Use this function to defrost and toast frozen food. Select your desired shade, then press the SULATUS -painiketta ja sen jälkeen Toast/Cancel Button. The toaster will automatically adjust the toasting time.
- LÄMMITYS: This function quickly reheats previously toasted food without further browning. Press the LÄMMITÄ -painiketta ja sen jälkeen Toast/Cancel Button.
6. Puhdistus ja huolto
Säännöllinen puhdistus varmistaa optimaalisen suorituskyvyn ja pidentää leivänpaahtimen käyttöikää.
6.1 Murutarjotin

Image 6.1: The removable crumb tray for easy cleaning.
- Irrota leivänpaahtimen pistoke aina pistorasiasta ja anna sen jäähtyä kokonaan ennen puhdistamista.
- Pull out the removable crumb tray located at the back of the toaster.
- Discard crumbs. The crumb tray can be washed in the top rack of a dishwasher or by hand with warm, soapy water. Rinse thoroughly and dry completely before reinserting.
- Never operate the toaster without the crumb tray properly inserted.
6.2 Ulkopuoli
- Pyyhi leivänpaahtimen ulkopinta mainoksellaamp liinalla ja kuivaa huolellisesti.
- Älä käytä hankaavia puhdistusaineita tai hankaussieniä, sillä ne voivat naarmuttaa pintaa.
- Älä koskaan upota leivänpaahdinta veteen tai muuhun nesteeseen.
7. Vianmääritys
If you experience issues with your toaster, refer to the following table for common problems and solutions:
| Ongelma | Mahdollinen syy | Ratkaisu |
|---|---|---|
| Leivänpaahdin ei käynnisty. | Ei kytketty pistorasiaan; virta pois päältätage; sulake on lauennut. | Varmista, että leivänpaahdin on kytketty kunnolla toimivaan pistorasiaan. Tarkista kodin sulake. |
| Bread does not lower or raise. | Toaster not powered; Toast/Cancel button not pressed; food jammed. | Ensure power is on. Press Toast/Cancel button. Unplug toaster and carefully remove any jammed food. |
| Epätasainen paahtaminen. | Inconsistent bread thickness; crumb buildup. | Ensure bread slices are of similar thickness. Clean crumb tray regularly. |
| Savua tai palaneen käryä. | Food jammed; crumb buildup; high shade setting. | Immediately press Cancel. Unplug and allow to cool. Remove jammed food or clean crumb tray. Reduce shade setting for next use. |
Jos ongelma jatkuu näiden ratkaisujen kokeilemisen jälkeen, ota yhteyttä KitchenAidin asiakastukeen.
8. Tekniset tiedot
| Ominaisuus | Yksityiskohta |
|---|---|
| Mallinumero | 5KMT223GER |
| Wattage | 1100 wattia |
| Voitage | 220 volttia |
| Slot Count | 2 |
| Varjostuksen asetukset | 7 |
| Erikoistoiminnot | Keep Warm, Bagel, Defrost, Reheat, Cancel |
| Materiaali | Metalli |
| Tuotteen mitat (S x L x K) | 25S x 34L x 25.5K senttimetriä |
| Tuotteen paino | 2200 grammaa |
| Mukana olevat komponentit | Pop-up Toaster, Removable Crumb Tray |
9. Takuu ja tuki
Your KitchenAid 5KMT223GER 2-Slot Automatic Toaster is covered by a 2 vuoden rajoitettu takuu ostopäivästä lukien. Tämä takuu kattaa materiaali- ja valmistusvirheet normaalissa kotitalouskäytössä.
For warranty service, technical support, or to order replacement parts, please contact KitchenAid customer service. Keep your purchase receipt as proof of purchase for warranty claims.


