
1. Johdanto
This manual provides detailed instructions for the safe and efficient operation of your Audiocenter MX3200 Multi-channel Amplifier. Please read this manual thoroughly before using the product to ensure proper setup, optimal performance, and to prevent damage.
2. Tärkeitä turvallisuusohjeita
- Virtalähde: Yhdistä ampvain ilmoitettuun tilavuuteen astitage and frequency as indicated on the unit.
- Ilmanvaihto: Varmista riittävä ilmanvaihto ympärillä amplifier. Do not block ventilation openings. Maintain at least 10 cm (4 inches) of clear space around the unit.
- Kosteus: Älä paljasta amplifier to rain, moisture, dripping, or splashing liquids. Do not place objects filled with liquids, such as vases, on the apparatus.
- Lämpö: Pidä ampPidä laite kaukana lämmönlähteistä, kuten pattereista, lämmittimistä, liesistä tai muista laitteista (mukaan lukien ampnostimet), jotka tuottavat lämpöä.
- Maadoitus: Ensure the power cord is properly grounded. Do not defeat the safety purpose of the polarized or grounding-type plug.
- Huolto: Jätä kaikki huoltotyöt pätevän huoltohenkilöstön tehtäväksi. Älä yritä huoltaa tätä tuotetta itse.
- Puhdistus: Irrota laite pistorasiasta ennen puhdistamista. Käytä ainoastaan kuivaa liinaa.
3. Pakkauksen sisältö
Varmista, että pakkauksessa on kaikki tarvittavat osat:
- Audiocenter MX3200 Multi-channel Ampelävämpi
- Virtakaapeli
- Käyttöopas (tämä asiakirja)
4. Tuote ohiview
4.1 Takapaneelin asettelu
The rear panel of the MX3200 amplifier features all essential input, output, and control connections. Refer to the image below for a visual guide.
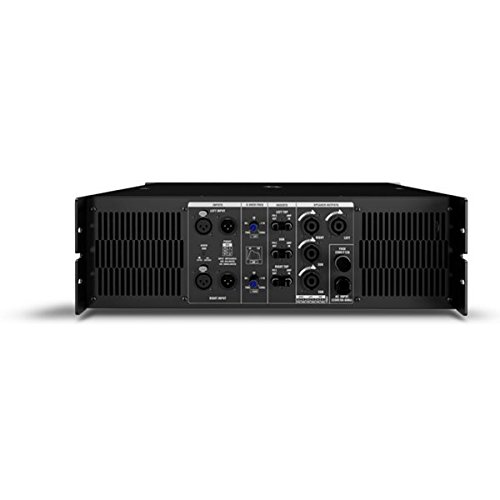
Figure 1: Rear Panel of Audiocenter MX3200 Amplifier. This image displays the various connection points and controls on the back of the amplifier, including XLR inputs, speaker outputs, and configuration switches.
- LEFT INPUT / RIGHT INPUT: XLR input connectors for audio signals.
- 2-WAY / 3-WAY Switch: Selects the crossover mode for the amplifier. Use 2-WAY for two-way speaker systems and 3-WAY for three-way speaker systems.
- PÄÄOHJAIMET: Adjusts the overall output level for the respective channels.
- SPEAKER OUTPUTS (LEFT / RIGHT): SpeakON connectors for connecting to passive speakers.
- AC-TULO: Standard IEC power inlet for connecting the power cable.
- VIRTALIITIN: Main power switch for turning the unit on or off.
5. Asennus
5.1 Sijoitus
Aseta amplifier on a stable, flat surface or mount it in a standard equipment rack. Ensure there is sufficient space around the unit for proper ventilation to prevent overheating.
5.2 Connecting Audio Inputs
- Liitä äänilähteesi (esim. mikseri, esivahvistin)ampnostaja) kohtaan VASEN TULO ja OIKEA TULO XLR connectors on the rear panel.
- Varmista, että kaikki liitännät ovat turvallisia.
5.3 Connecting Speaker Outputs
- Liitä passiiviset kaiuttimet SPEAKER OUTPUTS (LEFT / RIGHT) using appropriate SpeakON cables.
- Verify that the speaker impedance matches the amplifier's specifications to prevent damage.
5.4 Virtaliitäntä
- Varmista, että ampLifierin virtakytkin on OFF-asennossa.
- Liitä mukana toimitettu virtajohto pistorasiaan AC TULO on the rear panel and then to a suitable grounded electrical outlet.
6. Käyttöohjeet
6.1 Virran kytkeminen päälle/pois
- To power on, ensure all connections are secure and turn the VIRTALIITIN kytkin ON-asentoon.
- Katkaise virta kytkemällä VIRTALIITIN kytkin OFF-asentoon.
6.2 Adjusting Output Levels
Käytä MASTER Controls on the rear panel to adjust the output volume for the left and right channels independently. Start with the controls at a low setting and gradually increase to the desired listening level.
6.3 Crossover Mode Selection
The 2-WAY / 3-WAY Switch allows you to configure the amplifier's internal crossover. Select 2-WAY for systems with two frequency bands (e.g., woofer and tweeter) or 3-WAY for systems with three frequency bands (e.g., woofer, midrange, tweeter). Refer to your speaker system's specifications for the appropriate setting.
7. Huolto
- Puhdistus: Pyyhi laitteen ulkopinta säännöllisesti amppehmeällä, kuivalla liinalla. Älä käytä nestemäisiä puhdistusaineita tai liuottimia.
- Ilmanvaihto: Periodically check that the ventilation grilles are free from dust and obstructions. Use a soft brush or vacuum cleaner to remove any buildup.
- Varastointi: Jos säilytät amppitkään aikaan, irrota se virtalähteestä, puhdista se ja säilytä sitä viileässä, kuivassa paikassa, poissa suorasta auringonvalosta ja äärimmäisistä lämpötiloista.
8. Vianmääritys
| Ongelma | Mahdollinen syy | Ratkaisu |
|---|---|---|
| Ei virtaa | Power cable disconnected; Power outlet faulty; Ampkäännä virtakytkin pois päältä. | Check power cable connection; Test power outlet with another device; Ensure power switch is ON. |
| Ei äänilähtöä | Input cables disconnected; Speaker cables disconnected; Master controls set too low; Source device not playing. | Verify all input and speaker cable connections; Increase Master controls gradually; Check audio source. |
| Vääristynyt ääni | Input signal too high (clipping); Speaker impedance mismatch; Faulty cables. | Reduce input signal level from source; Verify speaker impedance; Replace suspect cables. |
| Ylikuumeneminen | Tukkeutunut ilmanvaihto; Liiallinen kuormitus. | Ensure clear ventilation paths; Reduce output level or check speaker impedance. |
9. Tekniset tiedot
| Ominaisuus | Yksityiskohta |
|---|---|
| Malli | MX3200 |
| Merkki | Audiocenter |
| Valmistaja | Audiocenter |
| Rungon materiaali | Muovi |
| Pakkauksen mitat | 48.3 x 39 x 13.2 cm |
| Tuotteen paino | 25 kg |
10. Takuu ja tuki
For warranty information and technical support, please refer to the documentation provided with your purchase or visit the official Audiocenter webÄlä yritä korjata laitetta itse, sillä se voi mitätöidä takuun.