
Fengda FE-134K
Fengda Precision Double Action Side Feed Airbrush FE-134K User Manual
Model: FE-134K | Brand: Fengda
Johdanto
The Fengda FE-134K is a versatile double-action airbrush designed for precision work in various fields such as commercial art, illustrations, retouching, hobby spraying, and cake decorating. This manual provides essential information for the proper setup, operation, and maintenance of your airbrush to ensure optimal performance and longevity.
Pakkauksen sisältö
Upon opening your Fengda FE-134K airbrush kit, please verify that all the following components are present:
- 1 x Airbrush gun FE-134 (0.3mm nozzle and nozzle needle pre-installed)
- 1 x Nozzle wrench
- 1 x 0.2mm nozzle and nozzle needle set
- 1 x 0.5mm nozzle and nozzle needle set
- 1 x 7cc metal cup (integrated)
- 1 x 22cc mason jar
- 1 x pipetti
- 1 x 1.80m braided hose with 1/8BSP swivel nut connections
- 1 x 1/8BSP male to 1/4BSP female adaptor
- Käyttöohje

Image: Complete Fengda FE-134K airbrush kit, including the airbrush gun, hose, various nozzles, cups, and accessories.
Tuotteen ominaisuudet
- Gravity feed Double-Action airbrush (0.3mm), with additional 0.2mm & 0.5mm complete needle/nozzle headsets.
- 1.80mt braided hose with 1/8bsp swivel nut connections, 1/8BSP male to 1/4BSP female adaptor, Pipette, Nozzle Spanner.
- Minimum Fine Lines 1mm or less with required skill level / Largest Spray Pattern is approx. 40mm distance.
- Precisely control the air/paint mix, all metal construction, 7ml metal cup & 22ml Glass Jar.
- Ideal for Model Painting, Body Art, Hobby and Craft, Fine Art, Car painting, Photo Retouching, Illustrations, Textiles and T-shirt painting.
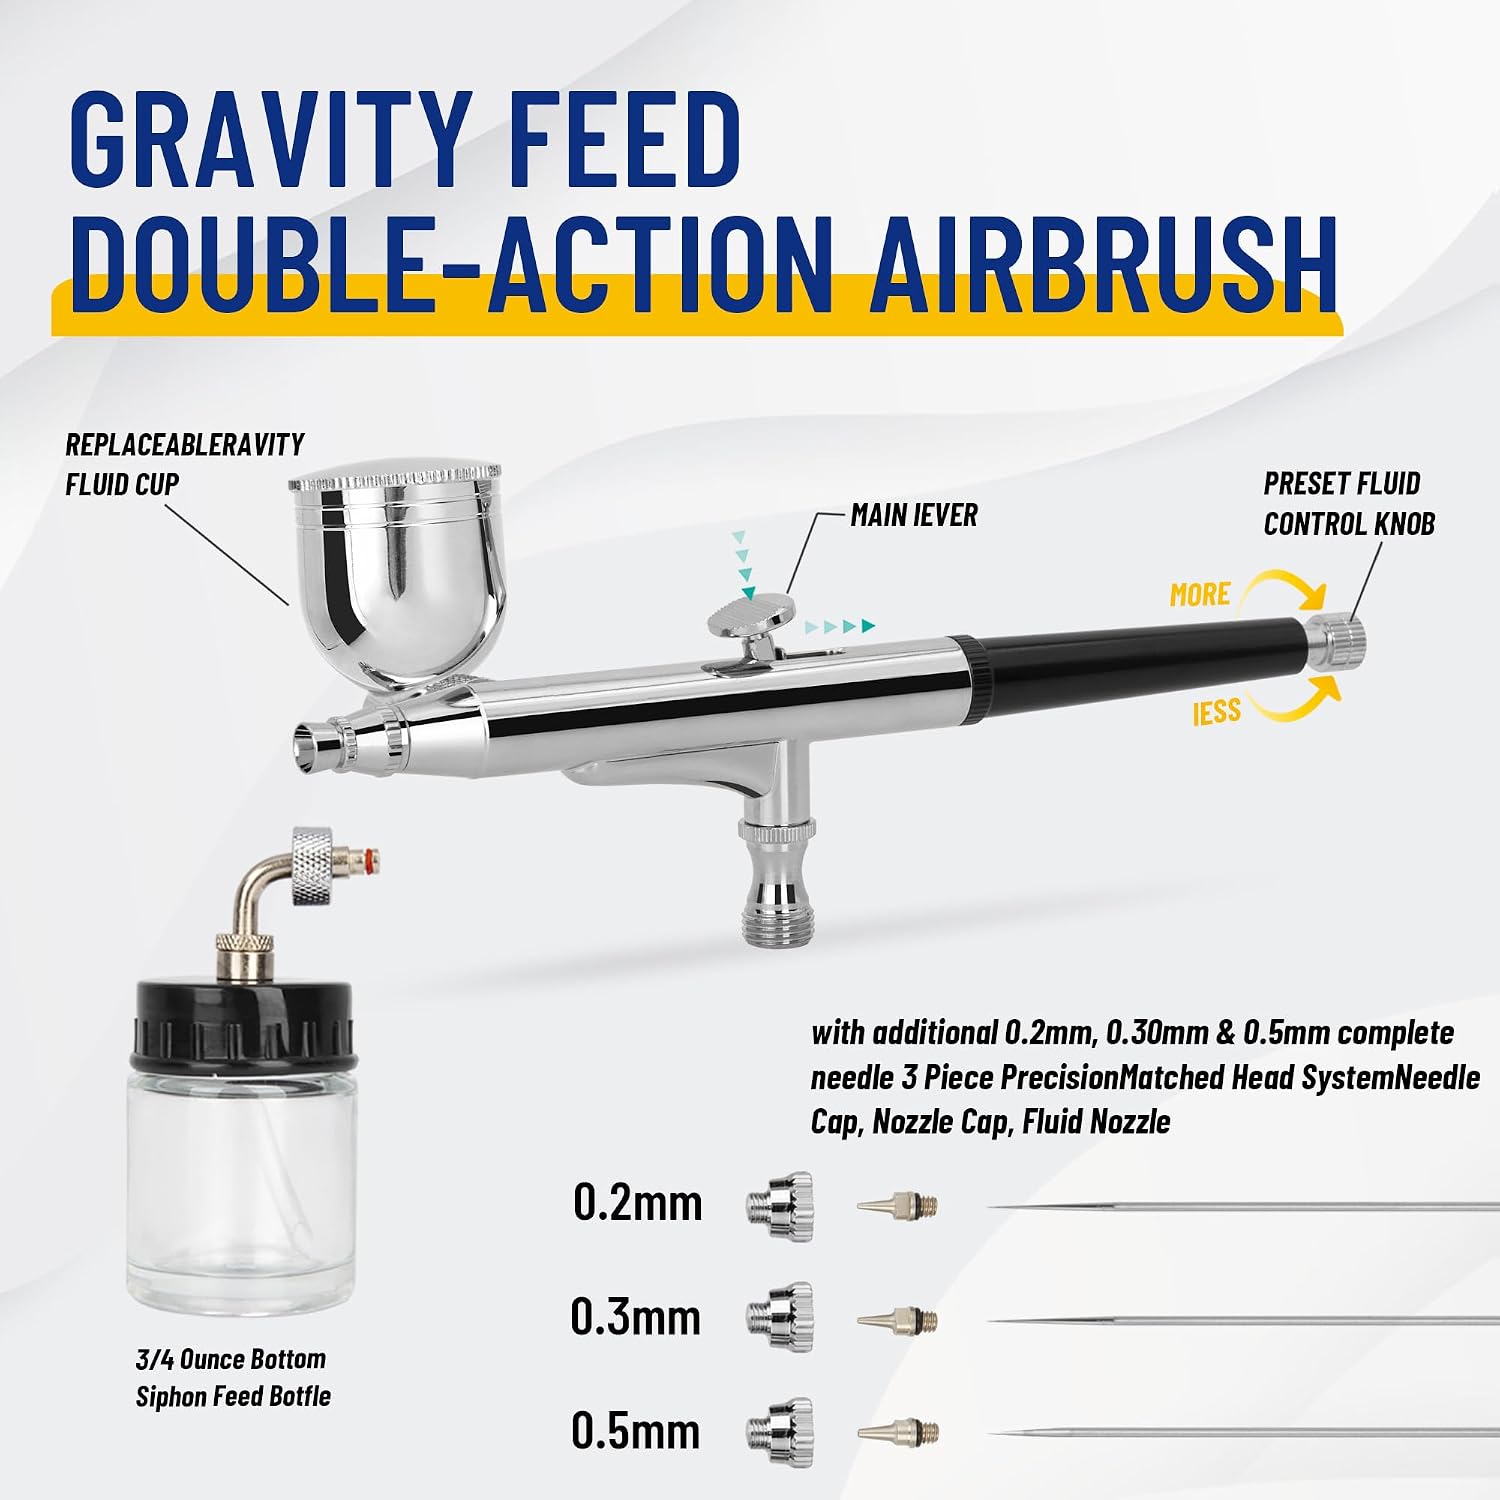
Image: Diagram illustrating the components of the gravity feed double-action airbrush, including the fluid cup, main lever, and fluid control knob.

Kuva: Räjähtänyt view of the airbrush showing internal components and the different nozzle/needle sizes (0.2mm, 0.3mm, 0.5mm).
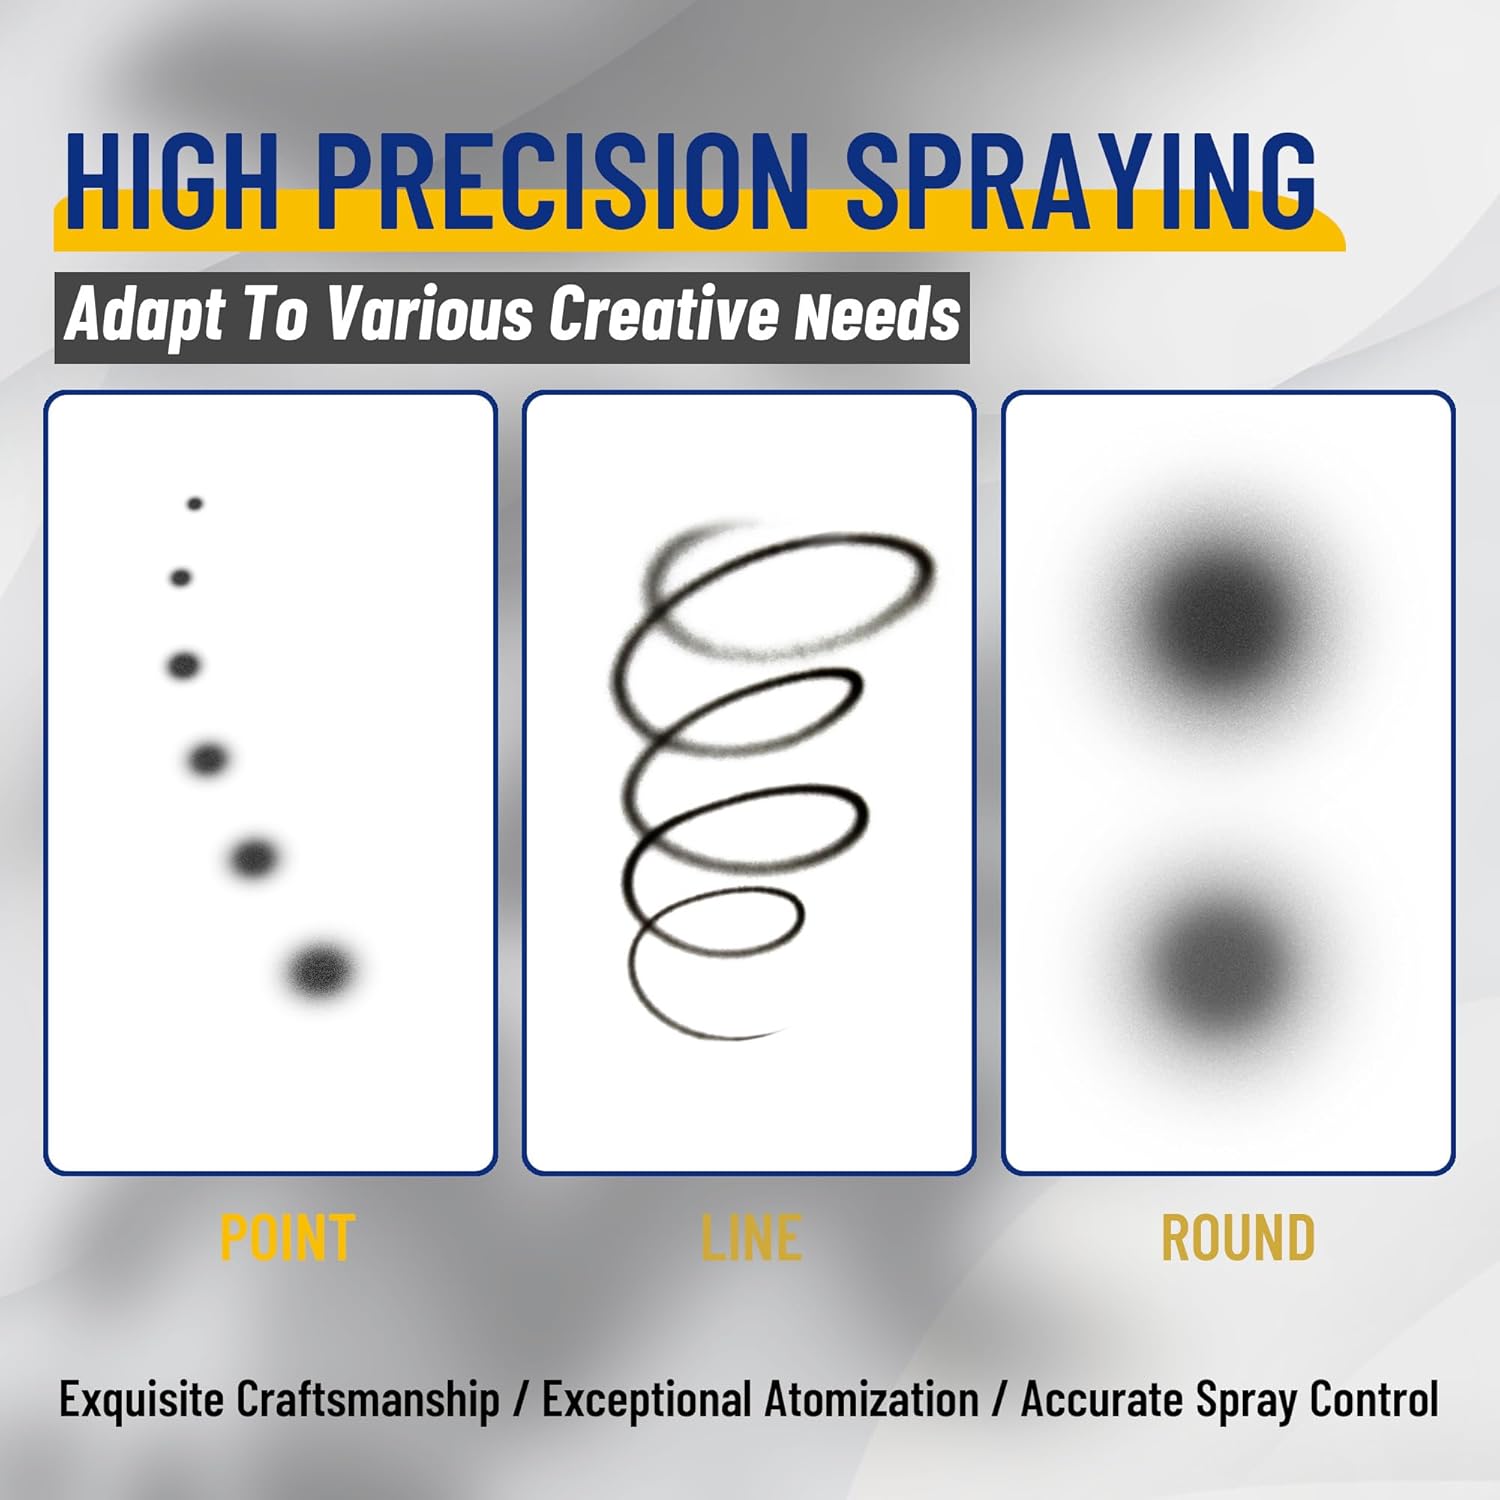
Kuva: esimamples of high precision spraying capabilities, demonstrating point, line, and round spray patterns achievable with the airbrush.
Asennus
1. Connecting the Airbrush
- Connect the braided air hose to the airbrush's air inlet (G1/8 screw connection).
- Connect the other end of the hose to your air compressor. If your compressor has a 1/4BSP connection, use the provided 1/8BSP male to 1/4BSP female adaptor.
- Varmista, että kaikki liitännät ovat tiukasti kiinni ilmavuotojen estämiseksi.
2. Installing Nozzles and Needles
- The 0.3mm nozzle and needle set are pre-installed. To change, carefully unscrew the nozzle cap and then the nozzle using the provided wrench.
- Gently pull out the needle from the rear of the airbrush.
- Insert the desired needle (0.2mm or 0.5mm) from the rear, pushing it forward until it seats correctly.
- Screw on the corresponding nozzle, ensuring it is snug but not overtightened. Replace the nozzle cap.
3. Filling the Paint Cup
- For the 7ml integrated metal cup, simply pour your prepared paint into the cup.
- For the 22cc mason jar, attach it to the bottom siphon feed connection. Ensure the connection is secure.
- Always ensure your paint is properly thinned for airbrush use to prevent clogging.
Toiminta
Basic Double-Action Operation
The Fengda FE-134K is a double-action airbrush, meaning it controls both air and fluid flow with a single trigger movement:
- Ilmavirta: Press the trigger down to release air.
- Nesteen virtaus: While holding the trigger down, pull it back to release paint. The further you pull back, the more paint is released.
Adjusting Fluid Control
The airbrush features an adjustable needle stop at the rear. This allows you to pre-set the maximum amount of paint that can be released, providing consistent lines and preventing overspray. Turn the knob clockwise to reduce paint flow and counter-clockwise to increase it.
Ruiskutustekniikat
- Hienot juonteet: Use a smaller nozzle (0.2mm) and minimal paint flow. Hold the airbrush close to the surface.
- Laaja kattavuus: Use a larger nozzle (0.5mm) and increase paint flow. Hold the airbrush further from the surface.
- Tasaiset iskut: Maintain a consistent distance and speed while moving the airbrush.
Huolto ja puhdistus
Proper cleaning is crucial for the longevity and performance of your airbrush. Clean your airbrush immediately after each use.
Quick Cleaning (Between Colors or Short Breaks)
- Tyhjennä kupista mahdolliset jäljellä olevat maalit.
- Add a small amount of appropriate cleaner (water for acrylics, solvent for enamels/lacquers) to the cup.
- Back-flush: Cover the nozzle with your finger or a cap and press the trigger down to allow air to bubble back into the cup, cleaning the internal passages.
- Spray the cleaner through the airbrush until it runs clear. Repeat if necessary.
Thorough Cleaning (After Each Session)
- Perform quick cleaning as described above.
- Disassemble the airbrush: Remove the needle, nozzle cap, and nozzle.
- Clean all components with appropriate cleaning solutions and small brushes. Pay special attention to the paint cup, nozzle, and needle.
- Wipe the needle clean with a soft cloth.
- Reassemble the airbrush, ensuring all parts are dry and correctly seated. Do not overtighten the nozzle.

Kuva: Lähikuva view of the gravity fluid cup, highlighting its smooth interior for easier cleaning of pigments.
Vianetsintä
| Ongelma | Mahdollinen syy | Ratkaisu |
|---|---|---|
| Ei maalin virtausta | Clogged nozzle/needle; Paint too thick; Air pressure too low; Needle not pulled back | Clean nozzle/needle; Thin paint; Increase air pressure (1-3.5 BAR); Pull trigger back |
| Splattering/Uneven spray | Clogged nozzle; Damaged needle tip; Inconsistent air pressure; Paint too thin/thick | Clean nozzle; Inspect/replace needle; Check compressor; Adjust paint consistency |
| Ilmakuplia maalikupissa | Loose nozzle; Damaged nozzle; Clogged air cap | Tighten nozzle; Replace nozzle; Clean air cap |
| Ilmavuotoja | Löysät liitokset; Vaurioituneet O-renkaat/tiivisteet | Tighten connections; Inspect/replace seals |
Tekniset tiedot
| Ominaisuus | Erittely |
|---|---|
| Airbrush tyyppi | Double-action, Gravity Feed |
| Mukana olevat suutinkoot | 0.2mm, 0.3mm (installed), 0.5mm |
| Neulan materiaali | Ruostumaton teräs |
| Tiivistemateriaali | Teflon (solvent resistant) |
| Integrated Cup Capacity | 7 ml |
| Mason Jar Kapasiteetti | 22 ml |
| Työpaine | 1-3.5 BAR (15-50 PSI) |
| Ilmaliitäntä | G1/8 screw |
| Letkun pituus | 1.8 metriä |
| Gun Weight | 130 g |
| Gun Length | 155 mm |
| Materiaali | Metalli |
Turvallisuusvaroitukset
Always use the product in a well-ventilated area. Avoid direct contact with skin, eyes, and mouth. Keep the airbrush and all accessories out of reach of children. Always wear appropriate personal protective equipment, such as a respirator and gloves, when spraying paints and solvents.
Takuu ja tuki
For any questions regarding your Fengda FE-134K airbrush, or for warranty claims, please contact the manufacturer or your point of purchase. Retain your proof of purchase for warranty purposes.
Aiheeseen liittyvät asiakirjat - FE-134K
 |
Toyota Tundra Air Conditioning Refrigerant Line Location and Torque Specifications Detailed guide to the location of air conditioning refrigerant lines, including suction hose, discharge hose, liquid tube, and condenser, for Toyota Tundra models (1GR-FE, 2UZ-FE) with specified torque values. |
 |
Toyota 2UZ-FE Throttle Body Components Diagram Detailed diagram of the Toyota 2UZ-FE engine throttle body assembly, showing all connected components, hoses, and electrical connections, along with torque specifications. |
 |
Toyota 2UZ-FE Engine Coolant Temperature (ECT) Sensor Components Diagram Diagram illustrating the components of the Engine Coolant Temperature (ECT) Sensor system for Toyota 2UZ-FE engines, including hoses, sensors, connectors, and related parts, along with torque specifications. |
 |
INVT FE Series I/O System User Manual - Industrial Automation Guide Comprehensive user manual for the INVT FE Series I/O System. Details installation, wiring, specifications, and troubleshooting for industrial automation applications using EtherCAT and PROFINET. Visit www.invt.com for support. |
 |
Izzo Alex Leva Espresso Machine Parts Breakdown Yksityiskohtainen osien erittely ja räjäytys view for the Izzo Alex Leva espresso machine, listing components for various sections including visible parts, water loading, boiler and pipes, external components, and assembly. |
 |
Toyota Tundra Manifold Gauge Set Set On Instructions Detailed instructions for connecting the manifold gauge set to Toyota Tundra 1GR-FE and 2UZ-FE engines, including safety precautions and step-by-step guidance for air conditioning service. |
Ask a question about this manual
Ask about setup, troubleshooting, compatibility, parts, safety, or missing instructions. Manuals+ will review the question and use this page’s manual context to help answer it.