
1. Tuote ohiview
The HP ProDisplay P17A is a 17-inch LED-backlit LCD monitor designed for general computing tasks. It features a 5:4 aspect ratio with a maximum resolution of 1280 x 1024 pixels, providing clear and consistent visuals. This monitor is equipped with both VGA and HDMI connectivity options, offering versatility for various system configurations. Its compact design and energy-efficient LED backlighting make it suitable for a range of environments.

Kuva 1: Etuosa view of the HP ProDisplay P17A monitor, showcasinsen näyttöä ja jalustaa.
2. Asennusohjeet
2.1 Näytön purkaminen pakkauksesta
Poista kaikki osat varovasti pakkauksesta. Varmista, että seuraavat osat ovat mukana:
- HP ProDisplay P17A Monitor
- Monitor Stand (base and neck)
- Virtakaapeli
- VGA Cable (may vary by region/package)
- HDMI-kaapeli (voi vaihdella alueittain/pakkauksittain)
2.2 Jalustan kokoaminen
- Aseta näyttö kuvaruutu alaspäin pehmeälle ja puhtaalle alustalle naarmuuntumisen estämiseksi.
- Attach the stand neck to the back of the monitor, aligning the tabs and pushing until it clicks into place.
- Attach the stand base to the bottom of the stand neck, securing it with the captive screw if present.
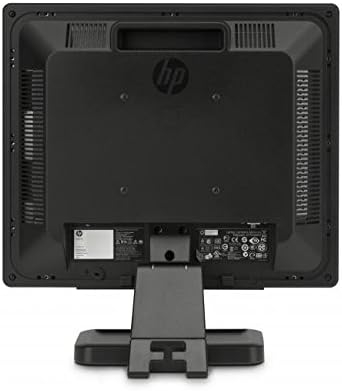
Kuva 2: Takaosa view of the monitor, illustrating the stand attachment point and various connectivity ports.
2.3 Liitäntäkaapelit
- Virtaliitäntä: Kytke virtajohto näytön virransyöttöön ja sitten maadoitettuun pistorasiaan.
- Videoliitäntä:
- For VGA: Connect one end of the VGA cable to the VGA port on the monitor and the other end to the VGA port on your computer. Tighten the screws on the VGA connector.
- For HDMI: Connect one end of the HDMI cable to the HDMI port on the monitor and the other end to the HDMI port on your computer.
- Varmista, että kaikki liitännät ovat turvallisia.
3. Käyttöohjeet
3.1 Virran kytkeminen päälle/pois
Press the power button located on the front bezel of the monitor to turn it on or off. The power indicator light will illuminate when the monitor is on.
3.2 Näyttöasetusten muuttaminen (OSD-valikko)
The On-Screen Display (OSD) menu allows you to adjust various monitor settings. Use the buttons on the front bezel to navigate and select options.
- Valikkopainike: Avaa OSD-valikon.
- Navigointipainikkeet (+ / - or Up/Down): Move through menu options and adjust values.
- Valitse/OK-painike: Vahvistaa valinnan tai siirtyy alivalikkoon.
- Poistu-painike: Poistuu nykyisestä valikosta tai kuvaruutunäytöstä.
Yleisiä säädettäviä asetuksia ovat:
- Kirkkaus/kontrasti: Säätää kokonaisluminanssia ja eroa vaaleiden ja tummien alueiden välillä.
- Värinhallinta: Allows adjustment of color temperature, RGB levels, or preset color modes.
- Tulon valinta: Manually switches between VGA and HDMI input sources.
- Kuvanhallinta: Adjusts sharpness, aspect ratio, and auto-adjustment for analog signals.
- Hallinto: Virransäästöasetukset, näyttövalikon aikakatkaisu, kielen valinta.
4. Huolto
4.1 Näytön puhdistaminen
- Sammuta näyttö aina ja irrota virtajohto pistorasiasta ennen puhdistamista.
- Käytä pehmeää, nukkaamatonta liinaa kevyesti dampvedellä tai hankaamattomalla näytönpuhdistusaineella.
- Do not spray cleaner directly onto the screen or monitor casing.
- Avoid using benzene, thinner, ammonia-based cleaners, or abrasive materials, as these can damage the surface.
4.2 Yleishoito
- Vältä sijoittamasta näyttöä suoraan auringonpaisteeseen tai lämmönlähteiden lähelle.
- Varmista riittävä ilmanvaihto näytön ympärillä.
- Älä tuki tuuletusaukkoja.
- Suojaa näyttöä teräviltä esineiltä tai liialliselta paineelta.
5. Vianmääritys
Before contacting support, try the following basic troubleshooting steps:
5.1 Ei kuvaa näytöllä
- Varmista, että näytön virtajohto on kytketty kunnolla sekä näyttöön että toimivaan pistorasiaan.
- Verify the power indicator light on the monitor is on. If not, press the power button.
- Check that the video cable (VGA or HDMI) is securely connected to both the monitor and the computer.
- Ensure the correct input source is selected on the monitor (use the OSD menu to switch inputs).
- Käynnistä tietokone uudelleen.
5.2 Huono kuvanlaatu
- Fuzzy or Blurry Image: Varmista, että tietokoneesi näytön resoluutio on asetettu näytön natiiviresoluutiolle (1280 x 1024).
- Väärät värit: Adjust color settings through the OSD menu or your computer's display settings.
- Image Off-Center/Incorrect Size (VGA only): Use the "Auto Adjust" function in the OSD menu.
- Vilkkuminen: Check the refresh rate setting on your computer; ensure it is set to 60 Hz.
5.3 Monitor Not Responding to Buttons
- Unplug the monitor's power cable, wait 10 seconds, then plug it back in and try again.
- Varmista, ettei mikään painike ole jumissa.
6. Tekniset tiedot
| Ominaisuus | Erittely |
|---|---|
| Merkki | HEWLETT PACKARD |
| Mallin nimi | HP P17A |
| Mallinumero | F4M97AAABA |
| Näytön koko | 17 tuumaa |
| Näytön tyyppi | LED-taustavalaistu LCD |
| Alkuperäinen resoluutio | 1280 x 1024 (SXGA) |
| Kuvasuhde | 5:4 |
| Kontrastisuhde | 1000:1 |
| Päivitystaajuus | 60 Hz |
| Vastausaika | 5 millisekuntia |
| Viewkulma | 170 astetta |
| Yhteydet | 1x VGA, 1x HDMI |
| Virrankulutus | 25 wattia (maksimi) |
| Tuotteen mitat (S x L x K) | 8.12" S x 14.85" L x 15.24" K |
| Tuotteen paino | 8.2 puntaa |
| Asennustyyppi | Seinäkiinnitys (VESA-yhteensopiva) |
| Lisäominaisuudet | Häikäisynestonäyttö |

Figure 3: Dimensions of the HP ProDisplay P17A monitor.
7. Takuu ja tuki
7.1 Takuutiedot
This product is often sold as a refurbished item. Refurbished products typically come with a limited warranty provided by the refurbisher or seller. Please refer to your purchase documentation for specific warranty terms and conditions, including duration and coverage details.
7.2 Tekninen tuki
For technical assistance, troubleshooting beyond this manual, or warranty claims, please contact the vendor or HP customer support. Have your monitor's model number (F4M97AAABA) and serial number ready when contacting support.
You can find additional support resources, drivers, and documentation on the official HP support websivusto.


