
Johdanto
This manual provides detailed instructions for the setup, operation, and maintenance of your Seiko QHR024S Digital Alarm Clock. Please read this manual thoroughly before using your clock to ensure proper function and longevity. Keep this manual for future reference.
Tuote loppuview
The Seiko QHR024S is a modern digital alarm clock featuring a clear LCD display, radio wave control for accurate timekeeping, and essential functions like alarm, snooze, and temperature display.
Tärkeimmät ominaisuudet:
- Digitaalinen näyttö
- Kalenterin näyttö
- Torkkutoiminto
- Lämpötilan näyttö
- Hälytystoiminto
- Quartz, Atomic Movement
- Illumination (Backlight)
- Global Radio Wave Control
Komponentin tunnistus:
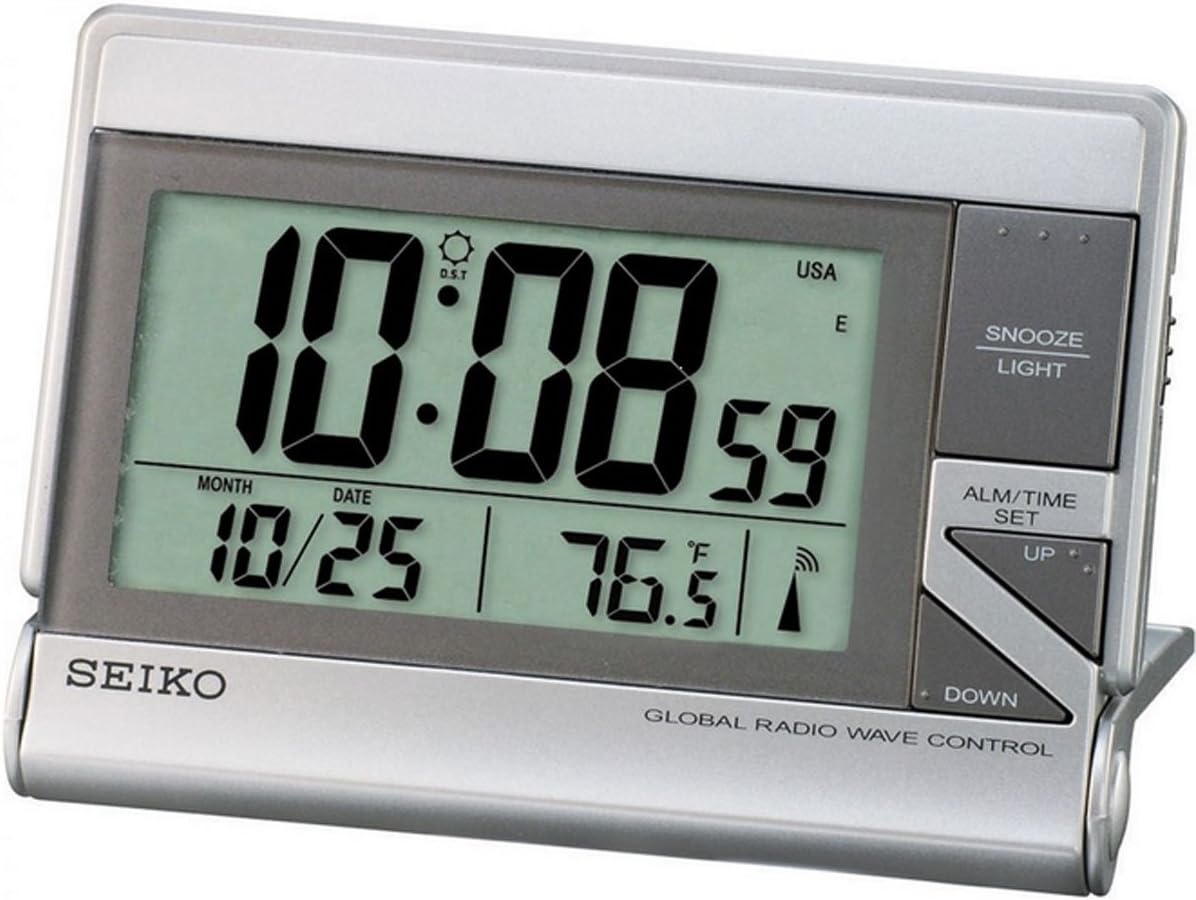
Kuvassa näkyy etupuoli view of the Seiko QHR024S Digital Alarm Clock. The large LCD screen shows the time (e.g., 10:08:59), date (e.g., 10/25), and temperature (e.g., 76.5°F). Indicators for Daylight Saving Time (DST), USA time zone, and radio wave reception are also visible. To the right of the display are the control buttons: 'SNOOZE LIGHT' at the top, 'ALM/TIME SET' in the middle, and 'UP' and 'DOWN' arrow buttons below it. The 'SEIKO' logo is printed on the bottom left, and 'GLOBAL RADIO WAVE CONTROL' is printed on the bottom right.
Katso yllä olevasta kuvasta seuraavien komponenttien sijainti:
- LCD-näyttö: Shows time, date, temperature, and various indicators.
- SNOOZE LIGHT Button: Activates snooze function and backlight.
- ALM/TIME SET Button: Used to enter time and alarm setting modes.
- YLÖS -painike: Säätää arvoja ylöspäin asetuksen aikana.
- ALAS -painike: Säätää arvoja alaspäin asetuksen aikana.
Asennus
1. Akun asennus
- Paikanna paristolokeron kansi kellon takaa.
- Remove the cover by sliding or unlatching it.
- Insert one (1) LR44 battery, ensuring the polarity (+/-) matches the diagram inside the compartment.
- Aseta paristolokeron kansi kunnolla takaisin paikalleen.
Note: An LR44 battery is typically included with your purchase.
2. Initial Power On and Radio Wave Reception
Upon battery installation, the clock will power on and automatically attempt to receive the time signal from the nearest atomic clock transmitter. This process may take several minutes to several hours depending on your location and environmental conditions.
- Aseta kello ikkunan lähelle, kauas elektronisista laitteista, jotka saattavat aiheuttaa häiriöitä.
- The radio wave indicator on the display will flash during reception and become solid once synchronized.
- If reception is poor, try repositioning the clock. Manual time setting is available if automatic synchronization is not successful.
Käyttöohjeet
1. Kellonajan ja päivämäärän asettaminen manuaalisesti
- Paina ja pidä painettuna ALM/TIME SET -painiketta, kunnes aikanäyttö alkaa vilkkua.
- Käytä UP or ALAS -painikkeita säätääksesi tuntia. Paina ALM/TIME SET vahvistamiseksi ja siirtymiseksi minuutteihin.
- Repeat this process for minutes, year, month, and date.
- Päivämäärän asettamisen jälkeen paina ALM/TIME SET poistuaksesi asetustilasta.
2. Hälytyksen asettaminen
- Paina ALM/TIME SET button once briefly to display the current alarm time.
- While the alarm time is displayed, press and hold ALM/TIME SET kunnes hälytyksen tunti vilkkuu.
- Käytä UP or ALAS -painikkeita säätääksesi hälytyksen tuntia. Paina ALM/TIME SET to confirm and move to alarm minutes.
- Adjust alarm minutes using UP or ALAS. Paina ALM/TIME SET vahvistaaksesi ja poistuaksesi hälytysasetuksesta.
- Voit aktivoida tai deaktivoida hälytyksen painamalla ALM/TIME SET button briefly to show the alarm time, then press UP or ALAS to toggle the alarm ON/OFF indicator.
3. Snooze and Backlight Function
Kun hälytys soi, paina TORKKUVALO button to temporarily stop the alarm. The alarm will sound again after a few minutes (typical snooze duration is 5-10 minutes). Pressing any other button will turn off the alarm until the next set time.
Paina TORKKUVALO button at any time to activate the backlight for a few seconds, illuminating the display for easy viewhämärässä.
4. Lämpötilanäyttö
The clock displays the ambient temperature. The unit of temperature (Celsius or Fahrenheit) can typically be switched via a small button or switch located on the back or side of the clock. Refer to the physical unit for the exact location of this control.
5. Kesäaika (DST)
The Seiko QHR024S, with its Global Radio Wave Control feature, is designed to automatically adjust for Daylight Saving Time. Ensure the DST indicator is correctly set (usually automatic) or manually adjust if necessary during time setting.
Huolto
1. Puhdistus
To clean the clock, use a soft, dry cloth. Do not use abrasive cleaners, solvents, or chemical sprays, as these can damage the casing tai näyttö.
2. Pariston vaihto
When the display becomes dim or the clock functions erratically, it is time to replace the battery. Follow the battery installation steps outlined in the
Ask a question about this manual
Ask about setup, troubleshooting, compatibility, parts, safety, or missing instructions. Manuals+ will review the question and use this page’s manual context to help answer it.