
1. Johdanto
Kiitos ostoksestasiasing the Hello Kitty KT2064 AM/FM Projection Alarm Clock Radio. This device combines a digital alarm clock with an AM/FM radio and a unique projection feature, allowing you to display the time on your ceiling or wall. Please read this manual carefully to ensure proper operation and to fully utilize all features of your new alarm clock radio.

Kuva 1.1: Edessä view of the Hello Kitty KT2064 Projection Alarm Clock Radio, showing the digital display and the Hello Kitty design.
2. Ominaisuudet
- Projisointiominaisuus: Projects the time onto your ceiling or wall with adjustable focus and up to 120-degree pivot angle.
- Dual Alarm Options: Wake up to either a buzzer alarm or your favorite radio station.
- AM/FM-radio: Integrated radio tuner for listening to broadcast stations.
- Torkkutoiminto: Allows for an additional 9 minutes of sleep before the alarm sounds again.
- Sleep to Radio: Set a timer (up to 2 hours) for the radio to play before automatically turning off.
- Akun varmuuskopiointi: Säilyttää aika- ja hälytysasetukset virrankatkaisun aikanatages (requires 3 CR2025 button cell batteries, not included).
- LED-aikanäyttö: Clear red LED display for current time.
3. Pakkauksen sisältö
Tarkista pakkauksesta seuraavat tuotteet:
- Hello Kitty KT2064 Projection Alarm Clock Radio Unit
- Verkkolaite
- Käyttöopas (tämä asiakirja)
Note: 3 CR2025 button cell batteries for backup are not included and must be purchased separately.
4. Asennus
4.1 Virtaliitäntä
- Unpack the alarm clock radio and its accessories.
- Connect the AC power adapter to the DC input jack located on the back of the unit.
- Plug the other end of the AC power adapter into a standard wall outlet. The unit will power on, and the LED display will light up.
4.2 Installing Backup Batteries
Installing backup batteries ensures that your time and alarm settings are retained during a power outage.
- Paikanna paristolokero laitteen pohjasta tai takaa.
- Avaa paristolokeron kansi.
- Insert 3 CR2025 button cell batteries, observing the correct polarity (+ and - markings).
- Sulje paristolokeron kansi kunnolla.

Kuva 4.2: Takaosa view of the alarm clock radio, showing control buttons and potential location for battery compartment.
5. Käyttöohjeet
5.1 Kellonajan asettaminen
- Paina ja pidä painettuna AJAN ASETUS button (or similar button, refer to unit markings) for approximately 3 seconds until the hour digits begin to flash.
- Käytä TUNNIN or + / - -painikkeita tuntien säätämiseksi. Kiinnitä huomiota AM/PM-ilmaisimeen.
- Paina AJAN ASETUS -painiketta uudelleen. Minuuttinumerot vilkkuvat.
- Käytä MINUUTI or + / - painikkeita minuuttien säätämiseksi.
- Paina AJAN ASETUS -painiketta vielä kerran vahvistaaksesi ja poistuaksesi ajan asetustilasta.
5.2 Setting the Alarm (Alarm 1 and Alarm 2)
This unit supports two independent alarms.
- Paina ja pidä painettuna AL1 SET -painike (herätykselle 1) tai AL2 SET button (for Alarm 2) for approximately 3 seconds until the hour digits of the alarm time begin to flash.
- Käytä TUNNIN or + / - painikkeita säätääksesi herätysaikaa.
- Paina vastaavaa AL SET -painiketta uudelleen. Minuuttinumerot vilkkuvat.
- Käytä MINUUTI or + / - painikkeita hälytyksen minuuttien säätämiseksi.
- Paina AL SET -painiketta uudelleen valitaksesi hälytyslähteen: SUMMERI or RADIO. Käytä + / - buttons to toggle.
- Paina AL SET -painiketta vielä kerran vahvistaaksesi ja poistuaksesi hälytysasetustilasta.
- Voit aktivoida/deaktivoida hälytyksen painamalla AL1 PÄÄLLE/POIS or AL2 PÄÄLLE/POIS button (or similar) repeatedly until the alarm indicator appears/disappears on the display.
5.3 Using the Radio
- Paina RADIO PÄÄLLE/POIS painiketta radion käynnistämiseksi.
- Paina AM/FM -painiketta vaihtaaksesi AM- ja FM-taajuusalueiden välillä.
- Käytä TUNE+ ja VIRITTÄÄ- painikkeita virittääksesi manuaalisesti halutulle asemalle.
- For automatic scanning, press and hold TUNE+ or VIRITTÄÄ- for a few seconds until the radio finds the next clear station.
- Säädä äänenvoimakkuutta VOLUME + ja ÄÄNENVOIMAKKUUS - painikkeita.
- Sammuta radio painamalla RADIO PÄÄLLE/POIS painiketta uudelleen.
5.4 Projection Feature
- Locate the projector lens on top of the unit.
- Paina PROJEKTORI PÄÄLLÄ/POIS button to activate the time projection.
- Adjust the angle of the projector head (up to 120 degrees) to direct the time display onto your ceiling or wall.
- Kierrä FOCUS ring around the projector lens to achieve a clear image.
- To turn off the projection, press the PROJEKTORI PÄÄLLÄ/POIS painiketta uudelleen.

Image 5.4: The alarm clock radio actively projecting the time and Hello Kitty logo onto a surface.
5.5 Torkku -toiminto
Kun hälytys soi, paina isoa TORKUTA button (usually located on top of the unit). The alarm will pause for approximately 9 minutes and then sound again.
5.6 Sleep to Radio Function
This feature allows you to fall asleep to the radio, which will automatically turn off after a set period.
- Turn on the radio and tune to your desired station.
- Paina NUKKUA button repeatedly to cycle through the available sleep timer durations (e.g., 120, 90, 60, 30, 15 minutes, or OFF). The selected duration will appear on the display.
- The radio will play for the chosen duration and then automatically turn off.
6. Huolto
- Puhdistus: Pyyhi laite pehmeällä, kuivalla liinalla. Älä käytä hankaavia puhdistusaineita tai liuottimia.
- Veden altistuminen: Pidä laite poissa vedestä tai liiallisesta kosteudesta.
- Lämpötila: Avoid exposing the unit to extreme temperatures or direct sunlight.
- Akun vaihto: Replace backup batteries annually or when the low battery indicator appears to ensure continuous functionality during power outages.
7. Vianmääritys
| Ongelma | Mahdollinen syy | Ratkaisu |
|---|---|---|
| Yksikkö ei käynnisty. | Virtasovitin ei ole kytketty tai pistorasia on viallinen. | Varmista, että virtalähde on kytketty kunnolla laitteeseen ja toimivaan pistorasiaan. Testaa pistorasiaa toisella laitteella. |
| Time/alarm settings are lost after power outage. | Varmuuskopioparistot ovat tyhjentyneet tai niitä ei ole asennettu. | Install new CR2025 button cell batteries or replace existing ones. |
| Projektio on sumea. | Tarkennusta ei ole säädetty oikein. | Kierrä FOCUS ring around the projector lens until the image is clear. |
| Radion vastaanotto on huono. | Antennia ei ole ojennettuna tai häiriöitä esiintyy. | Extend the FM wire antenna fully. For AM, try repositioning the unit. Avoid placing near electronic devices that may cause interference. |
| Hälytys ei soi. | Hälytys ei ole aktivoitu tai asetettu väärin. | Ensure the alarm is set and activated (alarm indicator visible). Check alarm volume if set to radio. |
8. Tekniset tiedot
| Merkki | Hello Kitty |
| Mallinumero | KT2064P |
| Näytön tyyppi | Digitaalinen LED |
| Virtalähde | Verkkolaite |
| Vara-akku | 3 x CR2025-nappiparisto (ei sisälly toimitukseen) |
| Radio Frequency | AM/FM (FM up to 108 MHz) |
| Tuotteen mitat (P x L x K) | 14.5 x 11.9 x 17.3 cm (noin 5.7 x 4.7 x 6.8 tuumaa) |
| Tuotteen paino | 885 g (noin 1.95 paunaa) |
| Projektiokulma | Jopa 120 astetta |
| Torkkuajan kesto | 9 minuuttia |
| Uniajastin | Jopa 2 tuntia |
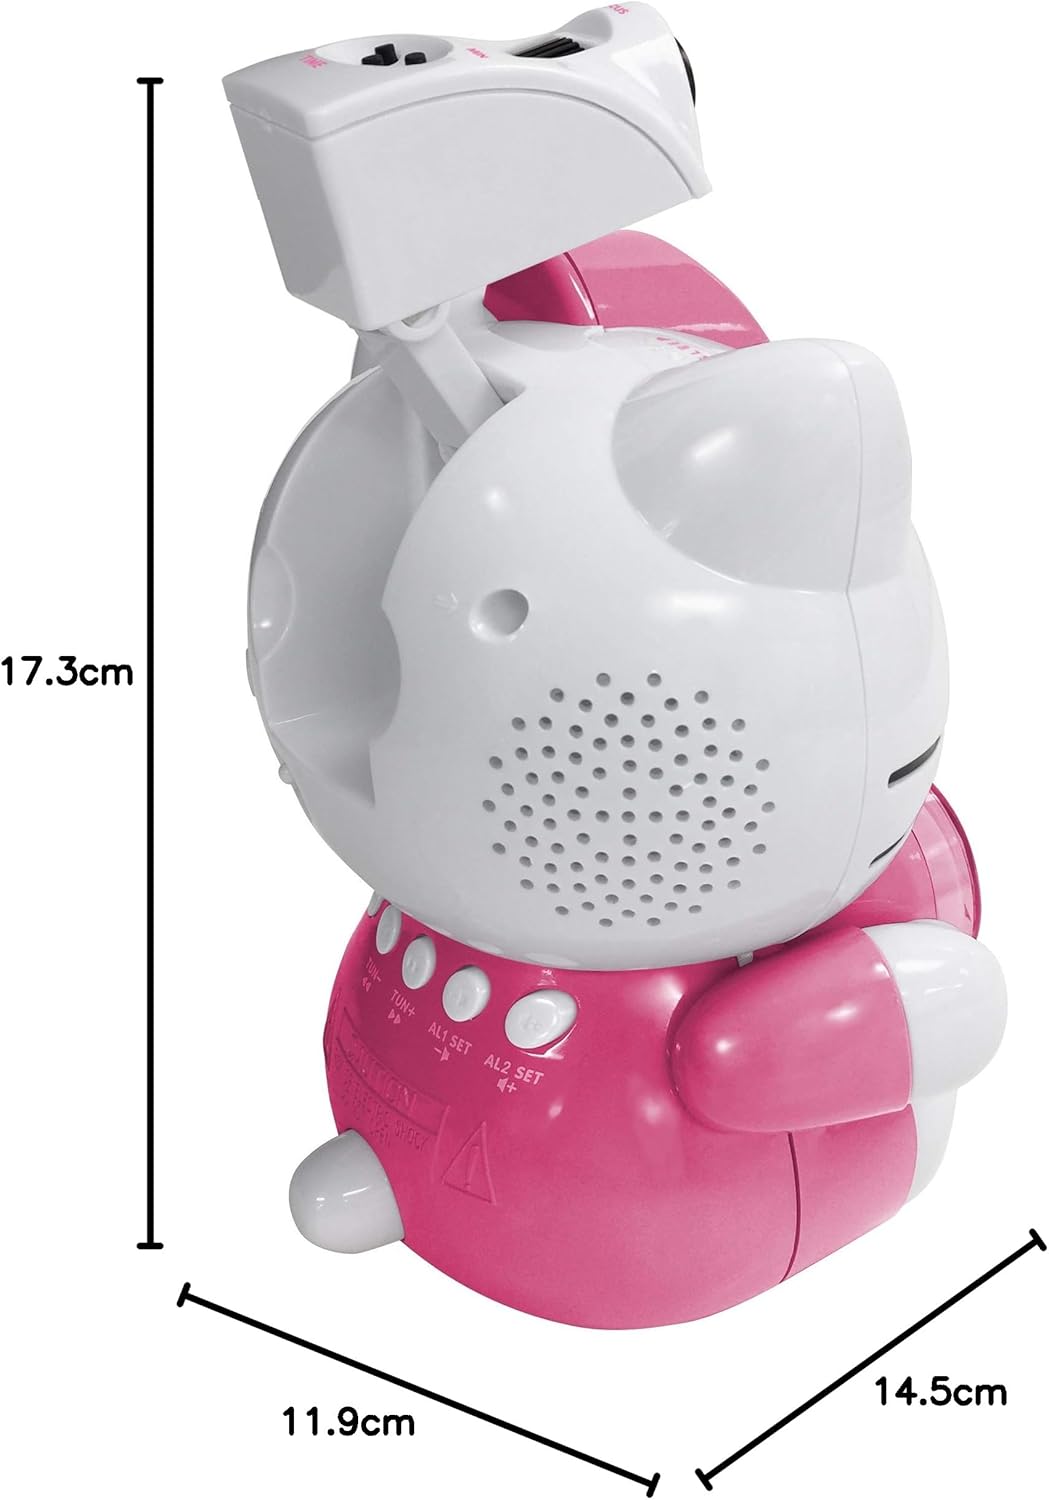
Image 8.1: Dimensions of the Hello Kitty KT2064 Projection Alarm Clock Radio.
9. Takuu ja tuki
This product comes with a standard manufacturer's warranty. For specific warranty details, please refer to the documentation provided at the time of purchase or contact your retailer. If you encounter any issues not covered in the troubleshooting section, please contact customer support for assistance.
For support inquiries, please visit the official Hello Kitty product support websivustolta tai ota yhteyttä paikalliseen jälleenmyyjään.