
1. Johdanto
Welcome to the user manual for your STANLEY FATMAX 1-77-121 CL2XTi Automatic Cross Line Laser Level Kit. This professional tool is designed for precise leveling and alignment tasks, projecting clear horizontal and vertical red laser lines. It is suitable for both indoor and outdoor applications, offering versatility for various projects.
Key features include automatic self-leveling, a robust magnetic pendulum system, a flashing out-of-level indicator, and an IP54 rating for protection against dust and water splashes. The kit comes complete with essential accessories to enhance its functionality and ease of use.
2. Turvallisuustiedot
Please read and understand all safety instructions before operating the device. Failure to follow these instructions may result in serious injury.
Yleiset turvallisuusvaroitukset
- Lasersäteily: This product is a Class 2 laser product. Do not stare directly into the laser beam. Direct eye exposure can cause eye injury.
- Silmien suojaus: Käytä aina asianmukaisia silmäsuojaimia laserlaitteita käyttäessäsi.
- Lapset: Pidä laite poissa lasten ja luvattomien henkilöiden ulottuvilta.
- Muutokset: Älä yritä muokata tai purkaa laserlaitetta. Korjaukset saa suorittaa vain valtuutettu huoltohenkilöstö.
- Akun turvallisuus: Use only the specified battery type (AA). Ensure correct polarity when inserting batteries. Do not mix old and new batteries or different types of batteries. Remove batteries if the device will not be used for an extended period.
- Toimintaympäristö: Use the device in a well-lit area. Avoid using it in explosive atmospheres or near flammable liquids or gases.
3. Pakkauksen sisältö
The STANLEY FATMAX 1-77-121 CL2XTi kit includes the following items:
- CL2XTi Automatic Cross Line Laser Level
- Mini-jalusta
- Seinäkiinnitysteline
- Tripod pole (extendable up to 3.30m)
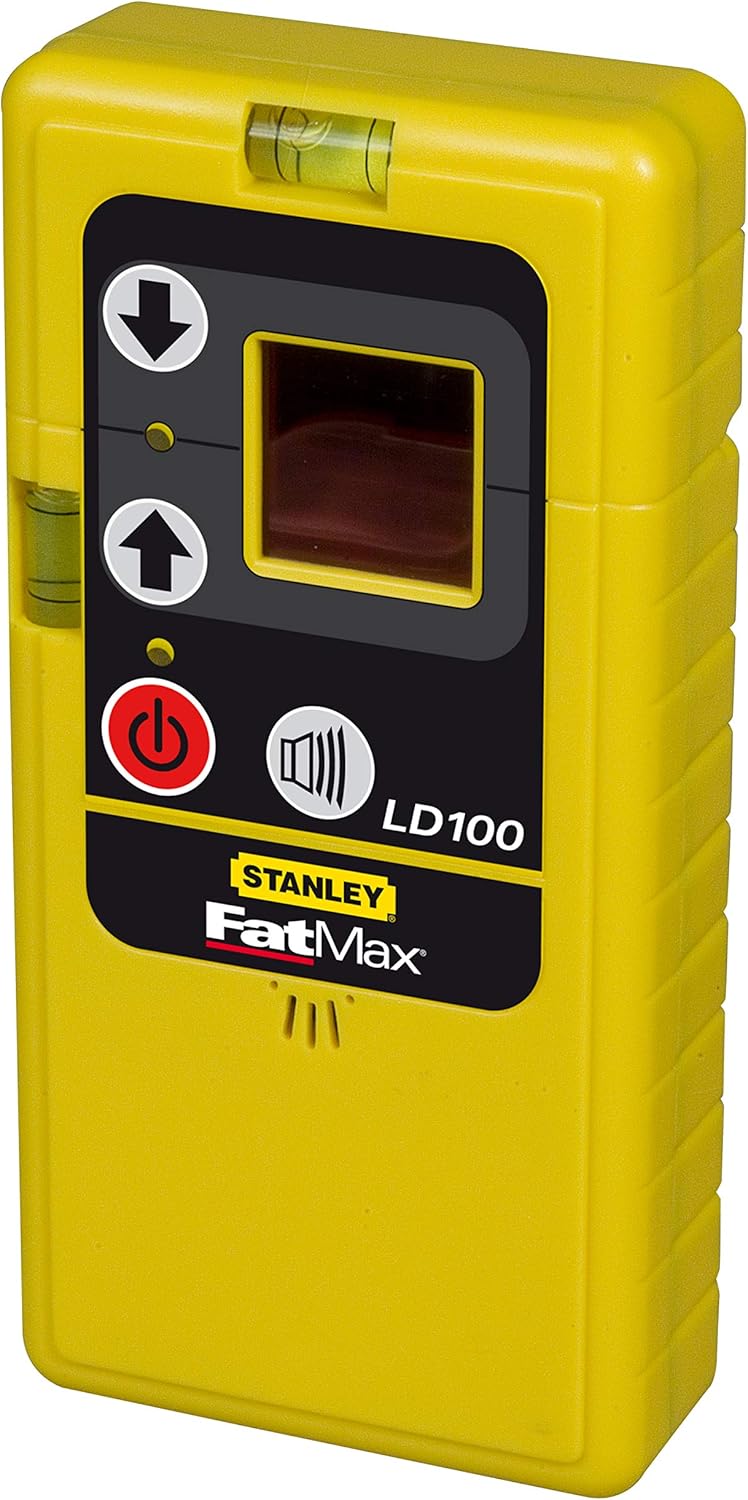
- Detection cell (LD100)
- Kantolaukku
- 3x AA-paristoa
4. Tuote ohiview
Laser Level Components


Detection Cell (LD100) Components

5. Asennus
5.1 Akun asennus
- Paikanna laitteen paristolokeron kansi.
- Open the cover and insert 3x AA batteries, ensuring correct polarity (+/-).
- Sulje paristolokeron kansi kunnolla.
5.2 Lasertason kiinnittäminen
The laser level can be mounted using various accessories included in the kit:
- Mini-Tripod: Attach the laser level to the mini-tripod using the 1/4'' mounting thread for stable placement on flat surfaces.
- Seinäkiinnitysteline: Use the wall mount bracket to secure the laser level to walls or other vertical surfaces. The bracket often features a clamp or screw mechanism for attachment.
- Tripod Pole: For elevated or floor-to-ceiling applications, assemble the extendable tripod pole. Attach the laser level to the pole's mounting platform. The pole can extend up to 3.30m.
- Magneettinen pohja: The laser level features a magnetic base for attachment to metallic surfaces.

6. Käyttöohjeet
6.1 Powering On and Automatic Leveling
- Place the laser level on a stable surface or mount it using one of the accessories.
- Paina virtapainiketta (punainen ympyrä viivalla) laitteen käynnistämiseksi.
- The laser level will automatically self-level using its magnetic pendulum system. Ensure the device is within its self-leveling range of +/- 4°.
- If the device is outside its self-leveling range, the laser lines will flash, indicating that the device needs to be adjusted to a more level position.
6.2 Laser-tilojen valitseminen
Paina tilapainiketta (button with horizontal and vertical lines) to cycle through the available laser projection modes:
- Vaakasuora viiva: Heijastaa yhden vaakasuoran laserviivan.
- Pystysuora viiva: Heijastaa yhden pystysuoran laserviivan.
- Poikkiviiva: Projects both horizontal and vertical laser lines simultaneously, forming a cross.
6.3 Using the Detection Cell (LD100)
For outdoor applications or when working over longer distances (up to 50m), use the LD100 detection cell:
- Turn on the laser level and select the desired laser mode.
- Turn on the LD100 detection cell.
- Move the detection cell along the path of the laser beam. The cell will emit an audible signal and/or display visual indicators when it detects the laser line.
- Adjust the position of the detection cell until the indicator shows that the laser line is centered.

6.4 Manuaalitila (lukittu heiluri)
To project angled lines (e.g., for stair railings), you can lock the pendulum:
- With the device off, slide the pendulum lock switch to the locked position.
- Turn on the laser level. The laser lines will now be projected at any angle without self-leveling. The lines may flash to indicate that it is not self-leveling.
- To return to automatic self-leveling, turn off the device, unlock the pendulum, and then power it on again.
7. Huolto
7.1 Puhdistus
Regularly clean the laser level and its accessories. Use a soft, damp cloth to wipe down the exterior. Do not use abrasive cleaners or solvents. Keep the laser apertures clean and free of dust.
7.2 Varastointi
When not in use, store the laser level in its carrying bag in a dry, cool place. Ensure the pendulum lock is engaged to protect the internal mechanism during transport and storage.

7.3 Pariston vaihto
Replace the 3x AA batteries when the laser lines become dim or the device fails to power on. Always replace all three batteries at the same time with new ones of the same type.
7.4 IP54-suojausluokka
The device has an IP54 rating, meaning it is protected against dust ingress and splashing water from any direction. While robust, avoid submerging the device in water or exposing it to heavy rain.
8. Vianmääritys
| Antaa | Mahdollinen syy | Ratkaisu |
|---|---|---|
| Laser ei käynnisty | Tyhjät tai väärin asetetut paristot | Check battery polarity, replace with new batteries. |
| Laserviivat vilkkuvat | Device is out of self-leveling range | Adjust the device's position to be within +/- 4° of level. |
| Laser lines are not level/plumb | Pendulum lock engaged (manual mode) or device not stable | Ensure pendulum lock is disengaged for automatic leveling. Place on a stable surface. |
| Laser not visible outdoors or over long distances | Ambient light too bright or distance too great | Use the LD100 detection cell for enhanced visibility and extended range. |
9. Tekniset tiedot
| Ominaisuus | Erittely |
|---|---|
| Mallinumero | 1-77-121 |
| Merkki | STANLEY FATMAX |
| Laser tyyppi | Red Cross Line |
| Tarkkuus | +/- 3mm @ 10m |
| Indoor Working Range | 15 m |
| Working Range with Detector | Jopa 50m |
| Itsetasaava alue | +/- 4 ° |
| Virtalähde | 3x AA-paristoa |
| Akun kesto | Jopa 12 tuntia |
| IP-luokitus | IP54 (Dust and Water Splash Protected) |
| Kiinnityslanka | 1/4 tuumaa |
| Materiaali | Kumi |
| Paino | 5.07 kiloa |
10. Takuu ja tuki
10.1 Takuutiedot
This STANLEY FATMAX product comes with a 1-year manufacturer's warranty from the date of purchase. The warranty covers defects in materials and workmanship under normal use. Please retain your proof of purchase for warranty claims.
10.2 Asiakastuki
For technical assistance, spare parts, or warranty claims, please contact your local STANLEY FATMAX service center or visit the official STANLEY FATMAX website for detailed support information and contact options.