
1. Johdanto ja loppuview
The OSD Audio ATM-7 is a sophisticated 7-zone automatic speaker selector designed to distribute amplified audio signals to various zones within a home or commercial space. It allows users to select between two distinct music sources for each designated zone, providing flexible audio management. This passive device is engineered for seamless integration into existing audio systems, offering remote control capabilities for enhanced convenience.
For optimal performance and to prevent potential damage to your amplifier, it is highly recommended to use impedance matching in-wall volume controls in conjunction with the ATM-7, as this unit does not include built-in impedance protection.

Figure 1.1: OSD Audio ATM-7 Speaker Selector and its accompanying remote control, showcasing the front panel and rear connections.
2. Tärkeimmät ominaisuudet
- 7-Zone Audio Distribution: Jakaa amplified audio signals to up to seven independent zones.
- Dual Source Selection: Allows selection between two distinct music sources (A or B) in each zone when operating in 2-input mode.
- Kaukosäädin: Includes an IR remote control for convenient operation from a distance of up to 10 meters.
- Front Panel Controls & LEDs: Features status LEDs for Power, Multi-zone, Master/Slave, Zone In/Out Select, In/Out Mode, and Zone Out/In Selector.
- Master-Slave Functionality: A Master-Slave switch on the rear panel enables parallel connection of two ATM-7 units for expanded zone control.
- Muistin toiminto: The remote control includes a backup memory function to retain settings.
- Passive Design: A passive device, requiring external impedance matching for ampnostimen suojaus.
3. Pakkauksen sisältö
Please verify that all items are present and in good condition upon unpacking.
- OSD Audio ATM-7 Speaker Selector Unit
- IR kaukosäädin
- Virtasovitin (tasavirta 12 V 1.5 A)
- External IR Receiver (for remote placement)
- Käyttöopas (tämä asiakirja)
4. Turvallisuustiedot
Turvallisen käytön varmistamiseksi ja vaurioiden välttämiseksi noudata seuraavia varotoimia:
- Virtalähde: Käytä ainoastaan laitteen mukana toimitettua virtalähdettä. Varmista, että äänenvoimakkuus ontage vastaa paikallista virtalähdettäsi.
- Ilmanvaihto: Älä tuki tuuletusaukkoja. Varmista riittävä ilmankierto laitteen ympärillä ylikuumenemisen estämiseksi.
- Kosteus: Do not expose the unit to water, moisture, or excessive humidity. Avoid placing liquids near the device.
- Sijoitus: Aseta laite vakaalle ja tasaiselle alustalle. Vältä sijoittamasta sitä lämmönlähteiden lähelle tai suoraan auringonvaloon.
- Huolto: Älä yritä huoltaa laitetta itse. Jätä kaikki huoltotyöt pätevän henkilöstön tehtäväksi.
- Impedanssin sovitus: As a passive device, the ATM-7 does not provide impedance protection. Always use impedance matching volume controls or ensure your amplifier can handle the combined speaker load to prevent damage to your ampelävämpi.
5. Asennus ja asennus
Follow these steps to connect your OSD Audio ATM-7 speaker selector:
- Sammuta kaikki laitteet: Ennen kuin teet mitään liitäntöjä, varmista, että amplifier and all audio sources are powered off and unplugged from the wall outlet.
- Yhdistä Ampnostimen lähtö: Connect the speaker output terminals from your amplifier to the "ZONE IN/OUT" terminals on the rear of the ATM-7. The ATM-7 supports two input modes: 2-input (for dual source selection) or 7-input (for individual zone control). Refer to the rear panel diagram for correct wiring.
- Yhdistä kaiuttimet: Connect your speakers to the corresponding "ZONE OUT" terminals on the rear of the ATM-7. Ensure correct polarity (+ to + and - to -) for all connections.
- Install Impedance Matching Volume Controls (Recommended): For optimal performance and amplifier protection, install impedance matching in-wall volume controls between the ATM-7 and your speakers. This is crucial to maintain a safe impedance load for your amplifier, especially when multiple zones are active.
- Kytke IR-vastaanotin: If the ATM-7 unit will be placed out of direct line of sight for the remote control, connect the external IR receiver to the "EXT IR Receiver" port on the rear panel. Position the IR receiver in a location where it can receive signals from the remote.
- Liitä virta: Plug the provided DC 12V 1.5A power adapter into the "DC 12V 1.5A" input on the rear of the ATM-7, then plug the adapter into a wall outlet.

Figure 5.1: Rear panel connections of the ATM-7, including speaker terminals, IR receiver port, and power input.

Kuva 5.2: Yksityiskohtainen view of the speaker wire terminals on the rear of the ATM-7, showing positive and negative connections for a zone.
6. Käyttöohjeet
The ATM-7 can be operated using the front panel controls or the included IR remote control.
6.1 Etupaneelin säätimet

Figure 6.1: Front panel of the ATM-7, displaying power button, status LEDs, and zone selectors.
- Virtanappi: Press to turn the unit On or Off. The "ON" LED indicates power status.
- Multi Zone Enable: Activates or deactivates multi-zone operation.
- MUTE-painike: Mutes all active audio outputs.
- Master/Slave Control Select (M/S): Toggles between Master and Slave mode when chaining two ATM-7 units.
- Zone In/Out Select: Toggles individual zones between input and output modes.
- IN/OUT Mode (2 IN / 7 IN): Selects between 2-input mode (allowing selection of Source A or B for each zone) or 7-input mode (where each zone acts as an independent input/output).
- ZONE OUT/IN SELECTOR (ZONE1-ZONE7): Buttons to individually activate or deactivate each of the seven zones. Corresponding LEDs indicate active zones.
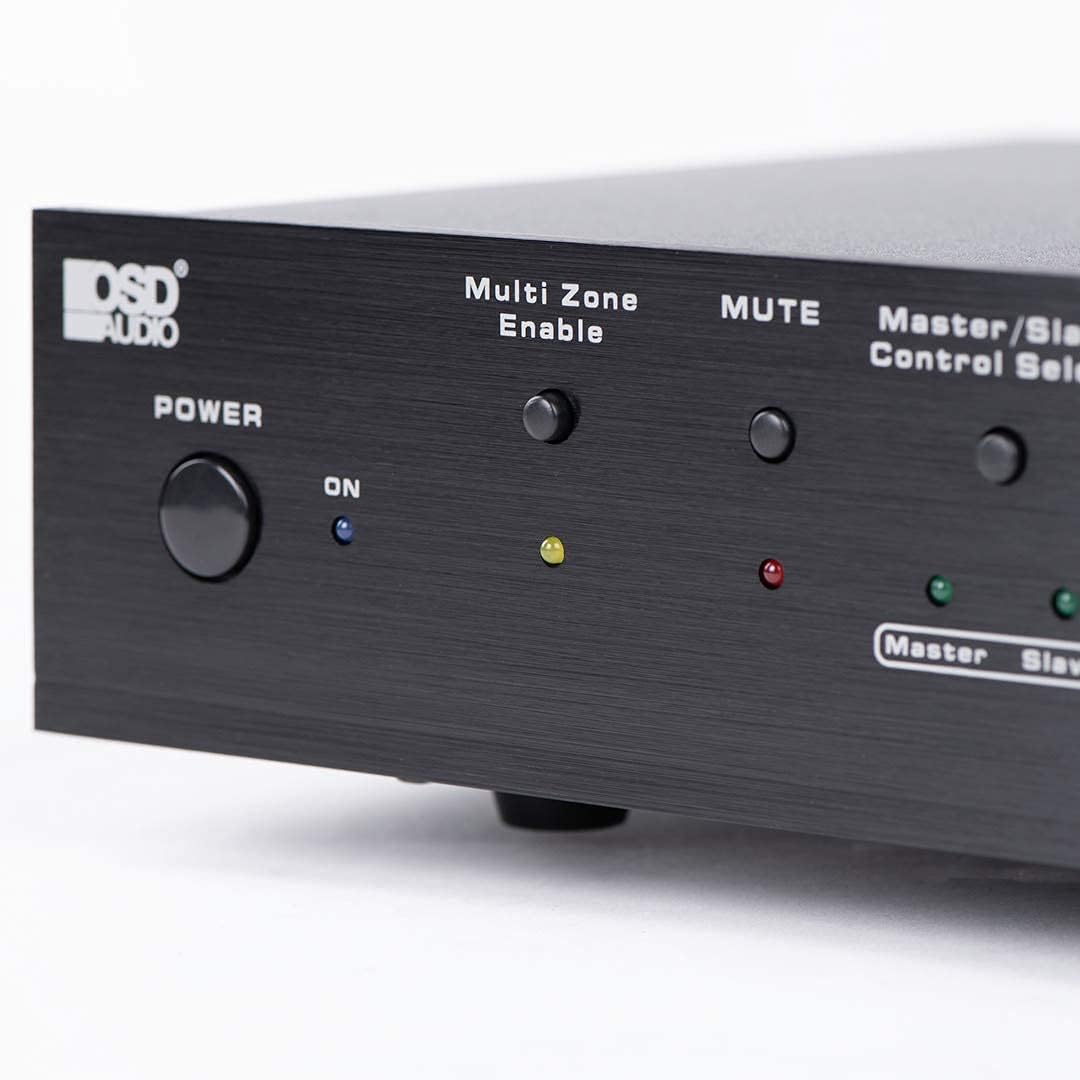
Figure 6.2: Detail of the Power and Multi Zone Enable buttons on the ATM-7 front panel.

Figure 6.3: Detail of the IN/OUT Mode (2 IN / 7 IN) and individual Zone Selector buttons on the ATM-7 front panel.
6.2 IR-kaukosäädin
The included IR remote control provides full functionality for the ATM-7. Point the remote towards the unit's IR sensor or the external IR receiver.
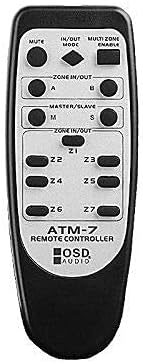
Figure 6.4: The ATM-7 remote control, featuring buttons for mute, input/output mode, master/slave, and individual zone selection.
- MYKISTÄ: Mykistää kaiken äänilähdön.
- IN/OUT MODE: Toggles between 2-input and 7-input modes.
- MULTI ZONE ENABLE: Activates or deactivates multi-zone operation.
- ZONE IN/OUT (A/B): In 2-input mode, selects between Source A and Source B for the active zones.
- MASTER/SLAVE (M/S): Selects Master or Slave mode for multi-unit configurations.
- Z1-Z7 Buttons: Individually activate or deactivate each of the seven zones.
The remote control has a backup memory function, retaining the last settings even after power cycling the unit. This allows for integration with smart plugs or switched outlets.
7. Huolto
The OSD Audio ATM-7 requires minimal maintenance. Follow these guidelines to ensure longevity:
- Puhdistus: Puhdista laitteen ulkopinta pehmeällä, kuivalla liinalla. Älä käytä nestemäisiä puhdistusaineita tai hankaavia kemikaaleja.
- Ilmanvaihto: Tarkista säännöllisesti, että tuuletusaukot ovat puhtaat pölystä ja roskista.
- Liitännät: Ensure all speaker wire connections remain secure and free from corrosion.
8. Vianmääritys
| Ongelma | Mahdollinen syy | Ratkaisu |
|---|---|---|
| No audio output from speakers. |
|
|
| Kaukosäädin ei toimi. |
|
|
| Äänen vääristymä tai alhainen äänenvoimakkuus. |
|
|
9. Tekniset tiedot
| Ominaisuus | Erittely |
|---|---|
| Mallinumero | Pankkiautomaatti-7 |
| Tuotteen mitat | 21.5 x 12 x 5.5 tuumaa |
| Tuotteen paino | 7 kiloa |
| Väri | Musta |
| Liittimen tyyppi | Speaker Wire (Banana Plugs compatible) |
| Kaapelin tyyppi | Kaiuttimen johto |
| Valmistaja | OSD-ääni |
| Virransyöttö | DC 12V 1.5A |
| Remote Operating Distance | Jopa 10 metriä |
10. Takuutiedot
Warranty information for the OSD Audio ATM-7 Speaker Selector is typically provided with the product at the time of purchase or can be found on the official OSD Audio website. Please retain your proof of purchase for warranty claims. For detailed terms and conditions, please visit the OSD Audio official websivustolla tai ota yhteyttä heidän asiakastukeen.
11. Asiakastuki
For technical assistance, troubleshooting, or general inquiries regarding your OSD Audio ATM-7, please contact OSD Audio customer support. You can find contact information, FAQs, and additional resources on the official OSD Audio websivusto: